Random Thoughts inside Alan's head
geeky stuff
General topics that geeks like.
Moving a domain to a new registrar
13 years
by alan
in geeky stuff on 2013-04-20
This week, I moved the “trilug.org” domain from GoDaddy to NameCheap. Our renewal time was coming up. And at the same time, we were discussing a new policy of inclusiveness and a code of proper conduct for the group. I had long felt that GoDaddy’s branding was “tacky”, and did not really align with the direction that TriLUG was heading. Really… GoDaddy Girls? It wouldn’t be appropriate to hold our meetings at Hooters, and we feel the same way about the GoDaddy Girls.
If you’ve never moved a domain from one registrar to another, it can be confusing. There are several interlocking steps that have to be done in a certain order. If you have a roadmap, it can take an hour or so. If not, you can waste a day or more waiting for all of the steps to complete.
This is the recipe that I have followed for several transfers.
From GoDaddy to NameCheap
- GoDaddy:unlock domain
- GoDaddy: send EPP (authorization code) via email
- NameCheap: initiate transfer
- NameCheap: fill in EPP codes
- NameCheap: use coupon code “SWITCH2NC”, save $1/domain
- NameCheap: submit transfer order, pay
- wait for email from NameCheap
- receive email from transfer-domain.com (for NameCheap)
- click on link, agree to the transfer
- wait for email from GoDaddy
- receive email from GaDaddy
- GoDaddy: pending transfers, accept or decline
- you’re done – wait for email confirmations
- email from GoDaddy, domain is transferred
- whois reports new registrar
- email from NameCheap, welcome
At this point, it’s a good idea to double-check that your DNS settings transferred correctly. Mine always have.
I hope that your transfer goes as smoothly as ours did.
iPhone photo gallery
13 years
I like to keep albums of recent photos on my iPhone, so I can show them to friends and family. Not only do I keep the photos that I took on the iPhone itself, but I also keep the photos I took using other cameras. Here, I will describe the method and tools I use to keep several months worth of photos conveniently in my pocket.
At first, this seems like a very simple problem, but there are a few subtle quirks, and I have worked around them using a script and some open source tools. In the end, I will have:
- photos from multiple cameras
- selected folders, but not necessarily everything
- photos are optimized for phone size, not wasting space
- photos are oriented correctly, not sideways or upside-down
- photos from multiple cameras appear in chronological order
- process is mostly automated
The end result looks like this:
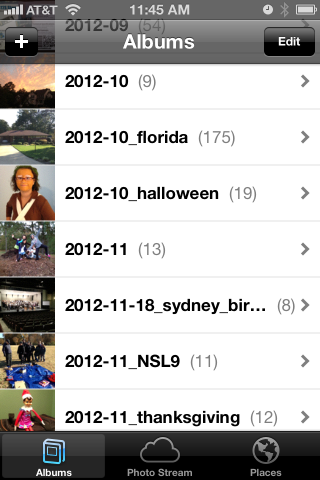
iPhone “Photos” app showing albums
How my photos are organized
When I worked at Ericsson’s research lab in Singapore, they had done a study on how people store their digital photos and how they find a particular one in the bunch. They found that people tend to associate events with nearby dates, so they might say “Let’s see… Bill broke his leg skiing right before Janet’s wedding, so that must have been Winter of 2009”.
I definitely fall into that category, and so my pictures are stored in folders by date. It looks like this:
pictures     - top level
+ bulk       - raw unprocessed stuff, too big to browse
+ import     - a working area
+ y          - photo albums arranged by year/month/event
  + 2011
  + 2012
    + 2012-09
    + 2012-10
    + 2012-10_florida
    + 2012-10_halloween
    + 2012-11
    + 2012-11-12_ducks
    + 2012-11-18_sydney_birthday
    + 2012-11_NSL9
    + 2012-11_thanksgiving
  + 2013
I also want to note that some of my friends take a completely different approach… they pick a single tool and simply dump the photos into the tool. They don’t care to organize them at all and just rely on the tool. That’s certainly OK… I would guess these are the same people who don’t balance their checkbooks. If that describes you, then I suggest you stop reading here, because none of this will apply to you.
I have used the date-folder method since I got my first digital camera in 1998. It has migrated from Windows to Linux to MacOS. My data far outlasts any one tool.
So one of my assumptions is that my “pictures” directory is sacred. I do not want any tool to write anything to that directory (I am looking at you, iPhoto & iTunes).
Selecting folders (albums) to copy to the iPhone
So I set up two more directories.
- $HOME/iphone/pictures – where I say what photos to copy
- $HOME/itunes/pictures – a directory that iTunes can sync with
In the first one, $HOME/iphone/pictures, I set up a bunch of symlinks to point to the directories that I would like to copy. I do this so I can easily select some folders but leave out others.
2011-11_happy_crabby       -> ../../pictures/y/2011/2011-11_happy_crabby
2012-09                    -> ../../pictures/y/2012/2012-09
2012-10                    -> ../../pictures/y/2012/2012-10
2012-10_florida            -> ../../pictures/y/2012/2012-10_florida
2012-10_halloween          -> ../../pictures/y/2012/2012-10_halloween
2012-11                    -> ../../pictures/y/2012/2012-11
*** note - no ducks here ***
2012-11-18_sydney_birthday -> ../../pictures/y/2012/2012-11-18_sydney_birthday
2012-11_NSL9               -> ../../pictures/y/2012/2012-11_NSL9
2012-11_thanksgiving       -> ../../pictures/y/2012/2012-11_thanksgiving
For example, let’s say I took 1000 boring photos of ducks in November. I could easily skip 2012-11-12_ducks by not creating a symlink. I can also specifically include a very old folder by leaving the symlink in this directory. I have done that here with my Happy Crabby pictures from 2011.
Copying and processing photos
I have written a script that will go through each of these directories and perform a few clean-up tasks as it copies the photos to the itunes staging area.
- It copies the photos to a temporary working directory.
We should never alter the original photos… always work with a copy.
- It rotates the image based on the EXIF orientation tag.
I’m gonna start slamming on Apple, so fanbois should cover their ears. I have found that Apple handles image rotation differently than everyone else, and it took a while to get a handle on it. I can take pictures on my iPhone and email them to someone and they’ll show up as upside-down or sideways. The images look OK on the iPhone or on a Mac, but everyone else (Linux, Windows) sees them rotated. The same thing happens if I upload them to “gallery”, an online photo gallery. Sometimes, they would show the correct dimensions but the image would still be rotated. That is, a portrait would be taller than wide, but the person’s face would be sideways and extremely elongated. The solution I found is to process them using “renrot” (see my blog post about renrot for detail).
- It renames the file using the date & time in the EXIF data.
When we get back from vacations, I find that we have photos from several different cameras, and it just seemed weird for my wife’s Nikon images (named DSCNxxxx.JPG) to appear before my iPhone images (named IMG_xxxx.JPG) and then my Panasonic images (named Pxxxxxxx.JPG) last. If I rename all of the images to (YYYY)(MM)(DD)(hh)(mm)(ss).JPG, they will appear in chronological order, regardless of which camera was used.
- It resizes the image to be no bigger than 1280 pixels high or wide.
There is no need to me to waste space on my iPhone by storing each image in their 12MP glory (actually, I typically shoot 3MP for normal vacation photos). So I resize the images using imagemagick.
- It moves the files into the iTunes directory in numerical (chronological order).
At one point, I had a problem with iTunes arranging my photos in the order that they happened to appear in the directory instead of sorted by name or anything else. If you do a “find” command on Linux or a Mac, you’ll see the files in the order that they appear in the directory file. That’s OK under the hood, because “ls” and Mac Finder and Nautilus are all smart enough to show the files in sorted order. But no, not iTunes. So I move the files from the temporary work area to the iTunes sync directory one at a time, in chronological order.
Using the script
When it’s time to sync my iPhone (less and less frequent these days, and primarily driven by when I want to update my photo albums), I simply look over the symlinks, run the script and then sync.
Running the script takes a few minutes, and syncing all of the pictures instead of just the ones that have changed takes a few minutes as well. But I am very happy with the consistent results.
I’m sure that some folks will claim that I am “doing it wrong”, that I should not have to do so many work-arounds. But the bottom line is that I encountered real-world problems from the interaction between various cameras and the quirks of iTunes, and this script smooths out all of the wrinkles. It is really no trouble to run the pre-syncing script before syncing, and it does solve the problems of images being mis-rotated, taking too much space on my phone, and appearing out of order. It also makes it trivial to choose which album folders are copied to the iPhone and which ones are not.
The script itself appears below.
The pre-syncing script
#!/bin/bash
shopt -s nocaseglob
shopt -s nullglob

src="$HOME/iphone"
dest="$HOME/itunes"
if [ ! -d "$dest" ] ; then mkdir -p "$dest" ; fi

echo "=== PHOTOS ==="

wildcard="*.[Jj][Pp][Gg] *.[Jj][Pp][Ee][Gg] *.[Pp][Nn][Gg]"
stage="/tmp/itunes.$$.stage"
mkdir -p $stage
rm -rf "$dest/pictures"

# go through each directory, and do some processing
( ls -1 $src/pictures ) | while read d ; do

   # skip non-directories
   [ ! -d "$src/pictures/$d/." ] && continue

   echo "processing photos in [$d]"
   indent="   $d >> "

   # copy source photos to staging area
   ( cd $src/pictures/$d ; cp $wildcard $stage/ )

   # rotate
   echo " - rotating photos"
   ( cd $stage ; renrot $wildcard ) 2>/dev/null | sed -e "s/^/$indent/g"
   rm $stage/*_orig 2>/dev/null

   # resize
   echo " - resize photos"
   # iphone 4S screen is 640x960 (2xVGA)
   ( cd $stage ; mogrify -verbose -geometry '1280x1280>' $wildcard ) 2>/dev/null | sed -e "s/^/$indent/g"

   # move to itunes area, reorder as you go
   echo " - re-ordering files"
   mkdir -p "$dest/pictures/$d"
   ls -1 $stage | while read f ; do
      # Mac bash v3 does not have ${f^^*}, so we have to use 'tr'
      upper=$(echo $f | tr /a-z/ /A-Z/)  # was bash internal ${f^^*}
      mv -v "$stage/$f" "$dest/pictures/$(basename $d)/$upper" | sed -e "s/^/$indent/g"
   done

   echo ""
done

# clean up some special cases
xargsR='-r'
[ "$OSTYPE" == "darwin12" ] && xargsR=''  # Mac xargs does not have -r
find $dest/pictures/ -type d -print0 | xargs -0 rmdir 2> /dev/null # empty directories
find $dest/pictures/ -name \*_orig -print0 | xargs -0 $xargsR rm -v
find $dest/pictures/ -name MEDI\*.JPG -print0 | xargs -0 $xargsR rm -v
echo ""
Halloween – traffic light costume
14 years
Last year, at the neighborhood Halloween party, one of the kids had dressed up as a traffic light. He simply wore all black, and he had three cardboard circles attached to his front. Audrey saw that boy’s costume and got to thinking… could we build one with real lights?
This is what we came up with.

Front

Back
Putting it together
We had the entire year to think about it. Sometime in the summer, we actually started planning. I knew that we could do the controls, but I was not so confident about the power or how to drive several LEDs.
The controller was easy. We have been using Arduinos for several projects, and I had ordered a few “nano” boards, which are about the size of a stick of gum. We plugged one into a solderless prototyping board. We used five of the Arduino’s outputs for our five lights: red, yellow, green, “WALK” (white) and “DONT WALK” (orange). We ordered super-bright colored LEDs from DealExtreme in Hong Kong.
The hard part was figuring out how to power several LEDs at the same time. I discovered a web site called “ledcalc.com” that showed us how to arrange the LEDs in several serial strings wired to each other in parallel. And after taking a few measurements, we figure out what the voltage drop on each LED was and we estimated how much current to push through each LED. This suggested that we should use a higher voltage than I normally would use to just power the Arduino. We chose 8 NiMH rechargeable AA batteries for 9.6 volts.
The LED calculator suggested that for red, yellow and orange, we should plug the LEDs in strings of 4 with a small resistor at the end. We wanted 8 LEDs for each color, so that meant we’d plug two strings of 4 LEDs together in parallel.

Since the “forward voltage” (voltage drop) across the white and green LEDs was higher, we ended up using strings of 3 LEDs for those. Fortunately, they were so bright that the fewer LEDs made no difference in overall brightness.
Now came the tricky part. We wanted the LEDs to run at 9.6 volts, but the Arduino runs at 5 volts. That meant we needed to use a transistor on each output to switch the higher-voltage LED strings on and off. We were able to figure out how to do this by looking at an Arduino experiment book. Below, you can see how one 5V output line from the Arduino can be used to switch 9.6V through a bank of LEDs.

During our tests, we found that after a while (a pretty long while), the white and green LEDs got very dim while the others stayed normal brightness. We decided that the battery had drained and the voltage had dropped just enough to make driving the three higher-voltage LEDs too hard. Doing a little bit of back-of-the-napkin math tells why. The white and green LEDs each have a 2.5V drop… times three LEDs and that means you have to have at least 7.5V to run them at all in series. The other color LEDs each dropped 1.75V, for a total of 7.0V. That means the white and green lights will poop out 0.5V earlier than the other colors will.
As a quick fix, we replaced the 1.2 volt NiMH rechargeable batteries with 1.5 volt alkaline batteries, making our total supply voltage a bit higher, a full 12 volts. This kept all of the LEDs bright all night. A quick estimate suggested we might get two or more DAYS worth of operation from a single set of batteries. But after watching them dim earlier, I decided to take a spare set of batteries with us while we went trick-or-treating, and I kept a close eye on the white and green LED brightness.
The big night
Halloween was a big hit. Everyone got a chuckle out of the costume, especially when Audrey turned around and they could see the WALK and DONT WALK signs.
Here is a photo of the Audrey in her stop light costume, Syndey as an Oompa Loompa and me as Harry Potter.

The Happy Crabby
14 years
In 2009, we got a hermit crab named “Peek-a-boo”. We kept him in a plastic shoebox-sized container with creek sand in the bottom and holes drilled in the lid. He seemed to enjoy his new home, and we enjoyed his company. But some time in the winter, he died.
This turned into an annual tradition. Peek-a-boo was followed by Boo and Sprinkle in 2010, Flicker in 2011, and Blink and Barney in 2012. Some of our crabs only stayed with us a short while; others lived through the winter, but not much longer.
I wanted to know how we could take better care of them, so in 2011, we replaced the plastic box with a small glass terrarium with a glass lid. I suspected that they were getting too cold in the winter, but when I read about crabs, I found that humidity might have been a factor. I know our house gets very dry in the winter.

Oregon Scientific hygrometer
It was time to find measure the temperature and humidity inside the cage.
I thought about buying a simple hygrometer. We have one in our hallway . But I wanted to keep a long-running log of temperature and humidity over time.
So I decided to build an Arduino-based crab cage monitor.
The Happy Crabby
I would use an Arduino UNO to control the overall flow. I wanted to add the following peripherals:
- temperature/humidity sensor – I chose one based on the SHT11 sensor: see Adafruit or the one I got.
- real-time clock – Adafruit has a breakout board for $9.
- SD card slot – Adafruit has a breakout board for $15.
- LCD display – Adafruit has a 20×4 character LCD for $18 and an I2C-to-LCD driver board for $10.
- Relays to turn on/off a heater or light – I have not added this yet.
- Some buttons for a simple UI – I have not added this yet.

Drivers
The first thing I had to do was write some software to read the temperature and humidity from the SHT11 board. The documentation claimed that it was an I2C device, which should have made it very easy. I knew all about I2C from when I worked at Ericsson. A lot of peripherals used an I2C interface. It’s a simple two-wire protocol where you can just wiggle two output lines in a specific order to send signals to the devices. It turns out that the SHT11 is mostly I2C, but it has a strange quirk that I had to code around.
Hardware Planning
After I was receiving real temperature and humidity readings from the SHT11, I had to start allocating Arduino I/O pins to the peripherals. I made a spreadsheet to keep track of the pins. Some pins on the Arduino have special alternate uses, so I made a note of them there. Since I was working on a prototyping board, I kept changing stuff, and when I did I’d just create a new spreadsheet column. In some configurations, I did not have enough pins… specifically, if I did not use the I2C-to-LCD board, I had to allocate most of my pins to simply driving the LCD display. In other configurations, I had plenty of pins left over.
What I ended up with was this:
| PIN | FEATURES | MY USE |
|---|---|---|
| D0 | RX | serial (future: for Bluetooth) |
| D1 | TX | serial (future: for Bluetooth) |
| D2 | relay (future: to control a relay) | |
| D3 | PWM | |
| D4 | ||
| D5 | PWM | |
| D6 | PWM | |
| D7 | ||
| D8 | bit-banged I2C-SDA for T/H | |
| D9 | PWM | bit-banged I2C-SCK for T/H |
| D10 | PWM or SPI-SS | SPI-SS for SD card |
| D11 | PWM or SPI-MOSI | SPI-MOSI for SD card |
| D12 | SPI-MISO | SPI-MISO for SD card |
| D13 | LED, SPI-SCK | SPI-SCK for SD card |
| A0 | (future) keyboard | |
| A1 | ||
| A2 | ||
| A3 | ||
| A4 | SDA | I2C-SDA for RTC and LCD |
| A5 | SCK | I2C-SCK for RTC and LCD |
Software and Integration
I wrote a simple program that takes a temperature and humidity reading, reads the current time, appends a line to a CSV file on the SD card, and updates the LCD display. Then it sleeps for a minute and does it all over again.
For a long while, we ran the Happy Crabby on the prototype board, with wires hanging out all over.

The Happy Crabby.

The display, up close.
What we learned
We ran in this configuration for a long time. We had been thinking that we would eventually add a relay to control either a heat lamp or a terrarium heater pad. But after taking measurements for several months, we decided that temperature was nearly as much of a problem in our house as humidity.
So we kept an eye on the humidity and we rearranged the inside of the cage, dumping a few inches of moist sand into the bottom. They like to dig tunnels and hide, especially when they are molting. Overall, they seem to be healthier now that the cage is not so dry, and they are less stressed because they have a place to hide.
Almost a year after we originally started taking measurements, we decided that our design was OK enough to make “permanent”. So we bought a “shield” board and soldered all of the pieces down. I made sure that all of the pieces still plug together, in case we feel like changing it down the road. It looks a little nicer without all of the rats nest of wires, and it’s a lot less likely to get messed up if somebody bumps it.

The component boards.

Fully assembled.
Resources
Source code that we wrote for this project can be found on github.
Garage Door Monitor
14 years
How many times have I gone outside in the morning, only to find that I had left my garage door open all night? Too many. I hate that uneasy feeling that I have just invited thieves into the garage for some easy pickin’s (truth be told, I’d be happy if they took some of that junk, but still).
For a long time, I had thought of rigging up a light upstairs that would come on whenever the garage door was open. That way, at night, it would be pretty obvious that I had left the door open. But I let that idea sit dormant for a long time.
Then I read an article in Make magazine (“12,000-Mile Universal Remote“, issue 30, page 66). In it, the author built a board called an “XBee Pulse I/O” that watched a door sensor, tapped the opener’s switch, and communicated with an XBee internet gateway. These talked to a cloud service called iDigi. This was not exactly what I wanted to do, but it pushed me in the direction I needed.
I decided that I wanted to build an Arduino board that would monitor my garage door. I wanted it to communicate with my home Linux server, “Bender”, which I consider to be sort of a digital butler, keeping track of stuff around the house and reminding me of stuff that I need to know.
PONDERING WIRELESS SOLUTIONS
For the next few weeks, I pondered how I would hook the Arduino board in the garage to Bender, which lives in the bonus room over the garage. I was not too fond of the idea of running a wire, even though the distance is very short. I scoured the internet for ZigBee boards, but soon decided that these were very pricey for what they did.
Inside the garage, I would need an “XBee” ZigBee radio module, which costs about $24~$40. But I would also need a controller board for another $10. This controller board acts as a front-end, providing a simple serial port to my project, and taking care of all of the ZigBee protocol stuff.
Then, on Bender’s end, I would need a similar XBee module ($24) and a USB adaptor ($20).
That’s a total of $78~$110, just for the wireless link!
Surely, dropping a Ben Franklin down for a home project is not such a big deal. But I was concerned that as my project grew, I might be adding many wireless links to it. And at $50 a pop, I figured it would be worthwhile to broaden my search a bit.
WHAT ABOUT BLUETOOTH?
I worked for Ericsson from 1998 until 2003, when they were first developing the Bluetooth standard. I remember reading presentations about the technology before they had come up with the Bluetooth name… internally they referred to it as “MC Link”, and occasionally, (my favorite) “wireless wire”! I knew that the goal for Bluetooth was to make these communication chips so low-power and so cheap that every device would include one… WORLD DOMINATION!

With that in mind, I wondered whether there were simple Bluetooth serial communication boards that would work with an Arduino. I found one, called the “BT2S” from Virtuabotix. It was only $15, and it looked pretty easy to use. AND… I would only need ONE on the garage monitor side, because I could use Bender’s existing Bluetooth interface!
I ordered two BT2S sticks from Virtuabotix. Later, I found another source for almost-identical boards. DealExtreme has the JY-MCU Arduino Bluetooth Wireless Serial Port Module for $8.60! (Be careful not to get the TTL version that looks very similar).
PUTTING IT TOGETHER – THE HARDWARE
I am not too fond of crawling up a ladder to reprogram my Arduino in my garage, so I decided to make the Arduino end of this project as simple and generic as possible.
The BT2S module plugs in to the Arduino’s serial port, and the program on the Arduino simply listens for serial commands and responds. I decided to implement three commands: read digital, write digital and read analog. That way, nothing would be hard-coded into the Arduino. Instead, all of the smarts would be in the client program that runs on Bender.

Schematic

Reed switch.
I plugged in a magnetic reed switch to one of the digital inputs, and an LED to a digital output. While I was at it, I put a light sensor on one of the analog inputs.
Then I hung it up on the garage door frame. I stuck a very strong hard drive magnet on the door so it would be close to the reed switch whenever the door was open.
TALKING TO IT VIA BLUETOOTH

Door, magnet, reed switch.
Bender is a Linux machine, and so I needed a Linux-based program that would open a Bluetooth serial connection to the Arduino and then send serial commands to it. I needed a mixture of shell commands to configure the Bluetooth connection and low-level communication to the serial port. So I chose Python.
Bluetooth is a complex protocol that supports a lot of different uses: real-time audio, serial communication, keyboard/mouse, dial-up networking, and more. We’re using a simple serial link, which they call “rfcomm”. In Linux, we establish the serial link using the rfcomm command. It makes a Bluetooth connection to the device and creates a serial port device named /dev/rfcomm0.
Once we have created a serial device, the python program simply reads and writes to that device just like any other file. I structured my program as a big loop with timers. Every so-many seconds, it sends a command to read the magnetic reed switch. It also sends commands to blink the LED, so I can tell from the garage that the python program is still running. When the reed switch response comes back, it writes the door status to a file. If I put that file in an area that is shared via my web server (/var/www/ or $HOME/public_html/), I can check on my door from any browser.
If the door state has changed since the last time it was read, the python program sends a push notification (like a text message) to my phone. This is another idea that I stole from the same issue of Make magazine (“You’ve Got (Snail) Mail“, page 76). This uses an iPhone app called “Prowl” and a web service that goes along with it.
COMPLETING THE LOOP
Sure, it’s cool to hear my phone “bling” when someone opens the door at home. But my original motivation was to be warned when I had left the door open.
Fortunately, that’s an easy job. I wrote a simple “cron” job that reads that status file at certain times of day (or night). If the door is open, it sends me another push notification saying “hey dummy, your garage door is still open!”.

Breadboard, with “Boarduino” and BT2S, sensors and LEDs
RESOURCES
Source code and other resources can be found on github.
CarolinaCon 8
14 years
Once again, it’s time for a weekend of frivolity and technology that we call “CarolinaCon”. While I was sure that doing so would put me on some secret list of persons-to-watch, I made plans to attend.
As usual, the Con spanned the weekend, from Friday evening until Sunday evening. Here’s my impressions.
FRIDAY EVENING
- 7:00pm – Identifying Cyber Warriors (Tom Holt / Professor Farnsworth)
The professor always does such a good job of easing the crowd out of reality and into the “Con-zone”. His presentations are academic, but touch on hacker culture. This year, he gave questionnaires to college students to determine correlations between their attitudes on protesting and hactivism across two dimensions: domestic-vs-foreign and physical-vs-virtual. - 8:00pm – Bypassing Android Permissions (Georgia Weidman)
Georgia explained how Android phone apps implement “intents” or services, and then how to inspect an Android app to see its contents. Using these two pieces, she was able to write unprivileged apps that use another app’s higher-priviledge services. - 9:00pm – Intro to Hacking Bluetooth (ronin)
Ronin has assembled a wide array of open source Bluetooth tools into a Linux distribution that he calls “Blubuntu”. He showed the basic usage of some of these tools, with some good background info on how the protocols work. A good overview talk! - 10:00pm – F-ing the Friendly Skies (Deviant Ollam)
The original plan was to end the Friday night session with a round of Hacker Trivia, but the schedule was abruptly changed to include this entertaining talk from Deviant Ollam, whose talks usually center on lock picking and air travel (and they usually include alcohol). This year’s presentation did not disappoint — the topic was the “Mile High Club”, with a complete survey of logistics, opportunity, and suggestions for flight timings and choice of aircraft.
SATURDAY
- 10:00am – DevHack: Pre-Product Exploitation (Snide)
Once they cranked up the volume on Snide’s mic, he walked us through several ideas for planting malware into a software development environment, implanting your payload at the source. - 11:00am – Malware Retooled (Big-O)
This talk discussed how we can watch what malware DOES rather than trying to match against signatures. Big-O showed some nice visualization tools, like thread graphs. - lunch break
- 1:00pm – Inside Jobs: Stealing Sensitive Data and Intellectual Property (Vic Vandal and emwav)
Vic and emwav enumerated several ways that companies and employees can escalate the arms race… employees can steal proprietary information, and employers can make it difficult. The bottom line for me was that this arms race is stacked in favor of the attacker. - 2:00pm – Project Byzantium: Improvisable Ad-Hoc Wireless Mesh Networking for Disaster Zones (Sitwon The Pirate and The Doctor)
Apparently, someone told this group that CarolinaCon was a costume party. The pirate and the doctor win the prize for best costumes. But pay closer attention. These guys are smart — they have scoured the internet for cool mesh networking tools, and they have packaged them into a LiveCD distro called “Byzantium”. Imagine a disaster or political unrest scenario, where you would like to mesh together a group of users and share an internet connection. Keep an eye on this fledgling project. - 3:00pm – Hacking as an Act of War (G. Mark Hardy)
Gmark has been keeping his eye on the geopolitical landscape and how different nations approach info security. He has insights into the capabilities and motivations of the different players, and he observes recent cyber-attacks that have shaped the new balance of powers. Where do we draw the line between hacking and warfare? - 4:00pm – Big Bang Theory: The Evolution of Pentesting High Security Environments (Joe McCray)
Joe warns corporate America that we should stop focusing on the vulnerabilities, stop patting ourselves on the back when we’ve checked all of the patch check boxes, and instead focus on why an attacker would be interested in their companies to begin with, and prioritize based on the value of the assets (illustrated with a colorful analogy about driving through the ‘hood). - Dinner Break
- 7:00pm – Spyometrics: New World of Biometric Surveillance (Dr. Noah Schiffman, aka Lo-Res)
This talk had a lot of promise, because the subject matter is wide open for thought-provoking stories. But I felt like this talk left more loose ends than tied-up ones. - 8:00pm – Dr. Tran goes to Switzerland (Dr. Tran)
One of the best talks of the show, and it was not even about security! Dr Tran recently moved to Zurich, and he recorded his impressions and shared them with the Con attendees. - 9:00pm – Hacker Trivia
Much like hacker trivia in previous years, but I noticed three differences. The game was more lightly attended than at previous cons. Many of the questions went unanswered (meaning Vic had to take a drink). And most disappointing, Al did not emcee.
SUNDAY
- 10:00am – Attacking CAPTCHAs (Gursev Singh Kalra)
This talk was canceled. Instead, we heard from some UNC-Charlotte students on the accomplishments of their hacking competition team. - 11:00am – Patch to Pwned: Exploiting Firmware Patching to Compromise MFP Devices (Deral Heiland)
Deral Heiland has made a career out of keeping printer manufacturers on their toes. This time, he decomposes a firmware update package for Xerox printers, and he creates his own update that includes his “modifications”. - Lunch Break
- 1:00pm – Hacking your Mind and Emotions (Branson Matheson)
Branson shows how easily we can be socially engineered. It happens every day, from advertisers, authority figures and administrators. He shows us how to recognize when we’re being manipulated, and he encourages us to know our rights and responsibilities so we can limit our exposure. - 2:00pm – It’s 2012 and My Network Got Hacked (Omar Santos)
Case studies of real-life compromises, in spite of the sophisticated defenses employed. Omar discussed the challenges that are encountered by large organizations with wide networks and hundreds of assets to manage. - 3:00pm – Declarative Web Security: DEP for the Web (Steve Pinkham)
Modern browsers are starting to include advanced policy engines that allow web sites to declare rules, such as “only run javascript from this host”, in an attempt to restrict what potential malware can do. - 4:00pm – Raspberry Pi’s Impact on Hacking (DJ Palombo)
OK, the RaspPi is a cheap small computer. We get that. DJ Palombo seems to think that the revolutionary concept is that its low profile and disposability make it a good “bug” or or hidden node for hacking.
Thanks to the organizers and presenters for another memorable Con!

The Pirate and the Doctor discuss Byzantium
APRS iGate
15 years
by alan
in geeky stuff on 2011-08-14
When I was working with the NC Nearspace group on our high-altitude balloon, we experimented with two different methods of tracking it once aloft: ham radio APRS, and a commercial system called “SPOT“.
We had some early failures with APRS. But over time, we have found that it’s a pretty nice technology, if you use the proper equipment.
APRS, or “Automatic Packet Reporting System”, is a system that passes data packets over radios. It can be used for passing text messages, but most people use it for telemetry: tracking a vehicle’s position with a GPS, or on a weather station that broadcasts its weather readings every so often.
Since we have been playing with APRS on our balloons, I wanted to learn more about it. I have been keeping my eyes open for a reasonably-priced handheld radio that can encode and decode APRS packets. Sure, some people use a special radio modem (called a “TNC”) to do the encoding/decoding, but it’s important to me to have the modem and the radio in a single package, so I won’t have a big tangle of wires. This week, one such radio popped up on eBay, and so I bought it. While I waited for it to arrive, I did some homework on APRS and what it could do.
Building an iGate at home

My "mobile" radio at home
I already have two 2-meter radios: a small handheld “handy talkie” and a larger “mobile” radio that is designed to be installed in a car. So I tuned the mobile rig to 144.390 MHz and listened. It was a lot of static, with occasional squawks of data.
Most of the time, if you wanted to decode the squawks, you would buy a packet TNC (modem) to convert the squawks to data, and you’d hook the modem to a computer to use that data. But then I read an article about using your computer’s sound card to encode and decode the packets directly, with no modem at all. Heck, I was sitting around at home waiting for my new handheld-with-built-in-modem to arrive. Why don’t I try to do this modem-less setup?
Look, Ma, no modem!
The first thing I did was hook the speaker output from the radio to my computer’s “audio in”. Optionally, I could have hooked the computer’s “audio out” to the microphone input of the radio. That second step is more complicated than you’d think, because I would also need to hook SOMETHING — maybe a parallel port pin — to the radio’s “push to talk” or “PTT” to turn the transmitter on before it’s ready send a squawk of data over the air. You really don’t want to just let it transmit all of the time… because other people are using that radio channel, too.

My modest Linux server
I chose the simple receive-only option, setting up my Linux-based server to “listen” to the radio. I downloaded a package called soundmodem, which is a APRS decoder program. It listens to the noise and the squawks, and it outputs a stream of decoded data.
Soundmodem is hard to set up on a headless server, because the normal setup process involves running a graphical configuration program called “soundmodemconfig”. Since my server is “headless”, I don’t have a monitor or a keyboard or a mouse. I just connect to it over the network. So I could not run soundmodemconfig. So instead, I ran this program on my laptop and I copied the resulting configuration file back to the server. It was a pretty simple XML file that looked like this:
/etc/ax25/soundmodem.conf
<?xml version="1.0"?>
<modem>
  <configuration name="KISS">
    <channel name="Channel 0">
      <mod mode="afsk" bps="1200" f0="1200" f1="2200" diffenc="1"/>
      <demod mode="afsk" bps="1200" f0="1200" f1="2200" diffdec="1"/>
      <pkt mode="KISS" ifname="sm0" file="/dev/soundmodem0" unlink="1"/>
    </channel>
    <chaccess txdelay="150" slottime="100" ppersist="40" fulldup="0" txtail="10"/>
    <audio type="soundcard" device="/dev/dsp1" halfdup="1"/>
    <ptt file="none" gpio="0" hamlib_model="" hamlib_params=""/>
  </configuration>
</modem>
The important parts are where it says it’ll read the audio device /dev/dsp1 and it’ll create a KISS-mode packet device called /dev/soundmodem0.
To start the APRS decoder program, I just run /usr/sbin/soundmodem /etc/ax25/soundmodem.conf &. If it all works, then I can just do tail -f /dev/soundmodem0 and see some packets on the screen, with some header garbage and then some readable payload data with a bunch of callsigns. That is enough of an indication that the decoding is working correctly.
The iGate software
The second piece of software I installed was a digipeater package called APRS4R. I had read a story about a guy who put a small TNC (radio modem) board inside of a Linksys WRT54G router and turned it into a very small portable digitpeater. He ran APRS4R on the router, and so I figured that this program must be pretty lightweight. So I should be able to run it on my modest Linux server.
APRS4R is written in Ruby (that’s what the “for R” ending means), and it is configured using a single text file. Here is the configuration file that I came up with.
--- !ruby/object:APRS4R::APRS4RConfiguration
version: 1.0.2
devices:
  device0: !ruby/object:APRS4R::AX25SocketConfiguration
    name: rf0
    type: AX25Socket
    enable: true
    remote:
    deprecated:
    call: KR4JB
    device: /dev/soundmodem0
    port:
    baudrate: 9600
    mode: kiss/tnc2/northlink
    speed:
    duplicatePeriod: 20
    timeout:
    parameters: !ruby/object:APRS4R::KISSDeviceConfiguration
      name: kiss port
      type: KISSDevice
      enable: true
      remote: false
      deprecated: false
      device: /dev/soundmodem0
      baudrate: 9600
      port:
      speed: 1200
      timeout: 300
      txdelay:
      persistence:
      slottime:
      duplex:
  device1: !ruby/object:APRS4R::ISSocketConfiguration
    name: is0
    type: ISSocket
    enable: true
    remote:
    deprecated:
    hosts: [third.aprs.net]
    port: 14580
    username: KR4JB
    filter: "# filter m/100"
    duplicatePeriod: 20
    timeout: 60
plugins:
  plugin1: !ruby/object:APRS4R::BeaconPluginConfiguration
    name: igate is beacon
    type: BeaconPlugin
    enable: true
    remote:
    deprecated:
    device: is0
    period: 1200
    offset: 30
    message: !ruby/object:APRS4R::APRSMessage
      source: KR4JB
      destination: AP4R10
      path: []
      payload: "!3546.30N/07852.07W-&APRS4R CARY NC"
  plugin10: !ruby/object:APRS4R::GatewayPluginConfiguration
    name: rf02is0 Gateway
    type: GatewayPlugin
    enable: true
    remote:
    deprecated:
    call:
    inDevice: rf0
    outDevice: is0
    localOnly:
    replacePath:
    path:

My house on the map at APRS.FI
It’s kind of verbose, but it basically defines two devices called “rf0” (the radio) and “is0” (the internet).
Then it defines a few “plug-ins”, which are actions. I use two actions: a beacon that sends my call letters and position to the APRS internet site, and a gateway that forwards (some) packets from the radio to the internet.
If I had hooked up my radio to transmit as well as receive, then I would have also transmitted a beacon on the rf0 channel, and probably forward some of the incoming internet packets to the radio.
The only tricky bits in this file were:
- For the “is0” destination, I chose a random host from a list that I saw in example files. Mine is “third.aprs.net”.
- The “destination” in the beacon is
AP4R10. That is the code for the APRS4R software package. I have no idea why I send my beacons TO some oddly-named station to signify that I am using this digipeater software package. - The “payload” string in the beacon is
"!3546.30N/07852.07W-APRS4R CARY NC". It consists of a few parts: a bang, my latitude, slash (means “primary icon set”), my longitude, minus (means “house icon” in the primary icon set), and the rest is a comment with my software package name and my location city and state. - I had a hard time choosing which SSID (dash number after my callsign) to use. I finally decided that it does not really matter, because there are several conflicting conventions. But I like using “KR4JB” with no suffix to mean “home”. I will use “-1” for my new handheld and “-2” on the (internet-only) OpenAPRS app my iPhone. If I buy more toys, they will get higher numbers. Balloons typically use “-11”.
Stuff I didn’t do – and why
There were other APRS4R plugins that did stuff like full two-way digipeating and sending beacons on the radio. But my station is a one-way iGate, so I did not need them. My station forwards packets that it hears on the radio to the internet. It does not forward internet packets to the radio.
And my station is not a digipeater, it does not retransmit packets that it has heard on the air.
I run my station as a receive-only iGate for two reasons:
- Most immediately, I did not have a cable to hook into the microphone jack of my mobile radio, and rigging up the PTT looks like a hassle.
- More importantly, you need to coordinate with other digipeaters and gateways around you before you start transmitting packets over the air.
—
This has all been a lot of fun, and I have learned a lot about packet radio. Since I went down a few wrong paths, I learned a lot of stuff that was not immediately applicable. But in this article, I have summarized the parts that got my receive-only iGate working in a single afternoon.
Now I am waiting for my new APRS-capable radio to show up!
South East Linux Fest
15 years
I enjoyed a “Geekin’ Weekend” at South East Linux Fest in Spartanburg SC.
Four of us from TriLUG (Kevin Otte, Jeff Shornick, Bill Farrow and myself) packed into the minivan and made a road trip down to South Carolina on Friday. We got there in time to see some of the exhibits and a few of the Friday afternoon sessions. There was some light mingling in the evening, and then we all wrapped it up to prepare for the big day ahead.
On Saturday, we had breakfast with Jon “Maddog” Hall before he gave the keynote on how using open source can help create jobs. The day was filled with educational sessions. I attended ones on SELinux, Remote Access and Policy, FreeNAS, Arduino hacking, and Open Source in the greater-than-software world. We wrapped it up with a talk on the many ways that projects can FAIL (from a distro package maintainer’s view). But the night was not over… we partied hard in the hotel lounge, rockin’ to the beats of nerdcore rapper “Dual Core”, and then trying to spend the complimentary drink tickets faster than sponsor Rackspace could purchase them.
Sunday was much slower paced, as many had left for home and many others were sleeping off the funk of the previous night’s party. But if you knew where to be, there were door prizes to be scored. I ended up with a book on Embedded Linux.
It was a memorable weekend, for sure. We learned a lot of new tech tricks, and we enjoyed hanging out with the geeks.
CarolinaCon 7
15 years
CarolinaCon 7
For the fourth year in a row, I treated myself to a weekend of security training and adolescent tom-foolery called “CarolinaCon”. The event was sponsored by the local chapter of 2600. While the presentations covered a range of topics that would interest any security professional, the tone was that of a college party. It’s fun.
The tagline for this year’s event was “A weekend of brainstorming (and by brainstorming, we mean drinking)”.
The Con started on Friday after work, and it continued until supper time on Sunday. While the speakers were giving their presentations in the main room, there were side events going on, too: a “lock pick village”, a weekend-long game of capture-the-flag, and a crypto challenge. It was hard to decide what to do, but I stuck with the presentations.
Here’s my thoughts on the various presentations.
FRIDAY EVENING
- 7pm – Tales from the Crypto (G. Mark Hardy)
Security conferences are known for having puzzle challenges in their admission badges, and Gmark is the twisted mind behind several of them. He gave us an overview of classical (pen-and-paper) cryptography techniques, and showed how these tricks were incorporated into past Con badges. Finally, he issued a challenge to crack the code buried in the CarolinaCon 7 badge. - 8pm – How to Own and Protect Your Office Space (Dr. Tran)
Dr Tran, from the ToooL team (of lock-pickers) showed common weaknesses in office physical security. - 9pm – Serial Killers: USB as an Attack Vector (Nick Fury)
Nick likes to build stuff, and this time he built a small USB device that claims to be a keyboard, or a mouse, or both. And it can type stuff and click on stuff, just like a real mouse. - 10pm – Hacker Trivia (wxs, Vic Vandal, AlStrowger)
Hacker Trivia is CarolinaCon’s version of Jeopardy, where the questions are about hacker topics, and the answers will win you prizes (or crap). I won a lock pick set and a “vintage” (1990) T-shirt that says “Cray Ada 3.0”.
SATURDAY
- 10am – Music and Audio Production with FOSS (Adam Drew)
Some of the audience members partied a little hard last night, so Adam woke them up with some noise/music that he produced using 100% free and open source software. This was my favorite talk of the Con… but it had nothing to do with security. - 11am – PIG: Finding Truffles Without Leaving A Trace (Ryan Linn)
Ryan has given talks before about using metasploit to find vulnerabilities in a network. This time, he showed a plug-in that he calls “PIG”, which does Passive Information Gathering… just listening to what everyone else is willfully broadcasting. - LUNCH BREAK
- 1pm – If You Own a Multi-Function Printer than I Own You (Deral Heiland)
Every year, Deral brings some new way to crack an egg. This time, it was office printers with shoddy security. It’s as if the printer companies got their embedded software guys to do the web interfaces, too! [This, of course, describes MY day job pretty well – I should take notes.] - 2pm – Yara and Python: The Malware Detection Dynamic Duo (mjg = Michael Goffin)
Yara is a tool that can generate a “signature” to help classify malware. I sort of faded out during this one. Hey, it was just after lunch. - 3pm – There’s An App For That: Pentesting Moble (Joe McCray)
We always enjoy seeing Joe Mac, and so we were happy to learn that he could fill a last-minute vacancy with his talk on installing your favorite hacking tools on a mobile phone platform. - 4pm – Fun with SSH Honeypotting (Chris Teodorski)
Best security talk of the Con, starting with a simple tool that looks like a vulnerable SSH shell account, but is really just a frustrating maze that records an intruder’s every move. But not stopping there, Chris went on to profile his intruders by analyzing the rootkit they used, and then by chatting them up in their IRC forum. - DINNER BREAK
- 7pm – Why Your Password Policy Sucks (purehate = Martin Bos)
Using statistics from databases of passwords that have previously been compromised, Martin narrows down the search space significantly, speeding up the time to guess new passwords. For example, a large percentage of passwords are in the form “(some word) + (one number digit)”. Password policies that force you to use a digit only encourage users to choose one that follows this same template. - 8pm – Mackerel: A Progressive School of Cryptographic Thought (Justin Troutman)
There’s a dud at every Con, and this one was it. At first, it looked as though Justin had promise, with his good-ole-boy charm and his trippy slides (done with prezi). But in the end, it was an hour of techno-babble with over-animated slide transitions and no practical substance, a rehash of an academic paper, and a marketing pitch for his consulting business. Boo! [1] - 9pm – TTL of a Penetration (Branson Matheson)
Branson argues that it is more important to react quickly to the inevitable attack than to try to thwart attacks in the first place. Spoken like a real Windows user. - 10pm – Hacker Trivia (Vic Vandal, wxs, AlStrowger)
The Saturday night episode of Hacker Trivia was a little harder-edged than Friday night’s game. The staff spent much more of their time enforcing (and changing) the rules, and generally arguing with each other. Al (the MC) commented that this was like a game of “CalvinBall”. The cheezy prizes were replaced by unique “CarolinaCon 7” shot glasses, awarded (full) to the correct answerers.
SUNDAY
- 10am – logstash: Open Source Log and Event Management (Jordan Sissel)
Most of us just print logs to a file. Jordan Sissel manages logs like Sorcerer Mickey manages his broom minions. His open source tools consolidate, format and distribute log messages in a very flexible way. And he even has stickers with cartoon logs and beavers to boot! - 11am – Dissecting the Hack: Malware Analysis 101 (Gerry Brunelle)
When a machine is hacked, many people want to just wipe it clean and reinstall the OS. Gerry tells us not to… save that image and study what the malware is doing. He showed several techniques for learning what a piece of malware is doing. This was primarily a Windows-based talk, and much of the work was done using debuggers that disassembled the object code. - LUNCH BREAK
- 1pm – Security Lessons from Cracking Enigma (Lisa Lorenzin)
Lisa walked us through the history of the German Enigma machine, and the extraordinary tale of how the code was broken by the British and the Allies. - 2pm – Hack from a Library with Katana (JP “ronin” Dunning)
A pretty straightforward talk about a toolkit that can be installed on a USB flash drive, and about the many places where one might find an unattended PC (McDonald’s drive-thru??). - 3pm – The Art of (Cyber) War (wxs = Wes Shields)
It’s time to put on our tin foil hats… Wes is about to tell us about the next generation of bad guys. While the media warns us of APT’s (Advanced Persistent Threats), Wes prefers to call them DHA’s (Determined Human Adversaries). They are organized, focused, funded, and take a long-term view of their attack. So determine what their motivation is, and how to counter them. Apologies for numerous Sun Tsu quotes. - 4pm – Pwning Capture the Flag: Step by Step (David Burt)
David Burt set up the playing field for the weekend-long capture-the-flag game, and so as the Con came to a close, he spilled the beans. Five machines were set up on a private network, two Linux machines and three Windows. Each had vulnerabilities and “flag files” hidden on them. Find the files, and cut-and-paste their contents into the scoreboard web page, and you pwn this game.
All in all, it was a very fun, but exhausting, weekend. I learned a lot… some of it security-related, and some… well… Thanks to the organizers for another fun weekend. I am glad that they only hold this thing once per year.
—
[1] I am also willing to accept an alternative explanation – that I am too dumb to understand what Justin was talking about.
Encrypting your entire hard disk (almost)
15 years
I have a small netbook that I use when I travel, one of the original Asus EeePC’s, the 900. It has a 9″ screen and a 16GB flash drive. It runs Linux, and it’s just about right for accessing email, some light surfing, and doing small tasks like writing blog posts and messing with my checkbook. And since it runs Linux, I can do a lot of nice network stuff with it, like SSH tunneling, VPN’s, and I can even make it act like a wireless access point.
However, the idea of leaving my little PC in a hotel room while I am out having fun leaves me a little uneasy. I am not concerned with the hardware… it’s not worth much. But I am concerned about my files, and the temporary files like browser cookies and cache. I’d hate for someone to walk away with my EeePC and also gain access to
countless other things with it.
So this week, I decided to encrypt the main flash drive. Before, the entire flash device was allocated as one device:
partition 1 – 16GB – the whole enhilada
Here’s how I made my conversion.
(0) What you will need:
- a 1GB or larger USB stick (to boot off of)
- an SD card or USB drive big enough to back up your root partition
(1) Boot the system using a “live USB stick” (you can create one in Ubuntu by going to “System / Administration / Startup Disk Creator”. Open up a terminal and do “sudo -i” to become root.
ubuntu@ubuntu:~$ sudo -i
root@ubuntu:~$ cd /
root@ubuntu:/$
(2) Install some tools that you’ll need… they will be installed in the Live USB session in RAM, not on your computer. We’ll install them on your computer later.
root@ubuntu:/$ apt-get install cryptsetup
(3) Insert an SD card and format it. I formatted the entire card. Sometimes, you might want to make partitions on it and format one partition.
root@ubuntu:/$ mkfs.ext4 /dev/sdb
root@ubuntu:/$ mkdir /mnt/sd
root@ubuntu:/$ mount /dev/sdb /mnt/sd
root@ubuntu:/$
(4) Back up the main disk onto the SD card. The “numeric-owner” option causes the actual owner and group numbers to be stored in the tar file, rather than trying to match the owner/group names to the names from /etc/passwd and /etc/group (remember, we booted from a live USB stick).
root@ubuntu:/$ tar --one-file-system --numeric-owner -zcf /mnt/sd/all.tar.gz .
root@ubuntu:/$
(5) Re-partition the main disk. I chose 128MB for /boot. The rest of the disk will be encrypted. The new layout looks like this:
partition 1 – 128MB – /boot, must remain unencrypted
partition 2 – 15.8GB – everything else, encrypted
root@ubuntu:/$ fdisk -l

Disk /dev/sda: 16.1 GB, 16139354112 bytes
255 heads, 63 sectors/track, 1962 cylinders
Units = cylinders of 16065 * 512 = 8225280 bytes
Sector size (logical/physical): 512 bytes / 512 bytes
I/O size (minimum/optimal): 512 bytes / 512 bytes
Disk identifier: 0x0002d507

Device Boot      Start         End      Blocks   Id  System
/dev/sda1   *        1          17      136521   83  Linux
/dev/sda2           18        1962    15623212+  83  Linux
root@ubuntu:/$
(6) Make new filesystems on the newly-partitioned disk.
root@ubuntu:/$ mkfs.ext4 /dev/sda1
root@ubuntu:/$ mkfs.ext4 /dev/sda2
root@ubuntu:/$
(7) Restore /boot to sda1. It will be restored into a “boot” subdirectory, because that’s the way it was on the original disk. But since this is a stand-alone /boot partition, we need to move the files to that filesystem’s root.
root@ubuntu:/$ mkdir /mnt/sda1
root@ubuntu:/$ mount /dev/sda1 /mnt/sda1
root@ubuntu:/$ cd /mnt/sda1
root@ubuntu:/mnt/sda1$ tar --numeric-owner -zxf /mnt/sd/all.tar.gz ./boot
root@ubuntu:/mnt/sda1$ mv boot/* .
root@ubuntu:/mnt/sda1$ rmdir boot
root@ubuntu:/mnt/sda1$ cd /
root@ubuntu:/$ umount /mnt/sda1
root@ubuntu:/$
(8) Make an encrypted filesystem on sda2. We will need a label, so I will call it “cryptoroot”. You can choose anything here.
root@ubuntu:/$ cryptsetup luksFormat /dev/sda2

WARNING!
========
This will overwrite data on /dev/sda2 irrevocably.

Are you sure? (Type uppercase yes): YES
Enter LUKS passphrase: ********
Verify passphrase: ********
root@ubuntu:/$ cryptsetup luksOpen /dev/sda2 cryptoroot
root@ubuntu:/$ mkfs.ext4 /dev/mapper/cryptoroot
root@ubuntu:/$
(9) Restore the rest of the saved files to the encrypted filesystem that lives on sda2. We can remove the extra files in /boot, since that will become the mount point for sda1. We need to leave the empty /boot directory in place, though.
root@ubuntu:/$ mkdir /mnt/sda2
root@ubuntu:/$ mount /dev/mapper/cryptoroot /mnt/sda2
root@ubuntu:/$ cd /mnt/sda2
root@ubuntu:/mnt/sda2$ tar --numeric-owner -zxf /mnt/sd/all.tar.gz
root@ubuntu:/mnt/sda2$ rm -rf boot/*
root@ubuntu:/mnt/sda2$ cd /
root@ubuntu:/$
(10) Determine the UUID’s of the sda2 device and the encrypted filesystem that sits on top of sda2.
root@ubuntu:/$ blkid
/dev/sda1: UUID="285c9798-1067-4f7f-bab0-4743b68d9f04" TYPE="ext4"
/dev/sda2: UUID="ddd60502-87f0-43c5-aa28-c911c35f9278" TYPE="crypto_LUKS"   << [UUID-LUKS]
/dev/mapper/root: UUID="a613df67-3179-441c-8ce5-a286c16aa053" TYPE="ext4"   << [UUID-ROOT]
/dev/sdb: UUID="41745452-3f89-44f9-b547-aca5a5306162" TYPE="ext3"
root@ubuntu:/$
Notice that you’ll also see sda1 (/boot) and sdb (the SD card) as well as some others, like USB stick. Below, I will refer to the actual UUID’s that we read here as [UUID-LUKS] and [UUID-ROOT].
(11) Do a “chroot” inside the target system. A chroot basically uses the kernel from the Live USB stick, but the filesystem from the main disk. Notice that when you do this, the prompt changes to what you usually see when you boot that system.
root@ubuntu:/$ mount /dev/sda1       /mnt/sda2/boot
root@ubuntu:/$ mount --bind /proc    /mnt/sda2/proc
root@ubuntu:/$ mount --bind /dev     /mnt/sda2/dev
root@ubuntu:/$ mount --bind /dev/pts /mnt/sda2/dev/pts
root@ubuntu:/$ mount --bind /sys     /mnt/sda2/sys
root@ubuntu:/$ chroot /mnt/sda2
root@enigma:/$
(12) Install cryptsetup on the target.
root@enigma:/$ apt-get install cryptsetup
root@enigma:/$
(13) Change some of the config files on the encrypted drive’s /etc so it will know where to find the new root filesystem.
root@enigma:/$ cat /etc/crypttab
cryptoroot  UUID=[UUID-LUKS]  none  luks
root@enigma:/$ cat /etc/fstab
proc  /proc  proc  nodev,noexec,nosuid  0  0
# / was on /dev/sda1 during installation
# UUID=[OLD-UUID-OF-SDA1]  /  ext4  errors=remount-ro  0  1
UUID=[UUID-ROOT]  /  ext4  errors=remount-ro  0  1
/dev/sda1  /boot  ext4  defaults  0  0
# RAM disks
tmpfs   /tmp       tmpfs   defaults   0  0
tmpfs   /var/tmp   tmpfs   defaults   0  0
tmpfs   /var/log   tmpfs   defaults   0  0
tmpfs   /dev/shm   tmpfs   defaults   0  0
root@enigma:/$
(14) Rebuild the GRUB bootloader, since the files have moved from sda1:/boot to sda1:/ .
root@enigma:/$ update-grub
root@enigma:/$ grub-install /dev/sda
root@enigma:/$
(15) Update the initial RAM disk so it will know to prompt for the LUKS passphrase so it can mount the new encrypted root filesystem.
root@enigma:/$ update-initramfs -u -v
root@enigma:/$
(16) Reboot.
root@enigma:/$ exit
root@ubuntu:/$ umount /mnt/sda2/sys
root@ubuntu:/$ umount /mnt/sda2/dev/pts
root@ubuntu:/$ umount /mnt/sda2/dev
root@ubuntu:/$ umount /mnt/sda2/proc
root@ubuntu:/$ umount /mnt/sda2/boot
root@ubuntu:/$ umount /mnt/sda2
root@ubuntu:/$ reboot
When it has shut down the Live USB system, you can remove the USB stick and let it boot the system normally. If all went well, you will be prompted for the LUKS passphrase a few seconds into the bootup process.