Random Thoughts inside Alan's head
tips & tricks
Thunderbird keyboard hack
11 years
I’ve used Mozilla Thunderbird to read my email for years, and for the most part, I think it’s a pretty nice email client. But lately I’ve developed an itch that really needed scratching.
I tend to use the keyboard to navigate around through applications, and so in Thunderbird, I find myself using TAB to switch between the list of mail folders on the left and the list of messages on the right. The problem is that a few years back, when they added tabbed views, they changed the way that the TAB key works. (I’ll try to be clear about the tabbed views and the TAB key, which unfortunately share the same name). After the addition of tabbed views, the TAB key no longer toggled between just the (1) folders pane and (2) messages pane, but now it toggled between (1) folders pane (2) messages pane (3) tab selector widget. So that means I had to re-train myself to press the TAB key once to go from folders to messages, and twice to go from messages back to folders. But it got worse. If you turn on something like the Quick Filter, the TAB key toggles between (1) folder pane (2) messages pane (3) tab selector widget (4) the Quick Filter.
Basically, the TAB key works like it does in a web browser, which is pretty much useless when there are so many widgets that can accept focus.
Today I discovered that what I was really looking for was the F6 key. It strictly changes focus among the visible window panes. For me, most of the time, that’s (1) folder pane (2) messages pane, but if I turn on message previews (rarely), it expands to (1) folder pane (2) messages pane (3) preview pane.
THIS MAKES SENSE. Within the main window (tab) that I am looking at, the F6 key moves between the major window panes. Awesome.
However, wouldn’t it be cool if I could use the TAB key to do this focus-switching, instead of lifting my fingers off of their pseudo-home position to get way up to F6 (which I can’t find just by feel — I have to look down at it)?
A little bit of searching led me to extensions, such as the very old but still usable “keyconfig”. This is a pretty opaque tool that lets you insert some sort of arcane code into the prefs.js file. Basically, it did not help me do anything, but it did help me understand how keys are mapped. Deeper searches led me to the “DOM Inspector”, which lets you view the document that is being rendered (apparently, views in Thunderbird are pretty much HTML documents, which I suppose was hip at the time). That led me to some of the arcane codes that are mapped to certain keys.
So here’s what I tried. I looked at the arcane code that is mapped to F6, and I looked at the way “keyconfig” inserted some mappings of key names and their arcane codes. And I mimicked it. I just added this line to prefs.js:
user_pref("keyconfig.main.xxx_key75_SwitchPaneFocus(event);", "][][VK_TAB][SwitchPaneFocus(event);][");
And wouldn’t you know… it worked! Now the TAB key does what the F6 key normally does… it switches focus among the main window panes in the active tabbed view. Yay, lazy fingers cheer!
tar + netcat = very fast copy
11 years
I reformatted a hard disk this weekend. In the process, I needed to copy a bunch of files from one machine to the other. Since both of these machines were smaller embedded devices, neither one of them had very capable CPUs. So I wanted to copy all of the files without compression or encryption.
Normally, I would use “rsync -avz --delete --progress user@other:/remote/path/ /local/path/“, but this does both compression (-z) and encryption (via rsync-over-ssh).
Here’s what I ended up with. It did not disappoint.
Step 1 – On the machine being restored:
box1$ netcat -l -p 2020 | tar --numeric-owner -xvf -
Step 2 – On the machine with the backup:
box2$ tar --numeric-owner -cvf - | netcat -w3 box1 2020
Merging multiple git projects into one
11 years
Over the last few months, my daughter Sydney and I have been working on Python programming assignments. I showed her that we can occasionally make a snapshot of our work using git, so if we mess something up, we can always get back to our previous checkpoint.
So we got into the habit of starting off new assignments with “git init .“.
Recently, though, I decided I wanted to host a copy of her assignments on my home file server, so we could check out the assignments on her computer or on mine. In the process, I decided to merge all of the separate assignments into a single git project. As a matter of principle, I wanted to preserve the change histories (diffs and author and dates — but not necessarily the old SHA hashes, which would have been impossible).
I did some searching on the topic, and I found a variety of solutions. One of them used a perl script that sent me off into the weeds of getting CPAN to work. A couple of good posts (here and here) used branches for each assignment, and then merged all of the branches together. The results were OK, but I had the problem where the assignment files started off on their own top-level directory, and then I later moved the files to their own assignment subdirectories. I really wanted to rewrite history so it looked like the files were in their own subdirectories all along.
Then I noticed that my daughter and I had misspelled her name in her original “git config –global”. Oops! This ended up being a blessing in disguise.
This last little snag got me thinking along a different track, though. Instead of using branches and merges to get my projects together, maybe I could use patches. That way, I could edit her name in the commits, and I could also make sure that files were created inside the per-assignment directories!
So I whipped up a little shell script that would take a list of existing projects, iterate through the list, generate a patch file for each one, alter the patch file to use a subdirectory, (fix the mis-spelled name), and then import all of the patches. The options we pass to git format-patch and git am will preserve the author and timestamp for each commit.
#!/bin/bash

remoteProjects="$*"

git init .

for remoteProject in $remoteProjects ; do
   echo "remote project = $remoteProject"
   subProject=$(basename $remoteProject)
   ( cd $remoteProject ; git format-patch --root master --src-prefix=AAAA --dst-prefix=BBBB --stdout ) > $subProject.patch
   # essential file path fixes
   sed -i -e "s|AAAA|a/$subProject/|g" $subProject.patch
   sed -i -e "s|BBBB|b/$subProject/|g" $subProject.patch
   sed -i -e "s|/$subProject/dev/null|/dev/null|g" $subProject.patch
   # other fixes, while we're here
   sed -i -e 's/syndey/sydney/g' $subProject.patch
   # bring the patch into our repo
   git am --committer-date-is-author-date < $subProject.patch
   # clean up
   rm $subProject.patch
done

exit 0
I think this solution works nicely.
The one with the separate branches above was kind of cool because a git tree would show the work we did on each assignment. But in the end, the linear history that we produced by using patches was just as appropriate for our project, since we actually worked on a single homework assignment each week.
I suppose I could combine the two solutions by creating a branch before doing the "git am" (git "accept mail patch") step. That is left as an exercise for the reader.
dnsmasq + unbound
12 years
Recently, our local Linux Users Group was talking about DNS servers. Some folks in the group claimed that their ISP’s DNS servers were very slow.
In a group like this, there is usually a camp that are strong supporters of running BIND. Somehow, I have never been able to wrap my head around BIND. Instead, I have been using dnsmasq. These two packages are very different.
BIND
BIND is a fully recursive DNS resolver. When you look up a name like “www.cnn.com”, it goes to “com” to ask who “cnn” is, and then it goes to “cnn.com” to ask who “www.cnn.com” is. BIND has a steep learning curve, and that has always discouraged me from really tinkering with it. It also misses a very important point that my home network needs — local name resolution of DHCP-assigned addresses.
dnsmasq
Dnsmasq is more of a caching DNS server for a local network. It has a built-in DHCP server, so devices on my home network get their addresses from dnsmasq. When I make a DNS request, dnsmasq looks in its local DHCP table first. For example, if I want to talk to another device in the same room, like a Roku or a printer, dnsmasq knows the addresses of the local devices and it responds immediately. If the request is not a local name, it simply passes on the request to some other name server… maybe your ISP’s, or maybe a free server like OpenDNS or Google’s 8.8.8.8. Dnsmasq caches all DNS requests, so if you make repeated requests to the same site, they are answered pretty quickly.
I really like dnsmasq.
It is super flexible, and you configure it through a single configuration file which is super easy to understand. In fact, many home routers use dnsmasq under the hood.
unbound
But during the discussion in our LUG, someone mentioned unbound, another fully recursive DNS server that is super easy to set up. So I had to try it out. It did not disappoint.
My Setup
So how do these two tools work together?
Actually, it’s quite elegant. Dnsmasq listens on port 53 of all addresses on my router. It is the primary DNS server for all machines on my local network. If the request is for a local device, then it fills the request immediately. But if the request is for some site on the internet, then it passes the request off to unbound, which is also running on the router, but listening on a different address/port combination.
Here is how I configured dnsmasq.
/etc/dnsmasq.conf
# --- DNS ----------------------------

# Be a good netizen, keep local stuff local.
domain-needed
bogus-priv
filterwin2k

# Do not listen on "all" interfaces and just filter.
bind-interfaces
# Listen on port 53 on in-home network (eth1) and localhost (lo).
# Do not listen on internet interface (eth0).
interface=lo
interface=eth1

# Upstream servers are not listed in resolv.conf, they are listed here.
no-resolv
server=127.0.0.1#10053 # unbound

# Add this domain to all simple names in the hosts file.
# (Also sets the domain (15) option for DHCP).
expand-hosts
domain=home.alanporter.com

# Special treatments for some domains and hosts.
local=/local/ # dnsmasq handles these itself
server=/alanporter.com/69.93.127.10 # look up via ns1.linode.com
address=/doubleclick.net/127.0.0.1 # return this address immediately
address=/sentosa.us/108.161.130.139 # return this address immediately
cname=oldname.home.alanporter.com,newname.home.alanporter.com

# Logging
log-queries
log-facility=local1

# Caching
cache-size=1000

# --- DHCP ---------------------------

dhcp-range=FunkyNet,172.31.1.100,172.31.1.199,10m
dhcp-option=FunkyNet,1,255.255.255.0 # subnet mask - 1
dhcp-option=FunkyNet,3,172.31.1.1 # default router - 3
dhcp-option=FunkyNet,6,172.31.1.1 # DNS server - 6
dhcp-option=FunkyNet,15,home.alanporter.com # domain name - 15
dhcp-option=FunkyNet,28,172.31.1.255 # broadcast address - 28

dhcp-leasefile=/var/lib/dnsmasq.leases
read-ethers

# reserved names and addresses
dhcp-host=d8:5d:4c:93:32:41,chumby
dhcp-host=00:50:43:00:02:02,sheeva,172.31.1.3,10m

# --- PXE ----------------------------

dhcp-boot=pxelinux.0,bender,172.31.1.1
So dnsmasq listens on the local network for requests, answers what it can: local DHCP addresses, cached addresses and special overrides from the config file. And anything it can’t handle itself, it sends on upstream to unbound.
/etc/unbound/unbound.conf
server:
    # perform cryptographic DNSSEC validation using the root trust anchor.
    auto-trust-anchor-file: "/var/lib/unbound/root.key"
    # listen on local network, allow local network access
    interface: 127.0.0.1
    access-control: 127.0.0.0/8 allow
    # NOT listening on IPv6
    # interface: ::1
    # access-control: ::1 allow
    port: 10053
    # logging
    chroot: ""
    logfile: "/var/log/unbound.log"
    log-time-ascii: yes
    log-queries: yes
    verbosity: 2
As you can see, unbound does not require much configuration.
Notice that I am NOT listening on the IPv6 interface. It turns out, there is no need. Dnsmasq listens on both, and it forwards A requests and AAAA requests to unbound over an IPv4 connection on the local “lo” adaptor.
How it stacks up
So how well does this setup work? Are there advantages or disadvantages to using dnsmasq and unbound together?
Disadvantages
I tested this setup using “namebench“, a Google “20 percent” project that measures DNS lookup times. It told me that Google’s public DNS (8.8.8.8) was 250% faster than my in-home DNS. Furthermore, it said I would be better off using my ISP’s DNS servers. I am guessing that this is because these larger DNS servers cache a much larger pool of addresses, bypassing full recursive lookups of most common names.
Advantages of dnsmasq + unbound
If my setup is slower than using a single upstream DNS, then why should I run mine this way? I have a few reasons.
- First and foremost, I learn a lot about DNS this way.
- But also worth considering, ISP nameservers are notoriously flaky. Just because the ISP beat my nameserver on a single test, that does not mean it will always do so. That’s like comparing the bus to driving your own car… it might be better sometimes, but really bad other times.
- One compelling reason to run a recursive DNS server like unbound is that you know you’re getting the right answer. When you use an ISP’s DNS server, they may hijack some domains and give you an incorrect answer on purpose. For example, they may censor content, and return a bogus landing page address for addresses that are on their black list. OpenDNS touts this as a feature… it is more “family-friendly” than raw DNS.
- If you’re the tinfoil hat type, you might not want to use a DNS service from someone like Google, who makes their money from knowing more about your browsing habits than you do. Or from your ISP, who is always trying to up-sell you with something.
Advantages of dnsmasq + any upstream DNS
- Dnsmasq (whether I use an upstream DNS or unbound) gives me control over how stuff is looked up. For example, when I was working on a new web site, I could tell dnsmasq to use the hosting company’s DNS for that one domain, so I did not have to wait for caches to expire between me and the host.
- Dnsmasq caches lookups. Actually, unbound does, too. I am still playing with both.
- Dnsmasq make switching DNS providers really easy. Say your ISP’s nameservers are acting up… just change one line in dnsmasq.conf and start getting results from somewhere else.
The obstinate trash man
13 years
This weekend’s pet project was to set up Ubuntu Studio to run on my Macbook Pro.
Ubuntu Studio is a Linux distribution, based on Ubuntu, that comes with lots of audio and video software installed and configured. I have been wanted to play with Ardour, an open source digital audio workstation, and although it will run on a Mac, it runs much better on Linux. So I downloaded and burned a copy of the Ubuntu Studio “Live DVD”. This would allow me to test drive Ubuntu Studio on the Macbook without installing anything on the Macbook’s hard disk. It worked wonderfully, and so I decided to make a bootable “Live USB” stick as well. The Live USB stick acts just like the Live DVD, except it also allows you to save files back to the USB stick (obviously, you can’t save files to a read-only DVD). So I would be able to do my studio work in Linux and save my work when I reboot back into OSX.
I was greeted with a very weird bug in Ubuntu Studio’s desktop system. Whenever I tried to delete a file, I would get the following error:
Unable to find or create trash directory
What a weird error message!
Ubuntu Studio uses the XFCE desktop environment, which follows the Free Desktop’s “Desktop Trash Can Specification“. Yes, there are people who write specifications about how trash cans are supposed to work. There is a utility called “gvfs-trash” that actually handles moving deleted files to the appropriate trash can area. You can run this command from a shell prompt.
$ gvfs-trash somefile
Error trashing file: Unable to find or create trash directory
There’s that same error message.
I ran the same command with “strace” to figure out what it was doing, and I did a little bit of Googling. I found this blog post, which told me most of what I needed.
The gvfs-trash system wanted to find a directory called “.Trash-999” in the top level of the filesystem. It wanted 999 because my user ID number was 999 (run the “id” command to see what your user ID number is). Inside the /.Trash-999 folder, it also wanted two sub-folders named “files” and “info”. All three of these needed to have 700 permissions.
Here’s a one-liner that will do it all:
u=$(id -u) ; g=$(id -g) ; sudo mkdir -m700 /.Trash-$u ; sudo chown $u:$g /.Trash-$u ; mkdir -m700 /.Trash-$u/{files,info}After that, the desktop system could remove files OK, and the gvfs-trash command could as well.
That gvfs-trash command might make a good alias!
alias rm='gvfs-trash'iPhone dev notes: things that I got stuck on
13 years
Here are some things that I got stuck on this weekend while trying to work on iPhone apps.
Simulator ran my app in 3.5-inch (iPhone 4 size) instead of 4.0-inch (iPhone 5 size).
I wasted a lot of time on this one.
Whenever I ran the app in the simulator, it would launch in the shorter (640-960) 3.5-inch screen, even if I had previously chosen the taller (640×1136) 4.0-inch screen size.
In Xcode, there is a pulldown at the upper left where you can define your “scheme”. It looks like this:
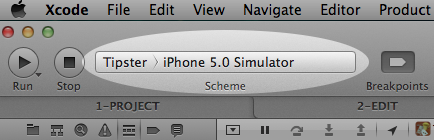
Here’s a cool trick. This is the menu where you can set certain parameters for when you build, run, debug, profile and archive the app. For example, you can set the simulator’s screen size by clicking on the app name on the left of the scheme widget and choosing “Edit Scheme…”. Then select the “Run MyApp.app” action on the left, the “Options” tab, and set the “iPhone simulator display” to the size that you want to use each time you run.
But still, even if I chose the 4-inch display in my scheme’s “run” action, the simulator ignored this setting and opened in a 3.5-inch display.
The problem is that iOS 5.0 does not support the 4-inch display. The taller display debuted with the iPhone 5, which came with iOS 6.0.
So the solution is to just change the target to “iPhone 6.0 simulator”. Then slap your forehead and say “duh!”.
Error: A valid provisioning profile for this executable was not found.
I had been preparing an app for submission into the App Store. Then I went to run it on my local device again, and it kept popping up an error message: “A valid provisioning profile for this executable was not found.”
I went into the project’s “Build Settings”, and I checked all of the values in the “Code Signing” section. I made sure that the “AdHoc” and “Debug” entries were set to iPhone Developer (currently matches ‘iPhone Developer: Alan Porter (ABCDE12345)’ in ‘MyProvProfile’). The “AppStore” entry was set to iPhone Distribution (currently matches ‘iPhone Distribution: Sentosa.US (LMNOP67890) in ‘VWXYZ12345.us.sentosa.Tipster’). These settings are important. They tell Xcode to sign your local development builds using your developer certificate, and to sign your App Store submissions using your team’s distribution certificate.
But once again, the problem was in the “scheme” menu. Under the “Run MyApp.app” action and “Info” tab, my “Build Configuration” was mistakenly set to “AppStore”. This won’t work, because for local builds, you need to sign the code with your own developer certificate. The Distribution certificate should only be used when you’re submitting your app to the App Store.
iPhone app startup: AppDelgates, MainWindow.xib and some code
13 years
When beginners learn to write programs in C, they learn that main() is the starting point of their program. But that is only partially correct. There is stuff that happens before main() is called. The first thing to run is the C runtime, which is in a library called crt.o. It allocates space for global and static variables, it copies initial values to initialized variables, and it initializes all static variables to 0. Then it calls your main(). At the end, it takes your return code from main() and passes it back to the operating system.
AppDelegates: your app’s front door
Similarly, iPhone apps have a startup and shutdown sequence that is handled by iOS. At certain points, it will dip into your code to determine what to do. The primary interface that you have to control this is the AppDelegate. The AppDelegate protocol has several methods that can be used to notify your app that something is about to happen (low memory, you’re going into the background, a notification of a time change or location change, etc). It also has some methods where you can specify your preferences (which orientations does your app support, what should the status bar look like). It’s a lot richer than just a simple call to main(), but the concept is the same. The OS is doing stuff, and when it needs you, these methods are the entry points into your app.
If you do not set your AppDelegate up properly, your app may fail to load, or it may simply show a black screen instead of your views.
I recently discovered this while trying to “modernize” an early XIB-based app that has been in the store for a few years. Somewhere in the process, I messed up this startup sequence, and I was greeted with a plain black screen. Here is what I found out about the startup sequence.
You actually do include a main() in your code. Usually, it is very small. This is the main.m from my XIB-based app.
#import <UIKit/UIKit.h>

int main(int argc, char *argv[]) {
    @autoreleasepool {
        return UIApplicationMain(argc, argv, nil, nil);
    }
}
The main thing it does it set up an autoreleasepool which keeps track of memory pointers and is used for garbage collection. Then it calls UIApplicationMain(). The first two arguments are familiar, but the next two are used if you want to override default behavior.
- The third argument is where you can specify the name of your own Application subclass.
- The fourth argument is where you can specify the name of your own class that will implement the AppDelegate protocol. We’ll talk about that below.
At this point, there are two ways your app can start up: through XIB files created in Interface Builder, or in Objective-C code.
XIB-based app startup
When the fourth argument to UIApplicationMain() is nil, the application will look in your plist file for a Main Storyboard or a Main Interface. You’ll see these in XCode under “target” in the “summary” tab. This will be the name of a XIB file.
It loads this XIB file, and looks for a class that will be your AppDelegate and a window that will be your main application window.
There are many tutorials on setting up these XIB files. The one that I used is at http://www.trappers.tk/site/2011/06/16/mainwindow-xib/.
In a nutshell, this is what you do. Note that all of my terminology is probably wrong here, because I don’t use Interface Builder much.
- Create an empty IB document.
- Set the Owner to a UIApplication class.
- Add an “Object” to the canvas, make it of
myAppDelegateclass. - Add a “Window” to the canvas.
- You already have a skeleton AppDelegate class (.h and .m files), edit the .h file to contain the key word “IBOutlet” in the window declaration. Interface Builder uses this to identify code that it can hook to objects in the XIB.
- Connect the AppDelegate object to the File Owner’s “delegate” hookup.
- Connect the Window object to the AppDelegate’s “window” hookup.
- Then edit your project target, in the “summary” tab, go to “Main Interface” and select your XIB file from the pulldown.
I find that using a GUI drawing tool to set up this sort of plumbing is confusing, but the gist of it is that you are creating an association between this class that you have (probably called myAppDelegate), a window, and the app’s AppDelegate protocol.
When the app starts up, it runs your main(), calls UIApplicationMain(), sees the nil in the fourth argument slot and decides that you want to use the XIB method. It looks in the myapp-Info.plist and finds the MainWindow XIB file, loads that XIB, loads that window, finds out which class is your AppDelegate, and then calls application:didFinishLaunchingWithOptions: on that class.
Programmatic app startup
Instead, I choose to implement most of my plumbing in Objective-C code, for the following reasons:
- I find the pictorial representation of these abstract connections to be more confusing than their code equivalents.
- It’s difficult to reproduce something when the steps are “control-drag the whoosit to the whatsit over there”.
- Code is much easier to copy and compare.
- This is a biggie — XIB file formats change with new tool releases, and so sometimes you’re left with no way forward. An example is when I used XCode5 (iOS7 tools) to create a XIB file, but could not use it at all under XCode 4.2 (iOS6 tools).
- I get all starry-eyed when I use a plain text editor.
Here are the three files that you must set up to get this same startup process working using Objective-C.
main.m
#import <UIKit/UIKit.h>
#import "AppDelegate.h"

int main(int argc, char *argv[]) {
    @autoreleasepool {
        return UIApplicationMain(
            argc, argv,                            // command-line args
            nil,                                   // Application class
            NSStringFromClass([AppDelegate class]) // AppDelegate
        );
    }
}
AppDelegate.h
#import <UIKit/UIKit.h>
#import "MyappModel.h"

@interface AppDelegate : UIResponder
<UIApplicationDelegate>
{
    UINavigationController * navController;
    MyappModel * myappModel;
}

@property (nonatomic, retain) UIWindow * window;
@property (nonatomic, retain) MyappModel * myappModel;

@end
AppDelegate.m
#import "AppDelegate.h"
#import "MyScreen1VC.h"
#import "MyScreen2VC.h"
#import "MyappModel.h"

@implementation AppDelegate

// create getters and setters for @properties
@synthesize window = _window;
@synthesize myappModel;

- (BOOL) application:(UIApplication *)application
didFinishLaunchingWithOptions:(NSDictionary *)launchOptions
{

    // My application model
    myappModel = [[MyappModel alloc] init];

    // Create a root window. Application delegates are expected to have one.
    self.window = [[UIWindow alloc] initWithFrame:[[UIScreen mainScreen] bounds]];
    self.window.backgroundColor = [UIColor lightGrayColor];

    // Create a navigation controller, attach it to the window as the "root".
    navController = [[UINavigationController alloc] init];
    [self.window setRootViewController: navController];

    // create a view controller for the first view
    MyScreen1VC * vc = [[MyScreen1VC alloc] init];
    // Push the first view controller on the stack.
    [navController pushViewController:vc animated:NO];

    // Add the navigation controller’s view to the window
    [self.window addSubview:navController.view];

    // Display the main window.
    [self.window makeKeyAndVisible];
}

@end
So how does this one work?
When the app starts up, it runs your main(), calls UIApplicationMain(), sees the name of your AppDelegate class in the fourth argument slot and sees that you will be handing app delegation yourself. It calls application:didFinishLaunchingWithOptions:, which you have implemented in your AppDelegate. Now it is up to you to allocate a window, create a controller and assign it as the root controller, and then make the window “key and visible”.
Conclusion
Whether you prefer to use Interface Builder or Objective-C code to create your views, it is important to understand the sequence of events that takes place when your app starts up. If you miss one of these steps, it could cause your app to fail to launch. I recently encountered the dreaded “black screen of nothing”, and it caused me to scratch a little deeper to see what was going on.
I hope this tutorial clarifies some of this delicate dance in your mind.
iPhone photo gallery
13 years
I like to keep albums of recent photos on my iPhone, so I can show them to friends and family. Not only do I keep the photos that I took on the iPhone itself, but I also keep the photos I took using other cameras. Here, I will describe the method and tools I use to keep several months worth of photos conveniently in my pocket.
At first, this seems like a very simple problem, but there are a few subtle quirks, and I have worked around them using a script and some open source tools. In the end, I will have:
- photos from multiple cameras
- selected folders, but not necessarily everything
- photos are optimized for phone size, not wasting space
- photos are oriented correctly, not sideways or upside-down
- photos from multiple cameras appear in chronological order
- process is mostly automated
The end result looks like this:
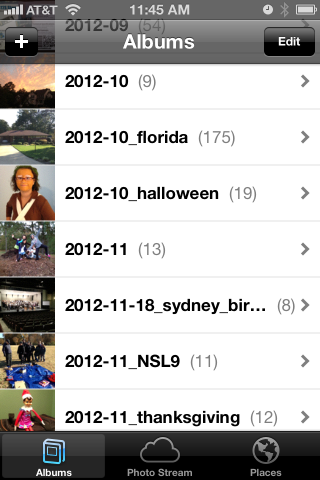
iPhone “Photos” app showing albums
How my photos are organized
When I worked at Ericsson’s research lab in Singapore, they had done a study on how people store their digital photos and how they find a particular one in the bunch. They found that people tend to associate events with nearby dates, so they might say “Let’s see… Bill broke his leg skiing right before Janet’s wedding, so that must have been Winter of 2009”.
I definitely fall into that category, and so my pictures are stored in folders by date. It looks like this:
pictures     - top level
+ bulk       - raw unprocessed stuff, too big to browse
+ import     - a working area
+ y          - photo albums arranged by year/month/event
  + 2011
  + 2012
    + 2012-09
    + 2012-10
    + 2012-10_florida
    + 2012-10_halloween
    + 2012-11
    + 2012-11-12_ducks
    + 2012-11-18_sydney_birthday
    + 2012-11_NSL9
    + 2012-11_thanksgiving
  + 2013
I also want to note that some of my friends take a completely different approach… they pick a single tool and simply dump the photos into the tool. They don’t care to organize them at all and just rely on the tool. That’s certainly OK… I would guess these are the same people who don’t balance their checkbooks. If that describes you, then I suggest you stop reading here, because none of this will apply to you.
I have used the date-folder method since I got my first digital camera in 1998. It has migrated from Windows to Linux to MacOS. My data far outlasts any one tool.
So one of my assumptions is that my “pictures” directory is sacred. I do not want any tool to write anything to that directory (I am looking at you, iPhoto & iTunes).
Selecting folders (albums) to copy to the iPhone
So I set up two more directories.
- $HOME/iphone/pictures – where I say what photos to copy
- $HOME/itunes/pictures – a directory that iTunes can sync with
In the first one, $HOME/iphone/pictures, I set up a bunch of symlinks to point to the directories that I would like to copy. I do this so I can easily select some folders but leave out others.
2011-11_happy_crabby       -> ../../pictures/y/2011/2011-11_happy_crabby
2012-09                    -> ../../pictures/y/2012/2012-09
2012-10                    -> ../../pictures/y/2012/2012-10
2012-10_florida            -> ../../pictures/y/2012/2012-10_florida
2012-10_halloween          -> ../../pictures/y/2012/2012-10_halloween
2012-11                    -> ../../pictures/y/2012/2012-11
*** note - no ducks here ***
2012-11-18_sydney_birthday -> ../../pictures/y/2012/2012-11-18_sydney_birthday
2012-11_NSL9               -> ../../pictures/y/2012/2012-11_NSL9
2012-11_thanksgiving       -> ../../pictures/y/2012/2012-11_thanksgiving
For example, let’s say I took 1000 boring photos of ducks in November. I could easily skip 2012-11-12_ducks by not creating a symlink. I can also specifically include a very old folder by leaving the symlink in this directory. I have done that here with my Happy Crabby pictures from 2011.
Copying and processing photos
I have written a script that will go through each of these directories and perform a few clean-up tasks as it copies the photos to the itunes staging area.
- It copies the photos to a temporary working directory.
We should never alter the original photos… always work with a copy.
- It rotates the image based on the EXIF orientation tag.
I’m gonna start slamming on Apple, so fanbois should cover their ears. I have found that Apple handles image rotation differently than everyone else, and it took a while to get a handle on it. I can take pictures on my iPhone and email them to someone and they’ll show up as upside-down or sideways. The images look OK on the iPhone or on a Mac, but everyone else (Linux, Windows) sees them rotated. The same thing happens if I upload them to “gallery”, an online photo gallery. Sometimes, they would show the correct dimensions but the image would still be rotated. That is, a portrait would be taller than wide, but the person’s face would be sideways and extremely elongated. The solution I found is to process them using “renrot” (see my blog post about renrot for detail).
- It renames the file using the date & time in the EXIF data.
When we get back from vacations, I find that we have photos from several different cameras, and it just seemed weird for my wife’s Nikon images (named DSCNxxxx.JPG) to appear before my iPhone images (named IMG_xxxx.JPG) and then my Panasonic images (named Pxxxxxxx.JPG) last. If I rename all of the images to (YYYY)(MM)(DD)(hh)(mm)(ss).JPG, they will appear in chronological order, regardless of which camera was used.
- It resizes the image to be no bigger than 1280 pixels high or wide.
There is no need to me to waste space on my iPhone by storing each image in their 12MP glory (actually, I typically shoot 3MP for normal vacation photos). So I resize the images using imagemagick.
- It moves the files into the iTunes directory in numerical (chronological order).
At one point, I had a problem with iTunes arranging my photos in the order that they happened to appear in the directory instead of sorted by name or anything else. If you do a “find” command on Linux or a Mac, you’ll see the files in the order that they appear in the directory file. That’s OK under the hood, because “ls” and Mac Finder and Nautilus are all smart enough to show the files in sorted order. But no, not iTunes. So I move the files from the temporary work area to the iTunes sync directory one at a time, in chronological order.
Using the script
When it’s time to sync my iPhone (less and less frequent these days, and primarily driven by when I want to update my photo albums), I simply look over the symlinks, run the script and then sync.
Running the script takes a few minutes, and syncing all of the pictures instead of just the ones that have changed takes a few minutes as well. But I am very happy with the consistent results.
I’m sure that some folks will claim that I am “doing it wrong”, that I should not have to do so many work-arounds. But the bottom line is that I encountered real-world problems from the interaction between various cameras and the quirks of iTunes, and this script smooths out all of the wrinkles. It is really no trouble to run the pre-syncing script before syncing, and it does solve the problems of images being mis-rotated, taking too much space on my phone, and appearing out of order. It also makes it trivial to choose which album folders are copied to the iPhone and which ones are not.
The script itself appears below.
The pre-syncing script
#!/bin/bash
shopt -s nocaseglob
shopt -s nullglob

src="$HOME/iphone"
dest="$HOME/itunes"
if [ ! -d "$dest" ] ; then mkdir -p "$dest" ; fi

echo "=== PHOTOS ==="

wildcard="*.[Jj][Pp][Gg] *.[Jj][Pp][Ee][Gg] *.[Pp][Nn][Gg]"
stage="/tmp/itunes.$$.stage"
mkdir -p $stage
rm -rf "$dest/pictures"

# go through each directory, and do some processing
( ls -1 $src/pictures ) | while read d ; do

   # skip non-directories
   [ ! -d "$src/pictures/$d/." ] && continue

   echo "processing photos in [$d]"
   indent="   $d >> "

   # copy source photos to staging area
   ( cd $src/pictures/$d ; cp $wildcard $stage/ )

   # rotate
   echo " - rotating photos"
   ( cd $stage ; renrot $wildcard ) 2>/dev/null | sed -e "s/^/$indent/g"
   rm $stage/*_orig 2>/dev/null

   # resize
   echo " - resize photos"
   # iphone 4S screen is 640x960 (2xVGA)
   ( cd $stage ; mogrify -verbose -geometry '1280x1280>' $wildcard ) 2>/dev/null | sed -e "s/^/$indent/g"

   # move to itunes area, reorder as you go
   echo " - re-ordering files"
   mkdir -p "$dest/pictures/$d"
   ls -1 $stage | while read f ; do
      # Mac bash v3 does not have ${f^^*}, so we have to use 'tr'
      upper=$(echo $f | tr /a-z/ /A-Z/)  # was bash internal ${f^^*}
      mv -v "$stage/$f" "$dest/pictures/$(basename $d)/$upper" | sed -e "s/^/$indent/g"
   done

   echo ""
done

# clean up some special cases
xargsR='-r'
[ "$OSTYPE" == "darwin12" ] && xargsR=''  # Mac xargs does not have -r
find $dest/pictures/ -type d -print0 | xargs -0 rmdir 2> /dev/null # empty directories
find $dest/pictures/ -name \*_orig -print0 | xargs -0 $xargsR rm -v
find $dest/pictures/ -name MEDI\*.JPG -print0 | xargs -0 $xargsR rm -v
echo ""
‘sudo’ vs using a root password
14 years
There seems to be a lot of confusion about the use of “sudo” vs using a root password. It’s a lot simpler than many make it out to be.
- On a system that uses a root password, all administrators use a shared root password.
- On a system that uses “sudo”, all administrators use their own passwords.
- There is no reason why you can’t do both.
Some people argue about a Linux distribution’s default setting, when they could simply change the setting after installation and forget about it.
- To enable a root password:
$ sudo passwd root - To disable a root password:
$ sudo passwd -l root - To start using sudo:
# apt-get install sudo

# adduser username sudo - To stop using sudo:
# gpasswd -d username sudo(optional)
# apt-get remove --purge sudo - To run a “su-like” shell using “sudo”:
$ sudo -s(runs a normal shell)
or
$ sudo -i(runs a login shell)
Personally, I have gotten used to disabling my root password and the using either sudo -i or ssh root@hostname. That’s one less password for me to remember, and one less password that can be probed on the network.
But you don’t have to be like me… you do what feels right to you!
Debian’s “dist-upgrade”
14 years
There seems to be a common misconception about Debian’s package manager “apt”, that the command “dist-upgrade” is used to upgrade to a new release. It is, but it isn’t. I wanted to clarify that here.
Basically, there are 4 things that you might want to do as part of upgrading a system.
apt-get update– updates the list of available packages and versionsapt-get upgrade– upgrade packages that you already haveapt-get dist-upgrade– upgrade packages that you already have, PLUS install any new dependencies that have come up- edit the sources files – change the release that you are tracking
That means that to freshen up your packages to the latest versions on your current release, you should do “apt-get update && apt-get dist-upgrade“. On some systems that track “testing”, which changes often, I do this almost daily.
When you’re ready to “really upgrade” to a new release, you edit your sources files in /etc/apt/sources and change the release names. If the source lists contain proper release names, like “etch”, “lenny”, “squeeze” or “wheezy”; then you change these names to the new release that you want (see http://www.debian.org/releases/). If the source lists contain symbolic names like “stable”, “testing” and “unstable”, you do not need to change anything. When a new release is ready, the Debian people will change the symbols to point to the new release names. For example, right now, stable=squeeze and testing=wheezy.
Note 1 – “unstable” never points to a named release… it’s the pre-release proving ground for packages, used before are ready for inclusion in the testing release.
Note 2 – Don’t let these symbolic names fool you:
- “Stable” means “old, tried, tested, and rock solid”. It’s a very conservative choice.
- “Testing” does not mean “chaotic”. It is roughly the equivalent of Red Hat’s Fedora. It’s new stuff, and each package changes on its own schedule, but they usually play well together.
- “Unstable” is not nearly as unstable as the name implies. It’s like a beta release that may be updated daily.
After your source lists look OK, you do the same thing you’ve always done: “apt-get update && apt-get dist-upgrade“”apt-get update && apt-get dist-upgrade“.
If you’re running Ubuntu, the release names are at http://releases.ubuntu.com/. And they’ve made a nice wrapper script called “do-release-upgrade” that basically edits your source lists and does the dist-upgrade for you (it also does some other nice steps, like letting you review the changes).
So there it is… fear not the “dist-upgrade”. In fact, most of the time, it is what you’ll want to run. It will make sure that you have all of the dependencies that you need.