Random Thoughts
Random Thoughts inside Alan's head
When a platform or a company (or a country, for that matter) becomes more focused on its celebrity leader than on the members or the products or the community, it’s time to leave.
Twitter is now Elon Musk’s private playground, so I no longer want to be a part of it.
I deleted my Twitter account this week. So maybe this personal blog is again the place for me to post my random thoughts.
For the last year or so, I have given up on using an actual email client like Thunderbird, and instead I simply use the web mail interface to my email, a package called “RoundCube”.
But lately, I have noticed that the cursor tends to disappear from the text edit box where I am composing new emails. This drives me crazy! It’s OK when I am cranking out new text, but as soon as I have to back up and edit anything, I find that I am lost.
I poked around the web a little bit, and I found this suggestion from over ten years ago. It has to do with the CSS of the page that is being rendered. Apparently, Mozilla Firefox has had a problem rendering scrolling text boxes for a long time.
I already use a plug-in called “Stylus”, which allows me to inject a little bit of custom CSS on pages that match a certain criteria. So I added a Stylus rule like this that applies to my web mail domain.
#composebody { overflow: hidden; }
I’ll give it a try, and see if the problem goes away.
When I was a kid, the state of the art for home movies was 8mm film. My parents had a movie camera that used a film cartridge that contained a 16mm film strip. They would insert the cartridge one way and record a few minutes of film, and then flip the cartridge over and record another few minutes. To develop the film, the processing company would open the film cartridge and split the long reel of 16mm wide film into two reels of 8mm wide film. They only took 25 reels of film over a span of 12 years. Back in 2012, I found a place that would convert the movies to DVD, and I kept an MP4 version on my computer, and I gave copies to everyone in my family. It was pretty awesome.
By the time my kids came along, the world had moved to videotape, and we were just moving from analog to digital. We went top-of-the-line with a Sony MiniDV (NTSC) recorder. The NTSC DV video files record 720×480 pixels at 30fps… far from the 1080p videos that you’d shoot on your iPhone today, but pretty hot for 2001. Like my parents, we ended up recording 20 MiniDV tapes over a period of 12 years, although our tapes were 60 minutes each instead of about 5.
This is the story of converting those tapes to a modern video format.
My 20 tapes sat on a shelf for several years, and then in 2012 I finally had the tools needed to copy the raw digital DV files to a computer hard disk. I used a tool called “dvgrab” on a laptop that had a FireWire connector. One side effect of dvgrab was that it saved every scene in a separate timestamped file. This turned out to be quite fortunate. When I was done, I had 250GB of raw DV files on an external hard drive. Unfortunately, I did not have enough disk space to do any processing on these files, so this external USB hard disk sat on a shelf for five years.
In 2017 I re-discovered this USB hard disk, and I decided to finish the job. I wanted to encode them in MP4 format, and I wanted them to be separated into “episodes” (such as “2003 beach”, “4th birthday”, “zoo” and so on).
The first step was to divide the 5000+ separate scene files into folders for episodes. I started with a script that looked at the timestamps in the filenames, and it moved them into folders based on that. This got me 90% of the way there. Here’s the script. It used a single variable for the “gap” in time that would mean a break to the next episode.
#!/bin/bash

GAP=$((60*90))

previous_timestamp=0
for x in $(ls -1 ALL/dvgrab-20*.dv | sort) ; do
    oldfolder=$(dirname $x)
    file=$(basename $x)
    # dvgrab-2011.02.12_19-04-58.dv
    year=${file:7:4}
    mon=${file:12:2}
    day=${file:15:2}
    hour=${file:18:2}
    min=${file:21:2}
    sec=${file:24:2}
    timestamp=$(date +%s -d "$year-$mon-$day $hour:$min:$sec")
    if [[ $(( $timestamp - $previous_timestamp )) -gt $GAP ]] ; then
        newfolder=$(date "+%Y-%m-%d_%H-%M-%S" -d "@$timestamp")
        mkdir $newfolder
    fi
    mv -v "$x" "$newfolder/$file"
    previous_timestamp=$timestamp
done
After I had the scenes grouped into episodes, I did an initial encoding of the entire thing. This ran overnight, but it could go unattended. The basic process was to concatenate the DV files and the use “ffmpeg” to encode the episode into an MP4 file. I used the following script to do this in a loop.
I ran this script many times, and it over time I tweaked the ffmpeg options to get a better output. This is the final cut.
#!/bin/bash

TMP="/tmp/encode"
srcdir="/media/alan/sandisk248GB/MINIDV"
destdir="/home/alan/media/videos/minidv"
wildcard="20*"  # directories starting with a date from 2001 onwards

ffopts=""

# FILTERS
ffopts="$ffopts -vf yadif"   # de-interlacing

# VIDEO ENCODING OPTIONS
ffopts="$ffopts -vcodec libx264"
ffopts="$ffopts -preset medium"  # balance encoding speed vs compression ratio
ffopts="$ffopts -profile:v main -level 3.0 "  # compatibility, see https://trac.ffmpeg.org/wiki/Encode/H.264
ffopts="$ffopts -pix_fmt yuv420p"  # pixel format of MiniDV is yuv411, x264 supports yuv420
ffopts="$ffopts -crf 23"  # The constant quality setting. Higher value = less quality, smaller file. Lower = better quality, bigger file. Sane values are [18 - 24]
ffopts="$ffopts -x264-params ref=4"

# AUDIO ENCODING OPTIONS
ffopts="$ffopts -acodec aac"
ffopts="$ffopts -ac 2 -ar 24000 -ab 80k"  # 2 channels, 24k sample rate, 80k bitrate

# GENERIC OPTIONS
ffopts="$ffopts -movflags faststart"  # Run a second pass moving the index (moov atom) to the beginning of the file.

for folder in $(cd $srcdir ; ls -1d $wildcard) ; do
    echo ; echo ; echo ; echo ; date ; echo $folder ; echo
    # do not overwrite existing files
    if [[ ! -f $destdir/$folder.mp4 ]] ; then
        mkdir $TMP 2> /dev/null
        cat $srcdir/$folder/*.dv >> $TMP/$folder.dv
        ffmpeg -i $TMP/$folder.dv $ffopts $destdir/$folder.mp4
        rm -frv $TMP
    else
        ls -l $destdir/$folder.mp4
    fi
done
The next step was the most time-consuming (but fun) part. I wanted to curate all of the “episodes” to make sure that they each contained a single subject in its entirety. I found a few variations:
To do this curation step, I loaded up “VLC” video player with a playlist of all of the episodes, and I simply watched them at 4x speed. I’d skip through predictable bits, and pay very close attention to the beginning and end of each episode. When I found something wonky, like a fade-out in its own separate directory, or a fade-out at the beginning of the next episode, I would find that DV file in the original directories and move it to the proper one.
When I was done, I simply deleted the MP4 files ran the encoding script again.
I noticed that the files would not play on my iPhone, and so I spent some time tweaking the ffmpeg options and re-encoding a few files (I limited it by changing the “wildcard” variable). Once I found the right options, I changed the wildcard back, deleted the MP4 files, and re-ran the encoder over all of the files again.
When it was all over, I ended up with 349 “episode” files in MP4 format, taking up 9.2 GB of disk space (much less than the 250 GB of the original DV files).
About a year ago, we switched from AT&T DSL to Time Warner Cable. I bought my own cable modem, a Motorola Surfboard SB6141 (hardware version 8). Time Warner’s web site said that they support the SB6181, but it turns out they only supported some earlier hardware versions of the SB6181. Basically, the modem worked for IPv4, but I found that it did not support IPv6, even though I know Time Warner’s network supports it. To get the modem to work with IPv6, I would have to wait for a firmware upgrade, which is something that Time Warner would have to make available, and then my modem would automatically install the next time it rebooted.
So I set up a cron job to reboot the modem every week. It would curl into the modem’s web interface and press the “reboot” button on the web form. Then it would wait for the modem to come back up, and it would look at the firmware version number. If the version number had changed, I would get an email. Furthermore, it would run rdisc6 eth0 to see if any IPv6 routes were being advertised, and if they were, I would get an email.
Nine months later, I got the email! They had upgraded my modem, and I had native IPv6 support! So I needed to log into my router (a Zotac ZBox C-series mini-sized computer running Ubuntu) and turn off the Hurricane Electric tunnel and configure it to use the native IPv6. This turned out to be easier said than done. I spent the entire day and part of the next doing just that.
On an IPv4 network, your ISP assigns a single IP address to your router, and you choose an unrouted private subnet to use on your home network (10.x.x.x, 172.16-31.x.x, or 192.168.x.x).
For IPv6, all of your addresses are routable, which means they come from your ISP. But they do assign two subnets to you: one (IA, or Identity Association) is for the router itself, and the other (PD, or Prefix Delegation) is for your home network. Typically, the IA will be a /64 subnet and the PD will be something larger, like a /60 or /56. You can split up that pool of IPs into smaller /64 subnets for each network segment in your home (maybe one for eth1 and another one for wlan0).
We need to set a few system parameters in order for our router to actually route IPv6 traffic.
We have to tell the kernel to forward traffic.
In /etc/sysctl.conf, add the following two lines: net.ipv6.conf.all.forwarding=1 and net.ipv6.conf.default.forwarding=1.
We have to accept router advertisements from our upstream.
Normally, if you’ve turned on forwarding, then the kernel will ignore router advertisements. But they’ve added a special flag for routers like ours. Add net.ipv6.conf.eth0.accept_ra = 2 to /etc/sysctl.conf.
Apply the changes.
These changes will be applied at the next reboot. You can do sysctl -p /etc/sysctl.conf to read those parameters into the kernel immediately.
At first, I experimented with the /etc/network/interfaces file and the built-in ISC DHCP client. I could not figure out how to make that do anything. Documentation is sparse and mainly concerned with traditional IPv4 DHCP use cases.
Then I played with the Wide DHCPv6 Client or dhcp6c. It looked promising, because its configuration file had all of the right options. It allowed you to ask for an IA and a PD, and you could specify how to slice up the PD space into smaller subnets for other interfaces. However, when I ran it, I got an (IA) IP address on my external interface, but I never got a (PD) IP address on my internal interface, and I never saw any internal routes added. I spent many hours trying to get this to work. For the record, here is the config that I used:
# /etc/wide-dhcpv6/dhcp6c.conf
interface eth0 { # external facing interface (WAN)
  send rapid-commit;
  send ia-na 0;  # request bender's eth0 network to talk to the router
  send ia-pd 0;  # request bender's eth1 network to share with the house
};

# non-temporary address allocation
id-assoc na 0 {
};

# prefix delegation
id-assoc pd 0 {
  # internal/LAN interfaces will get addresses like this:
  # (56-bit delegated prefix):(8-bit SLA ID):(64-bit host portion)
  # SLI ID's start with 1, go up to 255 (because SLA-len = 8)
  prefix-interface eth1 { # internal facing interface (LAN)
    sla-len 8;  # bits of "our portion" of the PD subnet
    sla-id  1;  # eth1 gets sub-network number 1 out of 255 (8 bits)
    ifid    1;  # bender's eth1 IP address will end with this integer
  };
};
There is another DHCPv6 client called “dibbler” that I had heard good things about. So I installed it, and armed with my knowledge learned from dhcp6c, I was able to get a configuration that worked… sort of. It would require some assistance.
With the following configuration, dibbler-client will request an IA and a PD on eth0, and it will create a route on eth1 for its slice of the PD.
# /etc/dibbler/client.conf
log-level 7
downlink-prefix-ifaces "eth1"
inactive-mode
iface eth0 {
    ia
    pd
}
script "/etc/dibbler/script.sh"
But after dibbler-client runs, the network is still not really ready to use.
These things can be fixed by a helper script. Fortunately, dibbler allows us to specify a script that will run every time some change takes place. Here is the script that I wrote. It does not take any information from dibbler itself. It simply looks around the system and fills in the missing pieces.
#!/bin/bash
# /etc/dibbler/script.sh

router_iface="eth0"
internal_iface="eth1"

function log () {
    printme="$*"
    echo "$(date '+%F %T') : $printme" >> /var/log/dibbler/script.log
}

log "started with arguments >> $*"

# check for default route
if [[ $(ip -6 route | grep -c default) -gt 0 ]] ; then
    # default route found
    log "default route found >> $(ip -6 route | grep default)"
else
    # no default route - look for route advertisements
    log "default route not found"
    router_ip=$(rdisc6 $router_iface | grep '^ *from' | grep -o '[0-9a-f:]\{4,\}')
    if [[ -n $router_ip ]] ; then
        route_command="ip -r route add ::/0 $router_ip dev $router_iface"
        log "adding route >> $route_command"
        $route_command
        log "return code was $?"
    fi
fi

# check for internal network IP
internal_ip="$(ip -6 addr show dev $internal_iface | grep 'scope global' | grep -o '[0-9a-f:]\{4,\}')"
if [[ -n $internal_ip ]] ; then
    # internal IP is set
    log "internal IP found >> $internal_ip"
else
    # internal IP is not set
    log "internal IP not found"
    prefix="$(ip -6 route | grep $internal_iface | grep -v 'proto kernel' | grep -o '[0-9a-f:]\{4,\}::')"
    if [[ -n $prefix ]] ; then
        ip_command="ip -r addr add ${prefix}1/64 dev $internal_iface"
        log "adding IP >> $ip_command"
        $ip_command
        log "return code was $?"
        # restart radvd
        systemctl restart radvd
    fi
fi
After the script runs, the router will be able to communicate with the internet using IPv6, and the other machines on the internal network will be able to communicate with the router.
NOTE – The version of dibbler (1.0.0~rc1-1) that comes with Ubuntu 15.10 crashed when I ran it. So I had to download a newer one. At first, I downloaded the source code for version 1.0.1 and compiled it. That seemed to work OK. But later, I grabbed the dibbler-client package (1.0.1) for Ubuntu 16.04 and installed it using “dpkg”. I prefer to install complete packages when I can.
When the machines on your network come up, they will look for route advertisements from your router. We need a RA daemon to send these out. The most common one is radvd.
While researching this setup, I saw several references to scripts that would modify the radvd config file, inserting the route prefixes that were assigned by the upstream prefix delegation. To me, this idea seemed like yet more duct tape. Fortunately, radvd does not need to be reconfigured when the prefixes change… it is smart enough to figure out what it needs to do. To make this happen, I used the magic prefix “::/64”, which tells radvd to read the prefix from the interface itself.
# /etc/radvd.conf
interface eth1 # LAN interface
{
    AdvManagedFlag off; # no DHCPv6 server here.
    AdvOtherConfigFlag off; # not even for options.
    AdvSendAdvert on;
    AdvDefaultPreference high;
    AdvLinkMTU 1280;
    prefix ::/64 # pick one non-link-local prefix from the interface
    {
        AdvOnLink on;
        AdvAutonomous on;
    };
};
That might seem like a lot for something that should “just work”. It turns out that the default ISC DHCP client does “just work” for a simple client machine.
But for a router, we need to be a little more explicit.
I hope this record helps others get their native IPv6 configured.
Audrey was looking for a replacement battery for an old watch, and that got me looking through my own wrist watch boneyard. I gave up wearing watches in 2008.
Back in the late 1990’s and early 2000’s, I wore one of these:

The Casio ABX-20 was an analog watch with a digital display that floated above the hands. I thought it was pretty cool at the time (although I am sure everyone else thought it was dorky). I also had a couple of Timex “Expedition” analog/digital watches — they had Indiglo backlights.
I still think the analog/digital dual format is pretty cool.
Sadly, the Casio ABX-20 is beyond repair. But while we were getting a battery for Audrey’s watch, I picked up a few batteries for some of the other boneyard watches, just to take them for a nostalgic spin.
This is either a story of poorly-managed expectations, or of me being an idiot, depending on how generous you’re feeling.
Eight months ago, when I heard that Moogfest was coming to Durham, I jumped on the chance to get tickets. I like electronic music, and I’ve always been fascinated by sound and signals and even signal processing mathematics. At the time, I was taking an online course in Digital Signal Processing for Music Applications. I recruited a wingman; my friend Jeremy is also into making noise using open source software.

The festival would take place over a four-day weekend in May, so I signed up for two vacation days and I cleared the calendar for four days of music and tech geekery. Since I am not much of a night-owl, I wanted to get my fill of the festival in the daytime and then return home at night… one benefit of being local to Durham.
Pretty soon, the emails started coming in… about one a week, usually about some band or another playing in Durham, with one or two being way off base, about some music-related parties on the west coast. So I started filing these emails in a folder called “moogfest”. Buried in the middle of that pile would be one email that was important… although I had purchased a ticket, I’d need to register for workshops that had limited attendance.
Unfortunately, I didn’t do any homework in advance of Moogfest. You know, life happens. After all, I’d have four days to deal with the festival. So Jeremy and I showed up at the American Tobacco campus on Thursday with a clean slate… dumb and dumber.
Thursday started with drizzly rain to set the mood.
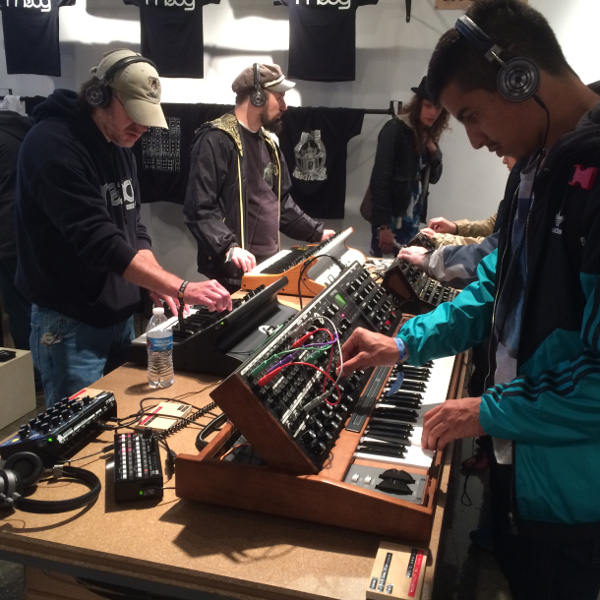
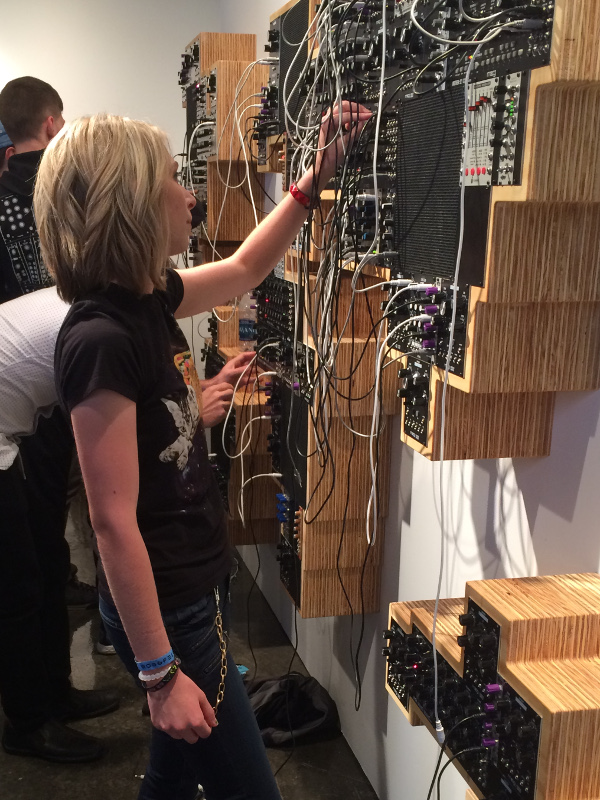
I’m not super familiar with Durham, but I know my way around the American Tobacco campus, so that’s where we started. We got our wristbands, visited the Modular Marketplace (a very small and crowded vendor area where they showed off modular synthesizer blocks) and the Moog Pop-up Factory (one part factory assembly area, and one part Guitar Center store). Thankfully, both of these areas made heavy use of headphones to keep the cacophony down.
From there, we ventured north, outside of my familiarity. The provided map was too small to really make any sense of — mainly because they tried to show the main festival area and the outlying concert area on the same map. So we spent a lot of time wandering, trying to figure out what we were supposed to see. We got lost and stopped for a milkshake and a map-reading. Finally, we found the 21c hotel and museum. There were three classrooms inside the building that housed workshops and talks, but that was not very clearly indicated anywhere. At every turn, it felt like we were in the “wrong place“.
We finally found a talk on “IBM Watson: Cognitive Tech for Developers“. This was one of the workshops that required pre-registration, but there seemed to be room left over from no-shows, so they let us in. This ended up being a marketing pitch for IBM’s research projects — nothing to do with music synthesis or really even with IBM’s core business.
Being unfamiliar with Durham, and since several points on the map seemed to land in a large construction area, we wandered back to the American Tobacco campus for a talk. We arrived just after the talk started, so the doors were closed. So we looked for lunch. There were a few sit-down restaurants, but not much in terms of quick meals (on Friday, I discovered the food trucks).
Finally, we declared Thursday to be a bust, and we headed home.
We’d basically just spent $200 and a vacation day to attend three advertising sessions. I seriously considered just going back to work on Friday.
With hopes of salvaging Friday, I spent three hours that night poring over the schedule to figure out how it’s supposed to be done.
I flew solo on Friday, starting off with some static displays and exploring the venues along West Morgan Street (the northern area). Then I attended a talk on “Techno-Shamanism“, a topic that looked interesting because it was so far out of my experience. The speaker was impressively expressive, but it was hard to tell whether he was sharing deep philosophical secrets or just babbling eloquently… I am still undecided.
I rushed off to the Carolina Theater for a live recording of the podcast “Song Exploder“. However, the theater filled just as I arrived — I mean literally, the people in front of me were seated — and the rest of the line was sent away. Severe bummer.
I spent a lot of time at a static display called the Wifi Whisperer, something that looked pretty dull from the description in the schedule, but that was actually pretty intriguing. It showed how our phones volunteer information about previous wifi spots we have attached to. My question – why would my phone share with the Moogfest network the name of the wifi from the beach house we stayed at last summer? Sure enough, it was there on the board!
Determined to not miss any more events, I rushed back to ATC for a talk on Polyrhythmic Loops, where the speaker demonstrated how modular synth clocks can be used to construct complex rhythms by sending sequences of triggers to sampler playback modules. I kind of wish we could’ve seen some of the wire-connecting madness involved, but instead he did a pretty good job of describing what he was doing and then he played the results. It was interesting, but unnecessarily loud.
The daytime talks were winding down, and my last one was about Kickstarter-funded music projects.
To fill the gap until the music started, I went to “Tech Jobs Under the Big Top“, a job fair that is held periodically in RTP. As if to underscore the craziness of “having a ticket but still needing another registration” that plagued Moogfest, the Big Top folks required two different types of registration that kept me occupied for much longer than the time I actually spent inside their tent. Note: the Big Top event was not part of Moogfest, but they were clearly capitalizing on the location, and they were even listed in the Moogfest schedule.
Up until this point, I had still not heard any MUSIC.
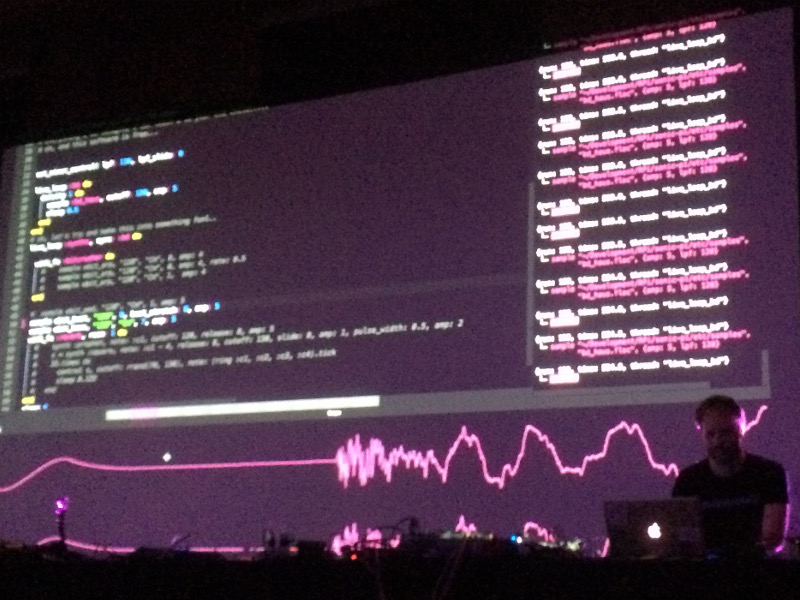
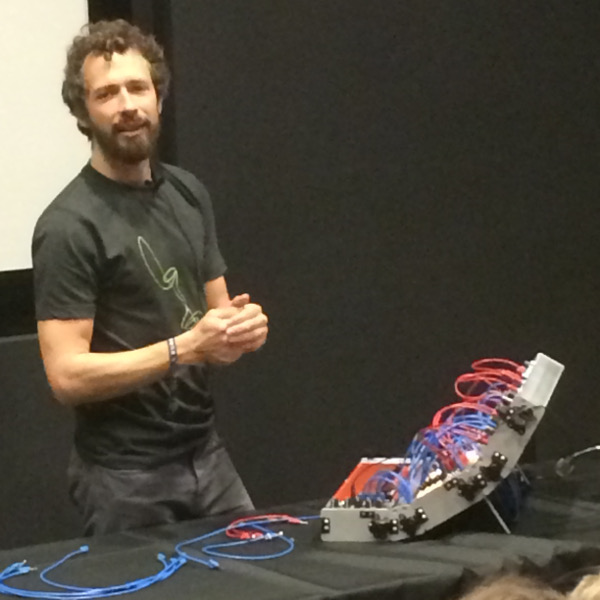
My wingman returned and we popped into our first music act, Sam Aaron played a “Live Coding” set on his Sonic Pi. This performance finally brought Moogfest back into the black, justifying the ticket price and the hassles of the earlier schedule. His set was unbelievable, dropping beats from the command line like a Linux geek.

To wrap up the night, we hiked a half mile to the MotorCo stage to see Grimes, one of the headline attractions of Moogfest. Admittedly, I am not part of the target audience for this show, since I had never actually heard of Grimes, and I am about 20 years older than many of the attendees. But I had been briefly introduced to her sound at one of the static displays, so I was stoked for a good show. However, the performance itself was really more of a military theatrical production than a concert.
Sure, there was a performer somewhere on that tiny stage in the distance, but any potential talent there was hidden behind explosions of LEDs and lasers, backed by a few kilotons of speaker blasts.
When the bombs stopped for a moment, the small amount of interstitial audience engagement reminded me of a middle school pep rally, both in tone and in body language. The words were mostly indiscernible, but the message was clear. Strap in, because this rocket is about to blast off! We left after a few songs.
Feeling that I had overstayed my leave from home, I planned a light docket for Saturday. There were only two talks that I wanted to see, both in the afternoon. I could be persuaded to see some more evening shows, but at that point, I could take them or leave them.
Some folks from Virginia Tech gave a workshop on the “Linux Laptop Orchestra” (titled “Designing Synthesizers with Pd-L2Ork“). From my brief pre-study, it looked like a mathematical tool used to design filters and create synthesizers. Instead, it turned out to be an automation tool similar to PLC ladder logic that could be used to trigger the playback of samples in specific patterns. This seemed like the laptop equivalent to the earlier talk on Polyrhythmic Loops done with synth modules. The talk was more focused on the wide array of toys (raspi, wii remotes) that could be connected to this ecosystem, and less about music. Overall, it looked like a very cool system, but not enough to justify a whole lot of tinkering to get it to run on my laptop (for some reason, my Ubuntu 15.10 and 16.04 systems both rejected the .deb packages because of package dependencies — perhaps this would be a good candidate for a docker container).
The final session of Moogfest (for me, at least) was the workshop behind Sam Aaron’s Friday night performance. Titled “Synthesize Sounds with Live Code in Sonic Pi“, he explained in 90 minutes how to write Ruby code in Sonic Pi, how to sequence samples and synth sounds, occasionally diving deep into computer science topics like the benefits of pseudo-randomness and concurrency in programs. Sam is a smart fellow and a natural teacher, and he has developed a system that is both approachable by school kids and sophisticated enough for post-graduate adults.
I skipped Sunday… I’d had enough.
My wife asked me if I would attend again next year, and I’m undecided (they DID announce 2017 dates today). I am thrilled that Moogfest has decided to give Durham a try. But for me personally, the experience was an impedance mismatch. I think a few adjustments, both on my part and on the part of the organizers, would make the festival lot more attractive. Here is a list of suggestions that could help.
All in all, I had a good time. But I feel like I burned two vacation days (and some family karma/capital) to attend a couple of good workshops and several commercial displays. I think I would have been equally as happy to attend just on Saturday and Sunday, if the music and talks were intermixed throughout the day, and did not require me to stick around until 2am.

On my way home today, I stopped by our neighborhood gas station to fill up the tank. As I was leaving, I noticed a mother duck and four ducklings walking along the curb of the shopping center driveway. They were making a lot of noise. The mother was cluck-cluck-clicking, and the ducklings were cheep-cheep-cheeping.
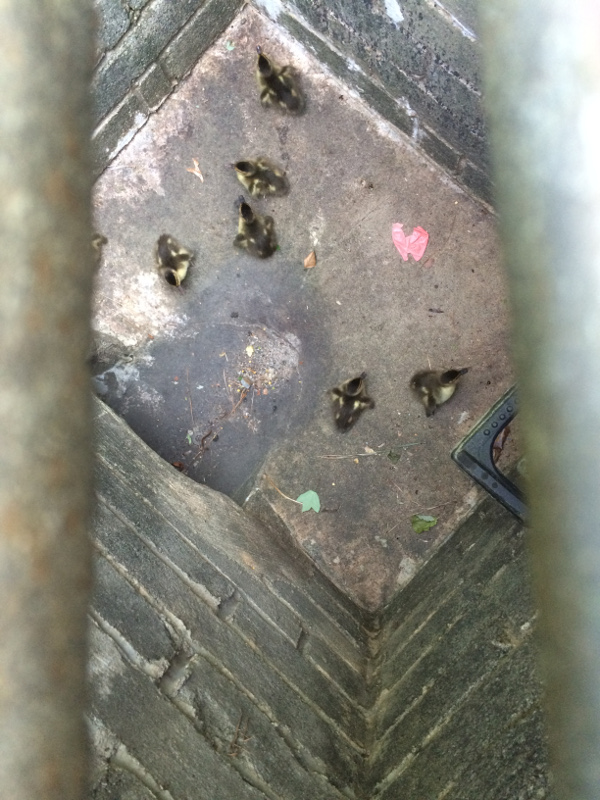
They were standing pretty close to a storm drain. Then a car came whizzing by and one of the ducklings jumped into the storm drain! I went over to the storm drain and found six ducklings at the bottom!
So I rushed home and recruited Audrey and Sydney, who were eager to help. We got some buckets and brooms and some rope and went back to the shopping center. By that time, a couple of other people were gathered around, and they said they had called the Cary Police.
We went ahead and lifted the storm drain grate and one lady climbed in, carrying a bucket. One by one, she lured them close and plucked them up and into the bucket!
 |
 |
 |
The Policeman finally showed up, and we went looking for the mother duck and the other three ducklings. They could’ve been in the woods or near one of the storm drains. We finally spotted them in the pond across the street.

So we carried our bucket to the pond. When we got close, the mother heard the ducklings cheeping and she ran over to us. Sydney laid the bucket down sideways in the grass and we all backed away. The mother duck ran to us, quacking like crazy, and all of the ducklings started cheeping even louder. The mother went to the bucket and then escorted them all down the grass and into the pond. And then they swam away in a tight formation, all nine babies clinging closely behind the mother.
Sydney said that it was the best day ever!
I’ve used Mozilla Thunderbird to read my email for years, and for the most part, I think it’s a pretty nice email client. But lately I’ve developed an itch that really needed scratching.
I tend to use the keyboard to navigate around through applications, and so in Thunderbird, I find myself using TAB to switch between the list of mail folders on the left and the list of messages on the right. The problem is that a few years back, when they added tabbed views, they changed the way that the TAB key works. (I’ll try to be clear about the tabbed views and the TAB key, which unfortunately share the same name). After the addition of tabbed views, the TAB key no longer toggled between just the (1) folders pane and (2) messages pane, but now it toggled between (1) folders pane (2) messages pane (3) tab selector widget. So that means I had to re-train myself to press the TAB key once to go from folders to messages, and twice to go from messages back to folders. But it got worse. If you turn on something like the Quick Filter, the TAB key toggles between (1) folder pane (2) messages pane (3) tab selector widget (4) the Quick Filter.
Basically, the TAB key works like it does in a web browser, which is pretty much useless when there are so many widgets that can accept focus.
Today I discovered that what I was really looking for was the F6 key. It strictly changes focus among the visible window panes. For me, most of the time, that’s (1) folder pane (2) messages pane, but if I turn on message previews (rarely), it expands to (1) folder pane (2) messages pane (3) preview pane.
THIS MAKES SENSE. Within the main window (tab) that I am looking at, the F6 key moves between the major window panes. Awesome.
However, wouldn’t it be cool if I could use the TAB key to do this focus-switching, instead of lifting my fingers off of their pseudo-home position to get way up to F6 (which I can’t find just by feel — I have to look down at it)?
A little bit of searching led me to extensions, such as the very old but still usable “keyconfig”. This is a pretty opaque tool that lets you insert some sort of arcane code into the prefs.js file. Basically, it did not help me do anything, but it did help me understand how keys are mapped. Deeper searches led me to the “DOM Inspector”, which lets you view the document that is being rendered (apparently, views in Thunderbird are pretty much HTML documents, which I suppose was hip at the time). That led me to some of the arcane codes that are mapped to certain keys.
So here’s what I tried. I looked at the arcane code that is mapped to F6, and I looked at the way “keyconfig” inserted some mappings of key names and their arcane codes. And I mimicked it. I just added this line to prefs.js:
user_pref("keyconfig.main.xxx_key75_SwitchPaneFocus(event);", "][][VK_TAB][SwitchPaneFocus(event);][");
And wouldn’t you know… it worked! Now the TAB key does what the F6 key normally does… it switches focus among the main window panes in the active tabbed view. Yay, lazy fingers cheer!
I reformatted a hard disk this weekend. In the process, I needed to copy a bunch of files from one machine to the other. Since both of these machines were smaller embedded devices, neither one of them had very capable CPUs. So I wanted to copy all of the files without compression or encryption.
Normally, I would use “rsync -avz --delete --progress user@other:/remote/path/ /local/path/“, but this does both compression (-z) and encryption (via rsync-over-ssh).
Here’s what I ended up with. It did not disappoint.
Step 1 – On the machine being restored:
box1$ netcat -l -p 2020 | tar --numeric-owner -xvf -
Step 2 – On the machine with the backup:
box2$ tar --numeric-owner -cvf - | netcat -w3 box1 2020
Over the last few months, my daughter Sydney and I have been working on Python programming assignments. I showed her that we can occasionally make a snapshot of our work using git, so if we mess something up, we can always get back to our previous checkpoint.
So we got into the habit of starting off new assignments with “git init .“.
Recently, though, I decided I wanted to host a copy of her assignments on my home file server, so we could check out the assignments on her computer or on mine. In the process, I decided to merge all of the separate assignments into a single git project. As a matter of principle, I wanted to preserve the change histories (diffs and author and dates — but not necessarily the old SHA hashes, which would have been impossible).
I did some searching on the topic, and I found a variety of solutions. One of them used a perl script that sent me off into the weeds of getting CPAN to work. A couple of good posts (here and here) used branches for each assignment, and then merged all of the branches together. The results were OK, but I had the problem where the assignment files started off on their own top-level directory, and then I later moved the files to their own assignment subdirectories. I really wanted to rewrite history so it looked like the files were in their own subdirectories all along.
Then I noticed that my daughter and I had misspelled her name in her original “git config –global”. Oops! This ended up being a blessing in disguise.
This last little snag got me thinking along a different track, though. Instead of using branches and merges to get my projects together, maybe I could use patches. That way, I could edit her name in the commits, and I could also make sure that files were created inside the per-assignment directories!
So I whipped up a little shell script that would take a list of existing projects, iterate through the list, generate a patch file for each one, alter the patch file to use a subdirectory, (fix the mis-spelled name), and then import all of the patches. The options we pass to git format-patch and git am will preserve the author and timestamp for each commit.
#!/bin/bash

remoteProjects="$*"

git init .

for remoteProject in $remoteProjects ; do
   echo "remote project = $remoteProject"
   subProject=$(basename $remoteProject)
   ( cd $remoteProject ; git format-patch --root master --src-prefix=AAAA --dst-prefix=BBBB --stdout ) > $subProject.patch
   # essential file path fixes
   sed -i -e "s|AAAA|a/$subProject/|g" $subProject.patch
   sed -i -e "s|BBBB|b/$subProject/|g" $subProject.patch
   sed -i -e "s|/$subProject/dev/null|/dev/null|g" $subProject.patch
   # other fixes, while we're here
   sed -i -e 's/syndey/sydney/g' $subProject.patch
   # bring the patch into our repo
   git am --committer-date-is-author-date < $subProject.patch
   # clean up
   rm $subProject.patch
done

exit 0
I think this solution works nicely.
The one with the separate branches above was kind of cool because a git tree would show the work we did on each assignment. But in the end, the linear history that we produced by using patches was just as appropriate for our project, since we actually worked on a single homework assignment each week.
I suppose I could combine the two solutions by creating a branch before doing the "git am" (git "accept mail patch") step. That is left as an exercise for the reader.