inside Alan's cluttered head
iPhone
iFamily
0
12 years
Like many families, we have accumulated several iPhones and iPods over the years. My wife and I have new iPhones, and we upgrade every so often, and our kids inherit our older phones. So we’ve encountered that age-old question: how should we manage the Apple IDs for all of these devices?
At first, we followed the simple approach — just leave the older devices associated with our Apple IDs. It makes some things easier. For example, the kids don’t have to re-buy the games that you bought over the last few years.
But when you share Apple IDs for all services, things get weird quickly. I started seeing my daughter’s iMessage conversations on my phone. If anyone in the family changed an account setting on any of the apps that use Apple IDs, we’d get a flood of notifications about the change, and the change would usually propagate to the other devices against our intentions. It felt like a very unstable equilibrium. Just as I’d get everything working right, something would upset the balance.
The thing that finally persuaded me to look at alternative setups was when I tried to set up “Find My Friends” so we could see where the others were. It did not want to let me track my daughter, because it thought she and I were the same user.
So I read a few discussions and articles about the different strategies for setting up Apple IDs for a family. They explained how Apple IDs work, and showed how to manage them. Some highlights:
- Creating an E-mail Account and Apple ID for your Child – Apple IDs are simple
- Moving from a shared iCloud to individual accounts – How to change your iCloud account on the phone
- Multiple Apple IDs and iOS devices in a Family – Simple list of Apple ID services (the basis for my bullet list below)
- How many Apple IDs should your family have? – Detailed list of services that use Apple IDs
OUR FAMILY’S STRATEGY
Everyone in our family now has a unique email address and their own Apple ID. My Apple ID is associated with a credit card, but theirs are just simple accounts. These can easily be set up at http://appleid.apple.com/.
Technically, since the kids are young, I have an Apple ID that they use. The contact info is mine. But the point is that each person has a unique identifier for their devices, and each one is tied to a unique email address.
The key to making this work is this sometimes-overlooked fact about how the Apple ecosystem works: a single device can use different Apple IDs for different purposes.
So in our family:
- iTunes Store – use Daddy’s ID
- iMessage – use your own
- FaceTime – use your own
- iCloud* – use your own
- Game Center – use your own
Note that iCloud is a biggie. It includes Mail, Contacts, Calendars, Reminders, Safari, Find My iPhone, Documents and Data, Photo Stream and Backups.
I’m not really sure how the iCloud Mail and Calendar stuff works, because we don’t use them. I host my own mail and calendar services on a Linux server, and that stuff works great with the iPhones. We have separate email addresses on several domains. And we have some shared calendars and some individual calendars.
Our family’s new setup puts some sanity back in the system. I know that my iMessages will only show up on my phone and Mac. I can call my kids using FaceTime without it getting confused, trying to call myself. I see my contacts, and my kids don’t. But we each get to use the games and other apps that we have bought as a family. And we can each use “Find my Friends” to keep track of where everyone is.
A WORD ABOUT EMAIL ADDRESSES VS APPLE IDS
I’m going to dive just a little deeper here, because I discovered something else in the transition that might help someone else.
Since I run my own mail server, I tend to use very specialized addresses for any kind of service that I sign up for. That way, I can sort all of my bills into a “bills” folder that I don’t have to see until it’s time to pay bills. Or if one vendor starts sending me too much junk, I can remove that one email address/alias and that stuff disappears forever.
Following this strategy, our Apple IDs are actually specially-made alias addresses in the form itunes-(name)@(ourdomain).com. But since we want to use our real email addresses for stuff like FaceTime and iMessage, we need to associate our real email addresses with these new Apple IDs. On that appleid.apple.com site, there’s a little form where you can associate all of your other email addresses to the Apple ID.
However, since we were migrating from a single Apple ID, I had to remove the kids’ preferred email addresses from my Apple ID before it would let me add them to their Apple IDs. This is very easily done on the appleid.apple.com site. However, if you just try to add the email address to the new Apple ID directly using the phone menus, it just sits there with a spinny star saying “verifying”, and it never actually sends the verification email.
So my advice is to manage your Apple IDs using the web site, http://appleid.apple.com/.
iPhone dev notes: things that I got stuck on
0
13 years
Here are some things that I got stuck on this weekend while trying to work on iPhone apps.
Simulator ran my app in 3.5-inch (iPhone 4 size) instead of 4.0-inch (iPhone 5 size).
I wasted a lot of time on this one.
Whenever I ran the app in the simulator, it would launch in the shorter (640-960) 3.5-inch screen, even if I had previously chosen the taller (640×1136) 4.0-inch screen size.
In Xcode, there is a pulldown at the upper left where you can define your “scheme”. It looks like this:

Here’s a cool trick. This is the menu where you can set certain parameters for when you build, run, debug, profile and archive the app. For example, you can set the simulator’s screen size by clicking on the app name on the left of the scheme widget and choosing “Edit Scheme…”. Then select the “Run MyApp.app” action on the left, the “Options” tab, and set the “iPhone simulator display” to the size that you want to use each time you run.
But still, even if I chose the 4-inch display in my scheme’s “run” action, the simulator ignored this setting and opened in a 3.5-inch display.
The problem is that iOS 5.0 does not support the 4-inch display. The taller display debuted with the iPhone 5, which came with iOS 6.0.
So the solution is to just change the target to “iPhone 6.0 simulator”. Then slap your forehead and say “duh!”.
Error: A valid provisioning profile for this executable was not found.
I had been preparing an app for submission into the App Store. Then I went to run it on my local device again, and it kept popping up an error message: “A valid provisioning profile for this executable was not found.”
I went into the project’s “Build Settings”, and I checked all of the values in the “Code Signing” section. I made sure that the “AdHoc” and “Debug” entries were set to iPhone Developer (currently matches ‘iPhone Developer: Alan Porter (ABCDE12345)’ in ‘MyProvProfile’). The “AppStore” entry was set to iPhone Distribution (currently matches ‘iPhone Distribution: Sentosa.US (LMNOP67890) in ‘VWXYZ12345.us.sentosa.Tipster’). These settings are important. They tell Xcode to sign your local development builds using your developer certificate, and to sign your App Store submissions using your team’s distribution certificate.
But once again, the problem was in the “scheme” menu. Under the “Run MyApp.app” action and “Info” tab, my “Build Configuration” was mistakenly set to “AppStore”. This won’t work, because for local builds, you need to sign the code with your own developer certificate. The Distribution certificate should only be used when you’re submitting your app to the App Store.
iPhone app startup: AppDelgates, MainWindow.xib and some code
0
13 years
When beginners learn to write programs in C, they learn that main() is the starting point of their program. But that is only partially correct. There is stuff that happens before main() is called. The first thing to run is the C runtime, which is in a library called crt.o. It allocates space for global and static variables, it copies initial values to initialized variables, and it initializes all static variables to 0. Then it calls your main(). At the end, it takes your return code from main() and passes it back to the operating system.
AppDelegates: your app’s front door
Similarly, iPhone apps have a startup and shutdown sequence that is handled by iOS. At certain points, it will dip into your code to determine what to do. The primary interface that you have to control this is the AppDelegate. The AppDelegate protocol has several methods that can be used to notify your app that something is about to happen (low memory, you’re going into the background, a notification of a time change or location change, etc). It also has some methods where you can specify your preferences (which orientations does your app support, what should the status bar look like). It’s a lot richer than just a simple call to main(), but the concept is the same. The OS is doing stuff, and when it needs you, these methods are the entry points into your app.
If you do not set your AppDelegate up properly, your app may fail to load, or it may simply show a black screen instead of your views.
I recently discovered this while trying to “modernize” an early XIB-based app that has been in the store for a few years. Somewhere in the process, I messed up this startup sequence, and I was greeted with a plain black screen. Here is what I found out about the startup sequence.
You actually do include a main() in your code. Usually, it is very small. This is the main.m from my XIB-based app.
#import <UIKit/UIKit.h>

int main(int argc, char *argv[]) {
    @autoreleasepool {
        return UIApplicationMain(argc, argv, nil, nil);
    }
}
The main thing it does it set up an autoreleasepool which keeps track of memory pointers and is used for garbage collection. Then it calls UIApplicationMain(). The first two arguments are familiar, but the next two are used if you want to override default behavior.
- The third argument is where you can specify the name of your own Application subclass.
- The fourth argument is where you can specify the name of your own class that will implement the AppDelegate protocol. We’ll talk about that below.
At this point, there are two ways your app can start up: through XIB files created in Interface Builder, or in Objective-C code.
XIB-based app startup
When the fourth argument to UIApplicationMain() is nil, the application will look in your plist file for a Main Storyboard or a Main Interface. You’ll see these in XCode under “target” in the “summary” tab. This will be the name of a XIB file.
It loads this XIB file, and looks for a class that will be your AppDelegate and a window that will be your main application window.
There are many tutorials on setting up these XIB files. The one that I used is at http://www.trappers.tk/site/2011/06/16/mainwindow-xib/.
In a nutshell, this is what you do. Note that all of my terminology is probably wrong here, because I don’t use Interface Builder much.
- Create an empty IB document.
- Set the Owner to a UIApplication class.
- Add an “Object” to the canvas, make it of
myAppDelegateclass. - Add a “Window” to the canvas.
- You already have a skeleton AppDelegate class (.h and .m files), edit the .h file to contain the key word “IBOutlet” in the window declaration. Interface Builder uses this to identify code that it can hook to objects in the XIB.
- Connect the AppDelegate object to the File Owner’s “delegate” hookup.
- Connect the Window object to the AppDelegate’s “window” hookup.
- Then edit your project target, in the “summary” tab, go to “Main Interface” and select your XIB file from the pulldown.
I find that using a GUI drawing tool to set up this sort of plumbing is confusing, but the gist of it is that you are creating an association between this class that you have (probably called myAppDelegate), a window, and the app’s AppDelegate protocol.
When the app starts up, it runs your main(), calls UIApplicationMain(), sees the nil in the fourth argument slot and decides that you want to use the XIB method. It looks in the myapp-Info.plist and finds the MainWindow XIB file, loads that XIB, loads that window, finds out which class is your AppDelegate, and then calls application:didFinishLaunchingWithOptions: on that class.
Programmatic app startup
Instead, I choose to implement most of my plumbing in Objective-C code, for the following reasons:
- I find the pictorial representation of these abstract connections to be more confusing than their code equivalents.
- It’s difficult to reproduce something when the steps are “control-drag the whoosit to the whatsit over there”.
- Code is much easier to copy and compare.
- This is a biggie — XIB file formats change with new tool releases, and so sometimes you’re left with no way forward. An example is when I used XCode5 (iOS7 tools) to create a XIB file, but could not use it at all under XCode 4.2 (iOS6 tools).
- I get all starry-eyed when I use a plain text editor.
Here are the three files that you must set up to get this same startup process working using Objective-C.
main.m
#import <UIKit/UIKit.h>
#import "AppDelegate.h"

int main(int argc, char *argv[]) {
    @autoreleasepool {
        return UIApplicationMain(
            argc, argv,                            // command-line args
            nil,                                   // Application class
            NSStringFromClass([AppDelegate class]) // AppDelegate
        );
    }
}
AppDelegate.h
#import <UIKit/UIKit.h>
#import "MyappModel.h"

@interface AppDelegate : UIResponder
<UIApplicationDelegate>
{
    UINavigationController * navController;
    MyappModel * myappModel;
}

@property (nonatomic, retain) UIWindow * window;
@property (nonatomic, retain) MyappModel * myappModel;

@end
AppDelegate.m
#import "AppDelegate.h"
#import "MyScreen1VC.h"
#import "MyScreen2VC.h"
#import "MyappModel.h"

@implementation AppDelegate

// create getters and setters for @properties
@synthesize window = _window;
@synthesize myappModel;

- (BOOL) application:(UIApplication *)application
didFinishLaunchingWithOptions:(NSDictionary *)launchOptions
{

    // My application model
    myappModel = [[MyappModel alloc] init];

    // Create a root window. Application delegates are expected to have one.
    self.window = [[UIWindow alloc] initWithFrame:[[UIScreen mainScreen] bounds]];
    self.window.backgroundColor = [UIColor lightGrayColor];

    // Create a navigation controller, attach it to the window as the "root".
    navController = [[UINavigationController alloc] init];
    [self.window setRootViewController: navController];

    // create a view controller for the first view
    MyScreen1VC * vc = [[MyScreen1VC alloc] init];
    // Push the first view controller on the stack.
    [navController pushViewController:vc animated:NO];

    // Add the navigation controller’s view to the window
    [self.window addSubview:navController.view];

    // Display the main window.
    [self.window makeKeyAndVisible];
}

@end
So how does this one work?
When the app starts up, it runs your main(), calls UIApplicationMain(), sees the name of your AppDelegate class in the fourth argument slot and sees that you will be handing app delegation yourself. It calls application:didFinishLaunchingWithOptions:, which you have implemented in your AppDelegate. Now it is up to you to allocate a window, create a controller and assign it as the root controller, and then make the window “key and visible”.
Conclusion
Whether you prefer to use Interface Builder or Objective-C code to create your views, it is important to understand the sequence of events that takes place when your app starts up. If you miss one of these steps, it could cause your app to fail to launch. I recently encountered the dreaded “black screen of nothing”, and it caused me to scratch a little deeper to see what was going on.
I hope this tutorial clarifies some of this delicate dance in your mind.
iPhone photo gallery
0
13 years
I like to keep albums of recent photos on my iPhone, so I can show them to friends and family. Not only do I keep the photos that I took on the iPhone itself, but I also keep the photos I took using other cameras. Here, I will describe the method and tools I use to keep several months worth of photos conveniently in my pocket.
At first, this seems like a very simple problem, but there are a few subtle quirks, and I have worked around them using a script and some open source tools. In the end, I will have:
- photos from multiple cameras
- selected folders, but not necessarily everything
- photos are optimized for phone size, not wasting space
- photos are oriented correctly, not sideways or upside-down
- photos from multiple cameras appear in chronological order
- process is mostly automated
The end result looks like this:
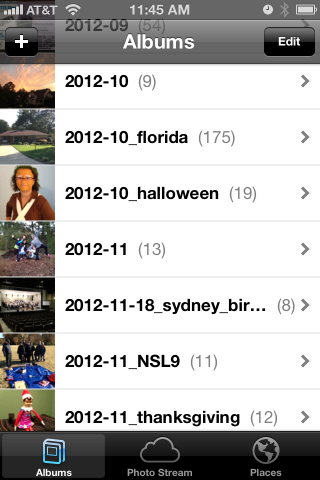
iPhone “Photos” app showing albums
How my photos are organized
When I worked at Ericsson’s research lab in Singapore, they had done a study on how people store their digital photos and how they find a particular one in the bunch. They found that people tend to associate events with nearby dates, so they might say “Let’s see… Bill broke his leg skiing right before Janet’s wedding, so that must have been Winter of 2009”.
I definitely fall into that category, and so my pictures are stored in folders by date. It looks like this:
pictures     - top level
+ bulk       - raw unprocessed stuff, too big to browse
+ import     - a working area
+ y          - photo albums arranged by year/month/event
  + 2011
  + 2012
    + 2012-09
    + 2012-10
    + 2012-10_florida
    + 2012-10_halloween
    + 2012-11
    + 2012-11-12_ducks
    + 2012-11-18_sydney_birthday
    + 2012-11_NSL9
    + 2012-11_thanksgiving
  + 2013
I also want to note that some of my friends take a completely different approach… they pick a single tool and simply dump the photos into the tool. They don’t care to organize them at all and just rely on the tool. That’s certainly OK… I would guess these are the same people who don’t balance their checkbooks. If that describes you, then I suggest you stop reading here, because none of this will apply to you.
I have used the date-folder method since I got my first digital camera in 1998. It has migrated from Windows to Linux to MacOS. My data far outlasts any one tool.
So one of my assumptions is that my “pictures” directory is sacred. I do not want any tool to write anything to that directory (I am looking at you, iPhoto & iTunes).
Selecting folders (albums) to copy to the iPhone
So I set up two more directories.
- $HOME/iphone/pictures – where I say what photos to copy
- $HOME/itunes/pictures – a directory that iTunes can sync with
In the first one, $HOME/iphone/pictures, I set up a bunch of symlinks to point to the directories that I would like to copy. I do this so I can easily select some folders but leave out others.
2011-11_happy_crabby       -> ../../pictures/y/2011/2011-11_happy_crabby
2012-09                    -> ../../pictures/y/2012/2012-09
2012-10                    -> ../../pictures/y/2012/2012-10
2012-10_florida            -> ../../pictures/y/2012/2012-10_florida
2012-10_halloween          -> ../../pictures/y/2012/2012-10_halloween
2012-11                    -> ../../pictures/y/2012/2012-11
*** note - no ducks here ***
2012-11-18_sydney_birthday -> ../../pictures/y/2012/2012-11-18_sydney_birthday
2012-11_NSL9               -> ../../pictures/y/2012/2012-11_NSL9
2012-11_thanksgiving       -> ../../pictures/y/2012/2012-11_thanksgiving
For example, let’s say I took 1000 boring photos of ducks in November. I could easily skip 2012-11-12_ducks by not creating a symlink. I can also specifically include a very old folder by leaving the symlink in this directory. I have done that here with my Happy Crabby pictures from 2011.
Copying and processing photos
I have written a script that will go through each of these directories and perform a few clean-up tasks as it copies the photos to the itunes staging area.
- It copies the photos to a temporary working directory.
We should never alter the original photos… always work with a copy.
- It rotates the image based on the EXIF orientation tag.
I’m gonna start slamming on Apple, so fanbois should cover their ears. I have found that Apple handles image rotation differently than everyone else, and it took a while to get a handle on it. I can take pictures on my iPhone and email them to someone and they’ll show up as upside-down or sideways. The images look OK on the iPhone or on a Mac, but everyone else (Linux, Windows) sees them rotated. The same thing happens if I upload them to “gallery”, an online photo gallery. Sometimes, they would show the correct dimensions but the image would still be rotated. That is, a portrait would be taller than wide, but the person’s face would be sideways and extremely elongated. The solution I found is to process them using “renrot” (see my blog post about renrot for detail).
- It renames the file using the date & time in the EXIF data.
When we get back from vacations, I find that we have photos from several different cameras, and it just seemed weird for my wife’s Nikon images (named DSCNxxxx.JPG) to appear before my iPhone images (named IMG_xxxx.JPG) and then my Panasonic images (named Pxxxxxxx.JPG) last. If I rename all of the images to (YYYY)(MM)(DD)(hh)(mm)(ss).JPG, they will appear in chronological order, regardless of which camera was used.
- It resizes the image to be no bigger than 1280 pixels high or wide.
There is no need to me to waste space on my iPhone by storing each image in their 12MP glory (actually, I typically shoot 3MP for normal vacation photos). So I resize the images using imagemagick.
- It moves the files into the iTunes directory in numerical (chronological order).
At one point, I had a problem with iTunes arranging my photos in the order that they happened to appear in the directory instead of sorted by name or anything else. If you do a “find” command on Linux or a Mac, you’ll see the files in the order that they appear in the directory file. That’s OK under the hood, because “ls” and Mac Finder and Nautilus are all smart enough to show the files in sorted order. But no, not iTunes. So I move the files from the temporary work area to the iTunes sync directory one at a time, in chronological order.
Using the script
When it’s time to sync my iPhone (less and less frequent these days, and primarily driven by when I want to update my photo albums), I simply look over the symlinks, run the script and then sync.
Running the script takes a few minutes, and syncing all of the pictures instead of just the ones that have changed takes a few minutes as well. But I am very happy with the consistent results.
I’m sure that some folks will claim that I am “doing it wrong”, that I should not have to do so many work-arounds. But the bottom line is that I encountered real-world problems from the interaction between various cameras and the quirks of iTunes, and this script smooths out all of the wrinkles. It is really no trouble to run the pre-syncing script before syncing, and it does solve the problems of images being mis-rotated, taking too much space on my phone, and appearing out of order. It also makes it trivial to choose which album folders are copied to the iPhone and which ones are not.
The script itself appears below.
The pre-syncing script
#!/bin/bash
shopt -s nocaseglob
shopt -s nullglob

src="$HOME/iphone"
dest="$HOME/itunes"
if [ ! -d "$dest" ] ; then mkdir -p "$dest" ; fi

echo "=== PHOTOS ==="

wildcard="*.[Jj][Pp][Gg] *.[Jj][Pp][Ee][Gg] *.[Pp][Nn][Gg]"
stage="/tmp/itunes.$$.stage"
mkdir -p $stage
rm -rf "$dest/pictures"

# go through each directory, and do some processing
( ls -1 $src/pictures ) | while read d ; do

   # skip non-directories
   [ ! -d "$src/pictures/$d/." ] && continue

   echo "processing photos in [$d]"
   indent="   $d >> "

   # copy source photos to staging area
   ( cd $src/pictures/$d ; cp $wildcard $stage/ )

   # rotate
   echo " - rotating photos"
   ( cd $stage ; renrot $wildcard ) 2>/dev/null | sed -e "s/^/$indent/g"
   rm $stage/*_orig 2>/dev/null

   # resize
   echo " - resize photos"
   # iphone 4S screen is 640x960 (2xVGA)
   ( cd $stage ; mogrify -verbose -geometry '1280x1280>' $wildcard ) 2>/dev/null | sed -e "s/^/$indent/g"

   # move to itunes area, reorder as you go
   echo " - re-ordering files"
   mkdir -p "$dest/pictures/$d"
   ls -1 $stage | while read f ; do
      # Mac bash v3 does not have ${f^^*}, so we have to use 'tr'
      upper=$(echo $f | tr /a-z/ /A-Z/)  # was bash internal ${f^^*}
      mv -v "$stage/$f" "$dest/pictures/$(basename $d)/$upper" | sed -e "s/^/$indent/g"
   done

   echo ""
done

# clean up some special cases
xargsR='-r'
[ "$OSTYPE" == "darwin12" ] && xargsR=''  # Mac xargs does not have -r
find $dest/pictures/ -type d -print0 | xargs -0 rmdir 2> /dev/null # empty directories
find $dest/pictures/ -name \*_orig -print0 | xargs -0 $xargsR rm -v
find $dest/pictures/ -name MEDI\*.JPG -print0 | xargs -0 $xargsR rm -v
echo ""
Host your own calendar server – iPhone client
0
14 years
I am a bit of a do-it-yourselfer. When looking for a new service like an online photo gallery, my first instinct is to find an open source package where I can host photos on my own web server. I know that many will skip this step and go directly to Picasa.
These days, it seems to come down to those choices: do it yourself, or give another slice of your life to Google. In this post, we’re going to do it ourselves.
Ever since the days of the Palm Pilot, I have made heavy use of the calendar application. When I switched to the iphone in 2009, I decided that I wanted to use a online calendar that I could access from my laptop and from the iphone. I looked at the open source world, and I found a package called DavICal, by Andrew McMillan in New Zealand. It uses the CalDAV protocol to exchange event information with clients like the iphone’s calendar, iCal on the Mac, Mozilla Thunderbird with the Lightning plug-in, Mozilla Sunbird, and (I think) Outlook.
Setting up the server is pretty well documented on the DavICal web site. On a Debian-based server, it’s a simple “apt-get” operation (after you add their site to your sources list).
Below, I will talk about how my calendars are organized, and then I’ll walk through the steps of setting up a new user and calendars on the server, and then setting up the iphone to access these new calendars.
How I organize my calendars
I organized my calendars in two groups, owned by users “alan” and “shared”. The “alan” user owns a set of calendars that I use, but that my family does not care about. The “shared” user is stuff that we all need to see. This might seem a little weird, but it makes things work out well on the iphone. Below is a picture of the iphone’s “calendars” screen, which shows this grouping. Notice the orange calendar called “meetings”. I have meetings at work all day, and my wife really doesn’t need to see them on her ipod, and she does not need to hear the reminders throughout the day. So the meetings calendar is owned by the “alan” user. On the other hand, we all need to know about family events (yellow), “his” stuff (blue) and “her” stuff (red). That stuff is owned by the “shared” user.
Below, when we set up the iphone calendar accounts, I will have two accounts (“alan” and “shared”), and my wife will only have one (“shared”). I am sure there are other ways to get the permissions to work out, but this is dead-simple, and it shows the division in the screen shot below.

iphone calendar screen
In case you wondered, “calvin” is my server. And “FWIW” stands for “for what it’s worth”… stuff that I want to know about, but that I am not planning on attending. I want to know when Mardi Gras and Burning Man and DefCon are taking place, but I am not going to any of them.
On the server
We’ll start with the DavICal web interface, which is functional, but not very polished. You need a user account, and that user can own several calendars (called “collections”).
To create a user on the DavICal web interface, you need to log in as an administrator and use the menu to “create a principle” of type “person”. See? Precise, carefully worded, but not so user-friendly.
The new user can now add calendars by logging into the same web interface and selecting “User Functions” and “List My Details”. That screen shows a bunch of junk you don’t care about at the top. But at the bottom, there is a list of “collections”. That’s the CalDAV term for a calendar. Use the “Create Collection” button to make one or more calendars. Make sure to give them a “display name”. That’s the name that will show up in the iphone’s calendar list.
On the iphone
Once you have the calendars on the web system, the iphone part is easy. Go to “Settings”, “Mail, contacts, calendar”, and “add account” of type “other”. Select “CalDAV”. Enter four things:
Server=(the nostname of your CalDAV server)
Username=(your new user's name)
Password=(your password)
Description=(some name)
When you hit “next”, it may pop up a box complaining about SSL certificates. In my case, I don’t have proper SSL certificates, so we’re going to just say “continue”. Setting up SSL on the server is a future blog post. So we’ll say “continue”. At this point, you wait… and wait… for the iphone to guess all of the rest of the settings it can think of.
It will finally finish, and you’ll have to again tell it “don’t use SSL”. But surprisingly, it should have figured out the rest of the settings.
SSL=off
port=80
URL=http://USER@SERVER/caldav.php/USER
At that point, when you open the iphone’s calendar application, your server should show up in the calendar list, with all of the individual calendar names below it.
iPhone VPN
2
17 years
One of the coolest features of the iPhone is the way it uses the best data network that it can find. If you’re at home or at work, or even at a coffee shop, it will use the local wifi network. But if you’re out of range of any suitable wifi networks, it will use AT&T’s “3G” (UMTS) network. And if it can’t find a UMTS network, it’ll fall back to EDGE. Phone companies call this hybrid approach “ABC”, or “always best connection”.
Now that I have an internet device in my pocket, I find myself using public (or otherwise open) wifi connections quite a bit. And this carries with it some unintended consequences. That is… everything I type and everything I read is transmitted in the clear, unencrypted.
I try to make a habit of encrypting my data traffic whenever possible. My mail server is set up to only allow SSL connections. So no matter where I check my mail from, I am forced to use an encrypted connection. Similarly, banks and commerce web sites usually force you to switch to HTTPS before you start entering information. But there are a lot of applications on the iPhone that do not use encryption at all.
You might ask yourself why bother to encrypt your Twitter connection, since what you type is going to be blasted out to the world anyway. But the point is…
If you encrypt everything, then nothing is left to chance.
So I decided to explore a VPN option on the iPhone. It supports three flavors of VPN: L2TP, PPTP and IPSec. I was disappointed (but not surprised) that “openvpn” was not an option, since I already use this excellent open source SSL-based VPN package.
So I decided to give PPTP a try.
Setting up the PPTP server
On my Ubuntu 8.04 LTS server, I installed a PPTP server called, appropriately enough, “pptpd“. Configuration was very easy. Most of the setup was done for me after I did the standard apt-get install pptpd. I simply needed to pick a private subnet that would be used for my VPN clients, and an IP address in that subnet to use for the server. I chose the 172.16.4.0/16 subnet and 172.16.4.1 for the server (these addresses are part of a private network address space, defined by RFC 1918, just like 192.168.x.x and 10.x.x.x addresses).
My /etc/pptp.conf configuration file for the pptp daemon looks like this:
option /etc/ppp/pptpd-options
logwtmp
localip 172.16.4.1
remoteip 172.16.4.2-250
I also needed to tell the daemon to give out some DNS addresses when a client connects, so in the /etc/ppp/pptpd-options file, I added the two “ms-dns” lines below:
name pptpd
refuse-pap
refuse-chap
refuse-mschap
require-mschap-v2
require-mppe-128
ms-dns 208.67.222.222  # resolver1.opendns.com
ms-dns 208.67.220.220  # resolver2.opendns.com
proxyarp
nodefaultroute
lock
nobsdcomp
Finally, I needed to add an entry into the /etc/ppp/chap-secrets file that would contain my password. Mine looks like this:
alan pptpd MyHardToGuessPassword *
At this point, the PPTP server was completely configured, so I restarted it with service pptpd restart.
Setting up the iPhone
On the iPhone, I needed to set up a VPN client. This is very easy. On the settings screen, go to general / network / VPN and “Add VPN Configuration…”. Then just fill in the blanks.
- choose “PPTP”
- enter a description
- your server’s IP address
- the username (from above)
- RSA SecurID=OFF
- the password (from above)
- encryption level = Auto
- “Send All Traffic” = ON
- Proxy = OFF
Click on “Save” and you will see a switch in the network tab and also in the main settings tab to turn the VPN on and off.
For now, I am leaving it off unless I am on a public network. I am not sure, but I think that keeping the VPN alive might use a lot of battery. So I do not use it unless I need it.
Networking
For me to get this VPN on the internet, I had to do two more things: punch a hole in my firewall for the PPTP traffic, and forward traffic from my VPN out to the rest of the world.
For my server, both of these tasks were handed by the same tool: shorewall.
I added a “masquerade” rule to /etc/shorewall/masq to NAT all of the traffic from 172.16.4.x out through my main network interface.
eth0 172.16.4.0/24 # OpenVPN and PPTP
And then I added two rules to /etc/shorewall/rules to allow the PPTP traffic in.
ACCEPT  net  fw   tcp  1723  # PPTP
ACCEPT  net  fw   gre        # PPTP
When shorewall starts, it will generate the iptables rules that are used by the kernel to filter packets. If you’re using hand-written iptables rules, then you will need some rules that look something like this:
# accept "gre" protocol traffic (PPTP tunnel traffic)
iptables -A INPUT -p gre -j ACCEPT
iptables -A OUTPUT -p gre -j ACCEPT
# accept PPTP control traffic to TCP port 1723
# (my server IP is 11.22.33.44)
iptables -A INPUT -p tcp --sport 1723 -s 11.22.33.44 -j ACCEPT
iptables -A OUTPUT -p tcp --dport 1723 -d 11.22.33.44 -j ACCEPT
# masquerade/NAT internet traffic out of interface eth0
iptables -t nat -A POSTROUTING -o eth0 -j MASQUERADE
# turn on packet forwarding
echo "1" > /proc/sys/net/ipv4/ip_forward
Conclusion
Now, when I am in a coffee shop, I can turn on the VPN easily by flipping the switch in the iPhone’s main settings screen. It will make a TCP connection to my server, negotiate a few things, and then send all further network traffic through an encrypted tunnel directly to my server, which relays it out to the internet.
You can test this by going to a web site like http://www.whatismyip.com/. If the VPN is working, it will show your server’s IP address. If not, it’ll show the coffee shop’s IP address.
Once I am using the VPN, anyone in the coffee shop who happens to be sniffing traffic on the wireless network will only see a single connection from my iPhone to my server, but the contents of this connection will be scrambled.
Custom ring tones for the iPhone
1
17 years
I spent five years working for Ericsson, devoting all of my professional energy towards making cellular phones better. I developed device drivers, application software, “middleware”, protocol stacks, and device prototypes. Not a day went by where I did not think about cellular phones in some way. It was not just a job, but a total gadget lifestyle.
Even in areas where I was not actively assigned to work, I still found ways to influence our products. Two particular examples come to mind.
In mid-2000, I was invited by our vice president (one of the two top managers in our NC office) to attend an all-day brainstorming session to discuss phones for kids and pre-teens: what it would mean for the kids, for the phone companies, for the parents, and for the content providers. I was a bit shocked when I entered the room — the attendee list was much smaller than I had expected, and I turned out to be the only software developer there. But the session went well, and I shared my (year 2000-era) thoughts on how Ericsson could never write even a small fraction of the applications that our customers would want, and so we would need to include some sort of API or virtual machine. At the time, Java looked promising. Fast forward to today, and see the success of Apple’s app store.
The second story, if you’ll indulge me (it is my blog, after all), is when I made friends with the King of Rings in Sweden. He was responsible for all ring tones that we delivered world-wide. I knew that he was also a Palm PDA user, so I showed him a Palm app that contained some really cool alert tones, and we discussed what made them really good alarm sounds: they did not blend in as background noise, they did not sound like voices or singing, they contained some pure tones of different pitches which would cut through the noise of everyday life. In short, they were alerts, not just sounds. That guy was very cool, and he had a very fun job.
It should be no surprise after hearing my Palm stories, that today I carry an iPhone. It’s everything the Palm aspired to be ten years ago, and a lot more than the Palm never imagined. It should also not be a surprise that I would find it important to install some good non-music ring tones for my iPhone. I was pleased to find that it is pretty easy to put custom ring tones on this device without writing a check to Apple or to AT&T. I dig free, and I really dig open.
On iTunes (we’ll forget about open for a second), I subscribed to a podcast that publishes ring tones. The one that I picked was the MacMost iPhone Ring Tones podcast. Every so often, it dumps a pile of ring tones (m4r files) onto your iPhone.
Some of them were cool, some were trash, and others needed a little bit of work. For example, one of them was a woman’s voice that said “ring ring, ring ring, your iPhone is ringing”. I liked the first half, but I thought the last part was tacky. So I decided to edit that one.
On my Linux machine, I downloaded “X Convert File Audio” (xcfa) and “audacity“. I copied the ring tone from iTunes to my desktop. I changed the file extension from “m4r” to “m4a”, since they really are the same thing, but Apple uses the “r” to distinguish ring tones from regular music files. Then I ran xcfa to convert the file to a common “wav” format. The GUI is a little crude (and some of the text is in French), but it works well enough for a quick conversion. Audacity understands wav files, and so I was able to edit the “your iPhone is ringing” out of my sample, and I cut and pasted until I had a 30-second clip (which worked better than a shorter clip for some reason). Audacity has all of the features you’d want, so you could add echo or reverb or whatever you like. I saved my sound as a wav file, using a new name (and also filling in that new name in the “properties” dialog box that popped up). Then I ran xcfa again to convert the file back to “m4a” format, and renamed it back to “m4r”. Finally, I imported the file back into iTunes.
So that was pretty simple: (1) export from iTunes (2) m4r to m4a (3) m4a to wav (4) edit (5) wav to m4a (6) m4a to m4r (7) import into iTunes.
If you wanted to start with a sound or a song instead of an existing ring tone, you would simply convert it to “wav” format and then continue at step (4).
If you’ll excuse me, my iPhone just farted.
Cell phone voice mail “hack” (customization)
3
17 years
This weekend, I was playing with ring tones, and so I called my iPhone several times to test them out. I started wondering how long it took before my unanswered calls were redirected to voice mail. So I timed it.
By default, it appears that AT&T sets that delay to 25 seconds.
When I worked at Ericsson (1998-2003), I collected a bag of tricks that I used to customize certain features of my phone and my Cingular account. It turns out that some of these tricks still work today. One of those tricks was to set that voice mail delay to a longer value by using the GSM “star” codes.
The wise folks that created the GSM cellular standard understood that some people might have an older phone, but that they might want to use newer network features.
For example, remember the “bag phone” that people used in the early 1990’s? Or the Motorola “brick”? Those had simple calculator-style displays. The did not have a “voice mail” menu… all they could display was numbers! However, the guy at the phone store could program a brick phone to forward unanswered calls to voice mail after a certain delay. Or he could turn on call forwarding. In fact, he is actually telling the BASE STATION to forward unanswered calls, since that’s the piece of equipment that handles that job. After all, the phone itself might be turned off, or have a dead battery, or it might be in Africa somewhere.
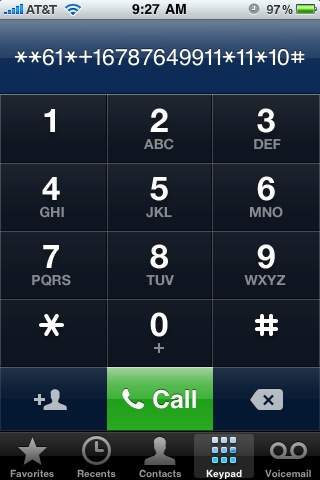
It turns out that most features of the GSM network can be accessed using a series of digits dialed into the keypad. The sequence for call forward on no answer is **61*(target number)*11*(seconds)#.
If you typed that sequence into the old Motorola “brick”, a message would be sent to the base station to say “forward my phone calls to the following number if I do not answer within a certain number of seconds”. That same star code works on a modern phone as well.
This is also how “smart” phones work — the user interface runs on a PDA-like device, and star codes are sent over a serial line to the “GSM modem module”, a completely separate phone-on-a-chip that does nothing but handle the phone calls.
Here’s what it looked like when I customized my voice mail delay from my iPhone. First, I dialed the star code to see what my current voice mail setting was. That code is *#61#.
I wrote down the voice mail number — this is the number for AT&T’s voice mail system. Then I dialed **61*+1xxxyyyzzzz*11*10# to see if it would change my “call forward on no answer” delay to 10 seconds.
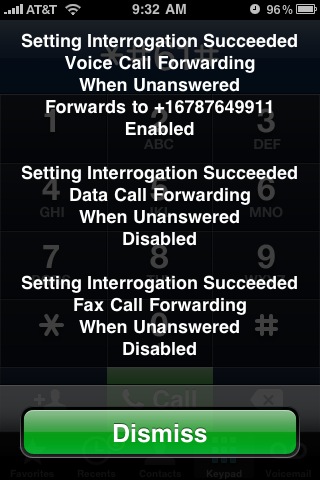
And I got this confirmation screen.
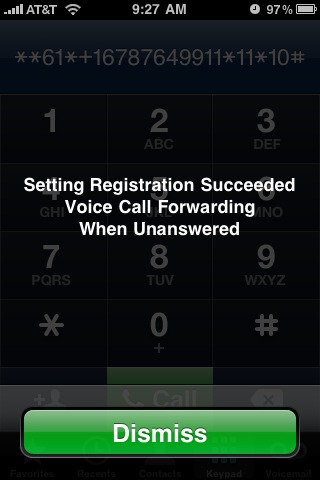
Then I called my iPhone. Sure enough, after 10 seconds, my call was routed to voice mail.
Of course, 10 seconds is too short — I used that number as a test. So I repeated the process to set the delay to a more reasonable 30 seconds.
A couple of important points:
- This is not hacking. This is a documented feature of GSM cellular networks, and it is exactly what happens behind the scenes when you enter a phone number in the “voice mail” menu of a cellular phone. The only difference is that the menu uses a hard-coded delay value, whereas you can set your own delay if you enter the command manually.
- This process should work on any GSM phone, not just on the iPhone.