Random Thoughts inside Alan's head
free software
Linux, open source software, tips and tricks.
Native IPv6 on TWC at home
0
9 years
About a year ago, we switched from AT&T DSL to Time Warner Cable. I bought my own cable modem, a Motorola Surfboard SB6141 (hardware version 8). Time Warner’s web site said that they support the SB6181, but it turns out they only supported some earlier hardware versions of the SB6181. Basically, the modem worked for IPv4, but I found that it did not support IPv6, even though I know Time Warner’s network supports it. To get the modem to work with IPv6, I would have to wait for a firmware upgrade, which is something that Time Warner would have to make available, and then my modem would automatically install the next time it rebooted.
So I set up a cron job to reboot the modem every week. It would curl into the modem’s web interface and press the “reboot” button on the web form. Then it would wait for the modem to come back up, and it would look at the firmware version number. If the version number had changed, I would get an email. Furthermore, it would run rdisc6 eth0 to see if any IPv6 routes were being advertised, and if they were, I would get an email.
Nine months later, I got the email! They had upgraded my modem, and I had native IPv6 support! So I needed to log into my router (a Zotac ZBox C-series mini-sized computer running Ubuntu) and turn off the Hurricane Electric tunnel and configure it to use the native IPv6. This turned out to be easier said than done. I spent the entire day and part of the next doing just that.
What needed to be done
On an IPv4 network, your ISP assigns a single IP address to your router, and you choose an unrouted private subnet to use on your home network (10.x.x.x, 172.16-31.x.x, or 192.168.x.x).
For IPv6, all of your addresses are routable, which means they come from your ISP. But they do assign two subnets to you: one (IA, or Identity Association) is for the router itself, and the other (PD, or Prefix Delegation) is for your home network. Typically, the IA will be a /64 subnet and the PD will be something larger, like a /60 or /56. You can split up that pool of IPs into smaller /64 subnets for each network segment in your home (maybe one for eth1 and another one for wlan0).
First things first
We need to set a few system parameters in order for our router to actually route IPv6 traffic.
-
We have to tell the kernel to forward traffic.
In /etc/sysctl.conf, add the following two lines:
net.ipv6.conf.all.forwarding=1andnet.ipv6.conf.default.forwarding=1. -
We have to accept router advertisements from our upstream.
Normally, if you’ve turned on forwarding, then the kernel will ignore router advertisements. But they’ve added a special flag for routers like ours. Add
net.ipv6.conf.eth0.accept_ra = 2to /etc/sysctl.conf. -
Apply the changes.
These changes will be applied at the next reboot. You can do
sysctl -p /etc/sysctl.confto read those parameters into the kernel immediately.
Stuff I tried that didn’t work
At first, I experimented with the /etc/network/interfaces file and the built-in ISC DHCP client. I could not figure out how to make that do anything. Documentation is sparse and mainly concerned with traditional IPv4 DHCP use cases.
Then I played with the Wide DHCPv6 Client or dhcp6c. It looked promising, because its configuration file had all of the right options. It allowed you to ask for an IA and a PD, and you could specify how to slice up the PD space into smaller subnets for other interfaces. However, when I ran it, I got an (IA) IP address on my external interface, but I never got a (PD) IP address on my internal interface, and I never saw any internal routes added. I spent many hours trying to get this to work. For the record, here is the config that I used:
# /etc/wide-dhcpv6/dhcp6c.conf
interface eth0 { # external facing interface (WAN)
  send rapid-commit;
  send ia-na 0;  # request bender's eth0 network to talk to the router
  send ia-pd 0;  # request bender's eth1 network to share with the house
};

# non-temporary address allocation
id-assoc na 0 {
};

# prefix delegation
id-assoc pd 0 {
  # internal/LAN interfaces will get addresses like this:
  # (56-bit delegated prefix):(8-bit SLA ID):(64-bit host portion)
  # SLI ID's start with 1, go up to 255 (because SLA-len = 8)
  prefix-interface eth1 { # internal facing interface (LAN)
    sla-len 8;  # bits of "our portion" of the PD subnet
    sla-id  1;  # eth1 gets sub-network number 1 out of 255 (8 bits)
    ifid    1;  # bender's eth1 IP address will end with this integer
  };
};
What worked – dibbler and some duct tape
There is another DHCPv6 client called “dibbler” that I had heard good things about. So I installed it, and armed with my knowledge learned from dhcp6c, I was able to get a configuration that worked… sort of. It would require some assistance.
With the following configuration, dibbler-client will request an IA and a PD on eth0, and it will create a route on eth1 for its slice of the PD.
# /etc/dibbler/client.conf
log-level 7
downlink-prefix-ifaces "eth1"
inactive-mode
iface eth0 {
    ia
    pd
}
script "/etc/dibbler/script.sh"
But after dibbler-client runs, the network is still not really ready to use.
- The internal interface does not have an IP address on its slice of the PD.
- The system does not have a default route.
These things can be fixed by a helper script. Fortunately, dibbler allows us to specify a script that will run every time some change takes place. Here is the script that I wrote. It does not take any information from dibbler itself. It simply looks around the system and fills in the missing pieces.
#!/bin/bash
# /etc/dibbler/script.sh

router_iface="eth0"
internal_iface="eth1"

function log () {
    printme="$*"
    echo "$(date '+%F %T') : $printme" >> /var/log/dibbler/script.log
}

log "started with arguments >> $*"

# check for default route
if [[ $(ip -6 route | grep -c default) -gt 0 ]] ; then
    # default route found
    log "default route found >> $(ip -6 route | grep default)"
else
    # no default route - look for route advertisements
    log "default route not found"
    router_ip=$(rdisc6 $router_iface | grep '^ *from' | grep -o '[0-9a-f:]\{4,\}')
    if [[ -n $router_ip ]] ; then
        route_command="ip -r route add ::/0 $router_ip dev $router_iface"
        log "adding route >> $route_command"
        $route_command
        log "return code was $?"
    fi
fi

# check for internal network IP
internal_ip="$(ip -6 addr show dev $internal_iface | grep 'scope global' | grep -o '[0-9a-f:]\{4,\}')"
if [[ -n $internal_ip ]] ; then
    # internal IP is set
    log "internal IP found >> $internal_ip"
else
    # internal IP is not set
    log "internal IP not found"
    prefix="$(ip -6 route | grep $internal_iface | grep -v 'proto kernel' | grep -o '[0-9a-f:]\{4,\}::')"
    if [[ -n $prefix ]] ; then
        ip_command="ip -r addr add ${prefix}1/64 dev $internal_iface"
        log "adding IP >> $ip_command"
        $ip_command
        log "return code was $?"
        # restart radvd
        systemctl restart radvd
    fi
fi
After the script runs, the router will be able to communicate with the internet using IPv6, and the other machines on the internal network will be able to communicate with the router.
NOTE – The version of dibbler (1.0.0~rc1-1) that comes with Ubuntu 15.10 crashed when I ran it. So I had to download a newer one. At first, I downloaded the source code for version 1.0.1 and compiled it. That seemed to work OK. But later, I grabbed the dibbler-client package (1.0.1) for Ubuntu 16.04 and installed it using “dpkg”. I prefer to install complete packages when I can.
The last step – advertise your new subnet to your network
When the machines on your network come up, they will look for route advertisements from your router. We need a RA daemon to send these out. The most common one is radvd.
While researching this setup, I saw several references to scripts that would modify the radvd config file, inserting the route prefixes that were assigned by the upstream prefix delegation. To me, this idea seemed like yet more duct tape. Fortunately, radvd does not need to be reconfigured when the prefixes change… it is smart enough to figure out what it needs to do. To make this happen, I used the magic prefix “::/64”, which tells radvd to read the prefix from the interface itself.
# /etc/radvd.conf
interface eth1 # LAN interface
{
    AdvManagedFlag off; # no DHCPv6 server here.
    AdvOtherConfigFlag off; # not even for options.
    AdvSendAdvert on;
    AdvDefaultPreference high;
    AdvLinkMTU 1280;
    prefix ::/64 # pick one non-link-local prefix from the interface
    {
        AdvOnLink on;
        AdvAutonomous on;
    };
};
Conclusion
That might seem like a lot for something that should “just work”. It turns out that the default ISC DHCP client does “just work” for a simple client machine.
But for a router, we need to be a little more explicit.
- Set up the kernel to forward and accept RAs.
- Set up dibbler to ask for IA and assign the external IP address.
- Set up dibbler to ask for PD and set up a route on internal interfaces.
- Use a helper script to assign IPs on the internal interfaces.
- Use a helper script to make sure the default route is set.
- Use radvd to advertise our new routes to clients in the home network.
I hope this record helps others get their native IPv6 configured.
Thunderbird keyboard hack
1
11 years
I’ve used Mozilla Thunderbird to read my email for years, and for the most part, I think it’s a pretty nice email client. But lately I’ve developed an itch that really needed scratching.
I tend to use the keyboard to navigate around through applications, and so in Thunderbird, I find myself using TAB to switch between the list of mail folders on the left and the list of messages on the right. The problem is that a few years back, when they added tabbed views, they changed the way that the TAB key works. (I’ll try to be clear about the tabbed views and the TAB key, which unfortunately share the same name). After the addition of tabbed views, the TAB key no longer toggled between just the (1) folders pane and (2) messages pane, but now it toggled between (1) folders pane (2) messages pane (3) tab selector widget. So that means I had to re-train myself to press the TAB key once to go from folders to messages, and twice to go from messages back to folders. But it got worse. If you turn on something like the Quick Filter, the TAB key toggles between (1) folder pane (2) messages pane (3) tab selector widget (4) the Quick Filter.
Basically, the TAB key works like it does in a web browser, which is pretty much useless when there are so many widgets that can accept focus.
Today I discovered that what I was really looking for was the F6 key. It strictly changes focus among the visible window panes. For me, most of the time, that’s (1) folder pane (2) messages pane, but if I turn on message previews (rarely), it expands to (1) folder pane (2) messages pane (3) preview pane.
THIS MAKES SENSE. Within the main window (tab) that I am looking at, the F6 key moves between the major window panes. Awesome.
However, wouldn’t it be cool if I could use the TAB key to do this focus-switching, instead of lifting my fingers off of their pseudo-home position to get way up to F6 (which I can’t find just by feel — I have to look down at it)?
A little bit of searching led me to extensions, such as the very old but still usable “keyconfig”. This is a pretty opaque tool that lets you insert some sort of arcane code into the prefs.js file. Basically, it did not help me do anything, but it did help me understand how keys are mapped. Deeper searches led me to the “DOM Inspector”, which lets you view the document that is being rendered (apparently, views in Thunderbird are pretty much HTML documents, which I suppose was hip at the time). That led me to some of the arcane codes that are mapped to certain keys.
So here’s what I tried. I looked at the arcane code that is mapped to F6, and I looked at the way “keyconfig” inserted some mappings of key names and their arcane codes. And I mimicked it. I just added this line to prefs.js:
user_pref("keyconfig.main.xxx_key75_SwitchPaneFocus(event);", "][][VK_TAB][SwitchPaneFocus(event);][");
And wouldn’t you know… it worked! Now the TAB key does what the F6 key normally does… it switches focus among the main window panes in the active tabbed view. Yay, lazy fingers cheer!
tar + netcat = very fast copy
2
11 years
I reformatted a hard disk this weekend. In the process, I needed to copy a bunch of files from one machine to the other. Since both of these machines were smaller embedded devices, neither one of them had very capable CPUs. So I wanted to copy all of the files without compression or encryption.
Normally, I would use “rsync -avz --delete --progress user@other:/remote/path/ /local/path/“, but this does both compression (-z) and encryption (via rsync-over-ssh).
Here’s what I ended up with. It did not disappoint.
Step 1 – On the machine being restored:
box1$ netcat -l -p 2020 | tar --numeric-owner -xvf -
Step 2 – On the machine with the backup:
box2$ tar --numeric-owner -cvf - | netcat -w3 box1 2020
Merging multiple git projects into one
0
11 years
Over the last few months, my daughter Sydney and I have been working on Python programming assignments. I showed her that we can occasionally make a snapshot of our work using git, so if we mess something up, we can always get back to our previous checkpoint.
So we got into the habit of starting off new assignments with “git init .“.
Recently, though, I decided I wanted to host a copy of her assignments on my home file server, so we could check out the assignments on her computer or on mine. In the process, I decided to merge all of the separate assignments into a single git project. As a matter of principle, I wanted to preserve the change histories (diffs and author and dates — but not necessarily the old SHA hashes, which would have been impossible).
I did some searching on the topic, and I found a variety of solutions. One of them used a perl script that sent me off into the weeds of getting CPAN to work. A couple of good posts (here and here) used branches for each assignment, and then merged all of the branches together. The results were OK, but I had the problem where the assignment files started off on their own top-level directory, and then I later moved the files to their own assignment subdirectories. I really wanted to rewrite history so it looked like the files were in their own subdirectories all along.
Then I noticed that my daughter and I had misspelled her name in her original “git config –global”. Oops! This ended up being a blessing in disguise.
This last little snag got me thinking along a different track, though. Instead of using branches and merges to get my projects together, maybe I could use patches. That way, I could edit her name in the commits, and I could also make sure that files were created inside the per-assignment directories!
So I whipped up a little shell script that would take a list of existing projects, iterate through the list, generate a patch file for each one, alter the patch file to use a subdirectory, (fix the mis-spelled name), and then import all of the patches. The options we pass to git format-patch and git am will preserve the author and timestamp for each commit.
#!/bin/bash

remoteProjects="$*"

git init .

for remoteProject in $remoteProjects ; do
   echo "remote project = $remoteProject"
   subProject=$(basename $remoteProject)
   ( cd $remoteProject ; git format-patch --root master --src-prefix=AAAA --dst-prefix=BBBB --stdout ) > $subProject.patch
   # essential file path fixes
   sed -i -e "s|AAAA|a/$subProject/|g" $subProject.patch
   sed -i -e "s|BBBB|b/$subProject/|g" $subProject.patch
   sed -i -e "s|/$subProject/dev/null|/dev/null|g" $subProject.patch
   # other fixes, while we're here
   sed -i -e 's/syndey/sydney/g' $subProject.patch
   # bring the patch into our repo
   git am --committer-date-is-author-date < $subProject.patch
   # clean up
   rm $subProject.patch
done

exit 0
I think this solution works nicely.
The one with the separate branches above was kind of cool because a git tree would show the work we did on each assignment. But in the end, the linear history that we produced by using patches was just as appropriate for our project, since we actually worked on a single homework assignment each week.
I suppose I could combine the two solutions by creating a branch before doing the "git am" (git "accept mail patch") step. That is left as an exercise for the reader.
dnsmasq + unbound
1
12 years
Recently, our local Linux Users Group was talking about DNS servers. Some folks in the group claimed that their ISP’s DNS servers were very slow.
In a group like this, there is usually a camp that are strong supporters of running BIND. Somehow, I have never been able to wrap my head around BIND. Instead, I have been using dnsmasq. These two packages are very different.
BIND
BIND is a fully recursive DNS resolver. When you look up a name like “www.cnn.com”, it goes to “com” to ask who “cnn” is, and then it goes to “cnn.com” to ask who “www.cnn.com” is. BIND has a steep learning curve, and that has always discouraged me from really tinkering with it. It also misses a very important point that my home network needs — local name resolution of DHCP-assigned addresses.
dnsmasq
Dnsmasq is more of a caching DNS server for a local network. It has a built-in DHCP server, so devices on my home network get their addresses from dnsmasq. When I make a DNS request, dnsmasq looks in its local DHCP table first. For example, if I want to talk to another device in the same room, like a Roku or a printer, dnsmasq knows the addresses of the local devices and it responds immediately. If the request is not a local name, it simply passes on the request to some other name server… maybe your ISP’s, or maybe a free server like OpenDNS or Google’s 8.8.8.8. Dnsmasq caches all DNS requests, so if you make repeated requests to the same site, they are answered pretty quickly.
I really like dnsmasq.
It is super flexible, and you configure it through a single configuration file which is super easy to understand. In fact, many home routers use dnsmasq under the hood.
unbound
But during the discussion in our LUG, someone mentioned unbound, another fully recursive DNS server that is super easy to set up. So I had to try it out. It did not disappoint.
My Setup
So how do these two tools work together?
Actually, it’s quite elegant. Dnsmasq listens on port 53 of all addresses on my router. It is the primary DNS server for all machines on my local network. If the request is for a local device, then it fills the request immediately. But if the request is for some site on the internet, then it passes the request off to unbound, which is also running on the router, but listening on a different address/port combination.
Here is how I configured dnsmasq.
/etc/dnsmasq.conf
# --- DNS ----------------------------

# Be a good netizen, keep local stuff local.
domain-needed
bogus-priv
filterwin2k

# Do not listen on "all" interfaces and just filter.
bind-interfaces
# Listen on port 53 on in-home network (eth1) and localhost (lo).
# Do not listen on internet interface (eth0).
interface=lo
interface=eth1

# Upstream servers are not listed in resolv.conf, they are listed here.
no-resolv
server=127.0.0.1#10053 # unbound

# Add this domain to all simple names in the hosts file.
# (Also sets the domain (15) option for DHCP).
expand-hosts
domain=home.alanporter.com

# Special treatments for some domains and hosts.
local=/local/ # dnsmasq handles these itself
server=/alanporter.com/69.93.127.10 # look up via ns1.linode.com
address=/doubleclick.net/127.0.0.1 # return this address immediately
address=/sentosa.us/108.161.130.139 # return this address immediately
cname=oldname.home.alanporter.com,newname.home.alanporter.com

# Logging
log-queries
log-facility=local1

# Caching
cache-size=1000

# --- DHCP ---------------------------

dhcp-range=FunkyNet,172.31.1.100,172.31.1.199,10m
dhcp-option=FunkyNet,1,255.255.255.0 # subnet mask - 1
dhcp-option=FunkyNet,3,172.31.1.1 # default router - 3
dhcp-option=FunkyNet,6,172.31.1.1 # DNS server - 6
dhcp-option=FunkyNet,15,home.alanporter.com # domain name - 15
dhcp-option=FunkyNet,28,172.31.1.255 # broadcast address - 28

dhcp-leasefile=/var/lib/dnsmasq.leases
read-ethers

# reserved names and addresses
dhcp-host=d8:5d:4c:93:32:41,chumby
dhcp-host=00:50:43:00:02:02,sheeva,172.31.1.3,10m

# --- PXE ----------------------------

dhcp-boot=pxelinux.0,bender,172.31.1.1
So dnsmasq listens on the local network for requests, answers what it can: local DHCP addresses, cached addresses and special overrides from the config file. And anything it can’t handle itself, it sends on upstream to unbound.
/etc/unbound/unbound.conf
server:
    # perform cryptographic DNSSEC validation using the root trust anchor.
    auto-trust-anchor-file: "/var/lib/unbound/root.key"
    # listen on local network, allow local network access
    interface: 127.0.0.1
    access-control: 127.0.0.0/8 allow
    # NOT listening on IPv6
    # interface: ::1
    # access-control: ::1 allow
    port: 10053
    # logging
    chroot: ""
    logfile: "/var/log/unbound.log"
    log-time-ascii: yes
    log-queries: yes
    verbosity: 2
As you can see, unbound does not require much configuration.
Notice that I am NOT listening on the IPv6 interface. It turns out, there is no need. Dnsmasq listens on both, and it forwards A requests and AAAA requests to unbound over an IPv4 connection on the local “lo” adaptor.
How it stacks up
So how well does this setup work? Are there advantages or disadvantages to using dnsmasq and unbound together?
Disadvantages
I tested this setup using “namebench“, a Google “20 percent” project that measures DNS lookup times. It told me that Google’s public DNS (8.8.8.8) was 250% faster than my in-home DNS. Furthermore, it said I would be better off using my ISP’s DNS servers. I am guessing that this is because these larger DNS servers cache a much larger pool of addresses, bypassing full recursive lookups of most common names.
Advantages of dnsmasq + unbound
If my setup is slower than using a single upstream DNS, then why should I run mine this way? I have a few reasons.
- First and foremost, I learn a lot about DNS this way.
- But also worth considering, ISP nameservers are notoriously flaky. Just because the ISP beat my nameserver on a single test, that does not mean it will always do so. That’s like comparing the bus to driving your own car… it might be better sometimes, but really bad other times.
- One compelling reason to run a recursive DNS server like unbound is that you know you’re getting the right answer. When you use an ISP’s DNS server, they may hijack some domains and give you an incorrect answer on purpose. For example, they may censor content, and return a bogus landing page address for addresses that are on their black list. OpenDNS touts this as a feature… it is more “family-friendly” than raw DNS.
- If you’re the tinfoil hat type, you might not want to use a DNS service from someone like Google, who makes their money from knowing more about your browsing habits than you do. Or from your ISP, who is always trying to up-sell you with something.
Advantages of dnsmasq + any upstream DNS
- Dnsmasq (whether I use an upstream DNS or unbound) gives me control over how stuff is looked up. For example, when I was working on a new web site, I could tell dnsmasq to use the hosting company’s DNS for that one domain, so I did not have to wait for caches to expire between me and the host.
- Dnsmasq caches lookups. Actually, unbound does, too. I am still playing with both.
- Dnsmasq make switching DNS providers really easy. Say your ISP’s nameservers are acting up… just change one line in dnsmasq.conf and start getting results from somewhere else.
Pogo Plug v4 + Flashback
1
12 years
A timely discovery
I have been interested in automated backups of computer data since the mid 90’s, when I had a very well-timed hard disk failure. By pure chance, I had been working on a script that would copy my “important files” from my hard disk to a 100MB “Zip Drive”. I finished my script after testing it several times, and then I went to bed. The next morning, I woke up to find that my hard disk had crashed. Fortunately, I had a very recent backup!
I have often marveled at how easy it would be to lose invaluable files in a single mishap… countless memories, photos, financial records and project work. Backups are important.
BackupPC
When I worked at “the oven place” (TMIO), I was tasked with evaluating backup schemes for their factory and office PC’s. So I looked at several open source packages, with emphasis on being server-centric and automatic. That is, the backup server would decide when to make the backups, and the employees would never have to remember to do anything special. Any process that relies on a human to remember to kick it off is destined to be run once-a-year.
We ended up choosing “BackupPC“, which runs on a modest server with a large storage disk. It would wake up every so often and run through its list of clients and pick one to back up.
For several years, I ran BackupPC at home, too. At first, I ran it on a discarded PC. But later, I migrated to low-power fanless embedded boards.
Flashback
In 2013, I decided that BackupPC was taking too long to make backups. I would bring my laptop home from work and turn it on, and BackupPC would notice it and start backing it up. But the backups were taking so long that they would still be running when I was ready to leave for work the next morning! I ran a few tests with rsync to see if the problem was with BackupPC or the file compression or their crazy idea of how “incremental backups” should work. So I wrote what started out to be a speed test, and then a wrapper around “rsback”, and finally a very minimal python script that I named “Flashback“. “Flash” because it’s fast. My laptop backup, which was taking all night using BackupPC, usually completes in a half hour or less.
You can find Flashback on github.
The Pogo Plug v4
 This week, I tried out a new hardware gadget called a Pogo Plug. It is a very close cousin to the SheevaPlug, an embedded Linux board which I had been BackupPC and Flashback on. What caught my attention about the Pogo Plug v4 was:
- It has two USB3 ports.
- It has gigabit ethernet.
- It was on sale for just $20.
The only bad part is that it only has 128MB of RAM… that’s only a quarter of what the SheevaPlug has. But I am not really using the memory for anything. I am just running rsync.
I did not spend any time using the stock firmware. Instead, I immediate enabled SSH and then followed these instructions for installing Arch Linux on a USB stick, which I plugged into the top plug (the bootable USB2 one). I plugged the 1-terabyte USB2 hard disk into the back of the Pogo Plug.
Then I installed Flashback and I modified the monitor script to take advantage of the three-color LED on the front (green for sleeping, yellow for backing up, red for error).
It’s been running for about a week now, and I think it has proven itself worthy.
I’d like to try it with a USB3 hard disk, and see if it’s any faster.
The obstinate trash man
3
12 years
This weekend’s pet project was to set up Ubuntu Studio to run on my Macbook Pro.
Ubuntu Studio is a Linux distribution, based on Ubuntu, that comes with lots of audio and video software installed and configured. I have been wanted to play with Ardour, an open source digital audio workstation, and although it will run on a Mac, it runs much better on Linux. So I downloaded and burned a copy of the Ubuntu Studio “Live DVD”. This would allow me to test drive Ubuntu Studio on the Macbook without installing anything on the Macbook’s hard disk. It worked wonderfully, and so I decided to make a bootable “Live USB” stick as well. The Live USB stick acts just like the Live DVD, except it also allows you to save files back to the USB stick (obviously, you can’t save files to a read-only DVD). So I would be able to do my studio work in Linux and save my work when I reboot back into OSX.
I was greeted with a very weird bug in Ubuntu Studio’s desktop system. Whenever I tried to delete a file, I would get the following error:
Unable to find or create trash directory
What a weird error message!
Ubuntu Studio uses the XFCE desktop environment, which follows the Free Desktop’s “Desktop Trash Can Specification“. Yes, there are people who write specifications about how trash cans are supposed to work. There is a utility called “gvfs-trash” that actually handles moving deleted files to the appropriate trash can area. You can run this command from a shell prompt.
$ gvfs-trash somefile
Error trashing file: Unable to find or create trash directory
There’s that same error message.
I ran the same command with “strace” to figure out what it was doing, and I did a little bit of Googling. I found this blog post, which told me most of what I needed.
The gvfs-trash system wanted to find a directory called “.Trash-999” in the top level of the filesystem. It wanted 999 because my user ID number was 999 (run the “id” command to see what your user ID number is). Inside the /.Trash-999 folder, it also wanted two sub-folders named “files” and “info”. All three of these needed to have 700 permissions.
Here’s a one-liner that will do it all:
u=$(id -u) ; g=$(id -g) ; sudo mkdir -m700 /.Trash-$u ; sudo chown $u:$g /.Trash-$u ; mkdir -m700 /.Trash-$u/{files,info}After that, the desktop system could remove files OK, and the gvfs-trash command could as well.
That gvfs-trash command might make a good alias!
alias rm='gvfs-trash'mrtg on Wheezy
0
13 years
by alan
in free software on 2013-05-06
I just upgraded my home server (a “Fit PC 1.0“) to Debian 7.0 “Wheezy”. Most of it went smoothly, but there were a few small snags.
I use a package called “mrtg” to create nice graphs of my network usage. See the pretty picture below.
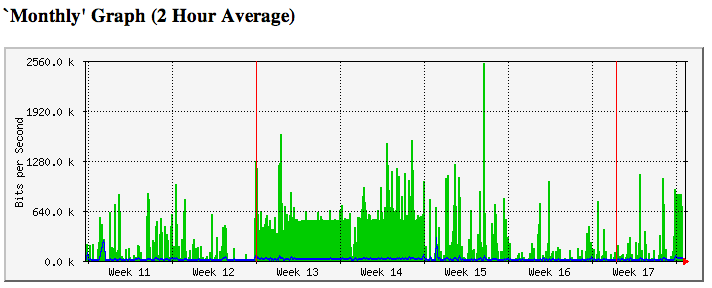
However, after the upgrade from Debian 6.0 “Squeeze” to 7.0 “Wheezy”, mrtg was reporting errors:
Subroutine SNMP_Session::pack_sockaddr_in6 redefined at /usr/share/perl/5.14/Exporter.pm line 67.
at /usr/share/perl5/SNMP_Session.pm line 149
Subroutine SNMP_Session::unpack_sockaddr_in6 redefined at /usr/share/perl/5.14/Exporter.pm line 67.
at /usr/share/perl5/SNMP_Session.pm line 149
Subroutine SNMP_Session::sockaddr_in6 redefined at /usr/share/perl/5.14/Exporter.pm line 67.
at /usr/share/perl5/SNMP_Session.pm line 149
Subroutine SNMPv1_Session::pack_sockaddr_in6 redefined at /usr/share/perl/5.14/Exporter.pm line 67.
at /usr/share/perl5/SNMP_Session.pm line 608
Subroutine SNMPv1_Session::unpack_sockaddr_in6 redefined at /usr/share/perl/5.14/Exporter.pm line 67.
at /usr/share/perl5/SNMP_Session.pm line 608
Subroutine SNMPv1_Session::sockaddr_in6 redefined at /usr/share/perl/5.14/Exporter.pm line 67.
at /usr/share/perl5/SNMP_Session.pm line 608
Subroutine SNMP_Session::pack_sockaddr_in6 redefined at /usr/share/perl/5.14/Exporter.pm line 67.
I am not sure what caused this problem, but I found a solution on a Raspberry Pi discussion board.
Simply patch this one SNMP_Session.pm file like this:
--- SNMP_Session.pm.orig   2011-06-01 15:48:06.000000000 +0200
+++ SNMP_Session.pm   2011-06-01 15:56:19.000000000 +0200
@@ -146,7 +146,7 @@

     if (eval {local $SIG{__DIE__};require Socket6;} &&
        eval {local $SIG{__DIE__};require IO::Socket::INET6; IO::Socket::INET6->VERSION("1.26");}) {
-   import Socket6;
+   Socket6->import(qw(inet_pton getaddrinfo));
    $ipv6_addr_len = length(pack_sockaddr_in6(161, inet_pton(AF_INET6(), "::1")));
    $SNMP_Session::ipv6available = 1;
     }
@@ -605,7 +605,7 @@
 BEGIN {
     if($SNMP_Session::ipv6available) {
    import IO::Socket::INET6;
-   import Socket6;
+   Socket6->import(qw(inet_pton getaddrinfo));
     }
 }
This quick fix worked for me. Let’s hope it gets included in the upstream package, libsnmp-session-perl.
Garage Door Monitor
3
14 years
How many times have I gone outside in the morning, only to find that I had left my garage door open all night? Too many. I hate that uneasy feeling that I have just invited thieves into the garage for some easy pickin’s (truth be told, I’d be happy if they took some of that junk, but still).
For a long time, I had thought of rigging up a light upstairs that would come on whenever the garage door was open. That way, at night, it would be pretty obvious that I had left the door open. But I let that idea sit dormant for a long time.
Then I read an article in Make magazine (“12,000-Mile Universal Remote“, issue 30, page 66). In it, the author built a board called an “XBee Pulse I/O” that watched a door sensor, tapped the opener’s switch, and communicated with an XBee internet gateway. These talked to a cloud service called iDigi. This was not exactly what I wanted to do, but it pushed me in the direction I needed.
I decided that I wanted to build an Arduino board that would monitor my garage door. I wanted it to communicate with my home Linux server, “Bender”, which I consider to be sort of a digital butler, keeping track of stuff around the house and reminding me of stuff that I need to know.
PONDERING WIRELESS SOLUTIONS
For the next few weeks, I pondered how I would hook the Arduino board in the garage to Bender, which lives in the bonus room over the garage. I was not too fond of the idea of running a wire, even though the distance is very short. I scoured the internet for ZigBee boards, but soon decided that these were very pricey for what they did.
Inside the garage, I would need an “XBee” ZigBee radio module, which costs about $24~$40. But I would also need a controller board for another $10. This controller board acts as a front-end, providing a simple serial port to my project, and taking care of all of the ZigBee protocol stuff.
Then, on Bender’s end, I would need a similar XBee module ($24) and a USB adaptor ($20).
That’s a total of $78~$110, just for the wireless link!
Surely, dropping a Ben Franklin down for a home project is not such a big deal. But I was concerned that as my project grew, I might be adding many wireless links to it. And at $50 a pop, I figured it would be worthwhile to broaden my search a bit.
WHAT ABOUT BLUETOOTH?
I worked for Ericsson from 1998 until 2003, when they were first developing the Bluetooth standard. I remember reading presentations about the technology before they had come up with the Bluetooth name… internally they referred to it as “MC Link”, and occasionally, (my favorite) “wireless wire”! I knew that the goal for Bluetooth was to make these communication chips so low-power and so cheap that every device would include one… WORLD DOMINATION!

With that in mind, I wondered whether there were simple Bluetooth serial communication boards that would work with an Arduino. I found one, called the “BT2S” from Virtuabotix. It was only $15, and it looked pretty easy to use. AND… I would only need ONE on the garage monitor side, because I could use Bender’s existing Bluetooth interface!
I ordered two BT2S sticks from Virtuabotix. Later, I found another source for almost-identical boards. DealExtreme has the JY-MCU Arduino Bluetooth Wireless Serial Port Module for $8.60! (Be careful not to get the TTL version that looks very similar).
PUTTING IT TOGETHER – THE HARDWARE
I am not too fond of crawling up a ladder to reprogram my Arduino in my garage, so I decided to make the Arduino end of this project as simple and generic as possible.
The BT2S module plugs in to the Arduino’s serial port, and the program on the Arduino simply listens for serial commands and responds. I decided to implement three commands: read digital, write digital and read analog. That way, nothing would be hard-coded into the Arduino. Instead, all of the smarts would be in the client program that runs on Bender.

Schematic

Reed switch.
I plugged in a magnetic reed switch to one of the digital inputs, and an LED to a digital output. While I was at it, I put a light sensor on one of the analog inputs.
Then I hung it up on the garage door frame. I stuck a very strong hard drive magnet on the door so it would be close to the reed switch whenever the door was open.
TALKING TO IT VIA BLUETOOTH

Door, magnet, reed switch.
Bender is a Linux machine, and so I needed a Linux-based program that would open a Bluetooth serial connection to the Arduino and then send serial commands to it. I needed a mixture of shell commands to configure the Bluetooth connection and low-level communication to the serial port. So I chose Python.
Bluetooth is a complex protocol that supports a lot of different uses: real-time audio, serial communication, keyboard/mouse, dial-up networking, and more. We’re using a simple serial link, which they call “rfcomm”. In Linux, we establish the serial link using the rfcomm command. It makes a Bluetooth connection to the device and creates a serial port device named /dev/rfcomm0.
Once we have created a serial device, the python program simply reads and writes to that device just like any other file. I structured my program as a big loop with timers. Every so-many seconds, it sends a command to read the magnetic reed switch. It also sends commands to blink the LED, so I can tell from the garage that the python program is still running. When the reed switch response comes back, it writes the door status to a file. If I put that file in an area that is shared via my web server (/var/www/ or $HOME/public_html/), I can check on my door from any browser.
If the door state has changed since the last time it was read, the python program sends a push notification (like a text message) to my phone. This is another idea that I stole from the same issue of Make magazine (“You’ve Got (Snail) Mail“, page 76). This uses an iPhone app called “Prowl” and a web service that goes along with it.
COMPLETING THE LOOP
Sure, it’s cool to hear my phone “bling” when someone opens the door at home. But my original motivation was to be warned when I had left the door open.
Fortunately, that’s an easy job. I wrote a simple “cron” job that reads that status file at certain times of day (or night). If the door is open, it sends me another push notification saying “hey dummy, your garage door is still open!”.

Breadboard, with “Boarduino” and BT2S, sensors and LEDs
RESOURCES
Source code and other resources can be found on github.
‘sudo’ vs using a root password
0
14 years
There seems to be a lot of confusion about the use of “sudo” vs using a root password. It’s a lot simpler than many make it out to be.
- On a system that uses a root password, all administrators use a shared root password.
- On a system that uses “sudo”, all administrators use their own passwords.
- There is no reason why you can’t do both.
Some people argue about a Linux distribution’s default setting, when they could simply change the setting after installation and forget about it.
- To enable a root password:
$ sudo passwd root - To disable a root password:
$ sudo passwd -l root - To start using sudo:
# apt-get install sudo

# adduser username sudo - To stop using sudo:
# gpasswd -d username sudo(optional)
# apt-get remove --purge sudo - To run a “su-like” shell using “sudo”:
$ sudo -s(runs a normal shell)
or
$ sudo -i(runs a login shell)
Personally, I have gotten used to disabling my root password and the using either sudo -i or ssh root@hostname. That’s one less password for me to remember, and one less password that can be probed on the network.
But you don’t have to be like me… you do what feels right to you!