Random Thoughts inside Alan's head
Posts by alan
iPhone dev notes: things that I got stuck on
0
13 years
Here are some things that I got stuck on this weekend while trying to work on iPhone apps.
Simulator ran my app in 3.5-inch (iPhone 4 size) instead of 4.0-inch (iPhone 5 size).
I wasted a lot of time on this one.
Whenever I ran the app in the simulator, it would launch in the shorter (640-960) 3.5-inch screen, even if I had previously chosen the taller (640×1136) 4.0-inch screen size.
In Xcode, there is a pulldown at the upper left where you can define your “scheme”. It looks like this:
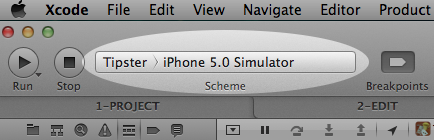
Here’s a cool trick. This is the menu where you can set certain parameters for when you build, run, debug, profile and archive the app. For example, you can set the simulator’s screen size by clicking on the app name on the left of the scheme widget and choosing “Edit Scheme…”. Then select the “Run MyApp.app” action on the left, the “Options” tab, and set the “iPhone simulator display” to the size that you want to use each time you run.
But still, even if I chose the 4-inch display in my scheme’s “run” action, the simulator ignored this setting and opened in a 3.5-inch display.
The problem is that iOS 5.0 does not support the 4-inch display. The taller display debuted with the iPhone 5, which came with iOS 6.0.
So the solution is to just change the target to “iPhone 6.0 simulator”. Then slap your forehead and say “duh!”.
Error: A valid provisioning profile for this executable was not found.
I had been preparing an app for submission into the App Store. Then I went to run it on my local device again, and it kept popping up an error message: “A valid provisioning profile for this executable was not found.”
I went into the project’s “Build Settings”, and I checked all of the values in the “Code Signing” section. I made sure that the “AdHoc” and “Debug” entries were set to iPhone Developer (currently matches ‘iPhone Developer: Alan Porter (ABCDE12345)’ in ‘MyProvProfile’). The “AppStore” entry was set to iPhone Distribution (currently matches ‘iPhone Distribution: Sentosa.US (LMNOP67890) in ‘VWXYZ12345.us.sentosa.Tipster’). These settings are important. They tell Xcode to sign your local development builds using your developer certificate, and to sign your App Store submissions using your team’s distribution certificate.
But once again, the problem was in the “scheme” menu. Under the “Run MyApp.app” action and “Info” tab, my “Build Configuration” was mistakenly set to “AppStore”. This won’t work, because for local builds, you need to sign the code with your own developer certificate. The Distribution certificate should only be used when you’re submitting your app to the App Store.
Summer Vacation in Canada
0The girls are out of school for their summer break, and so we spent a week in Canada.
Normally, the thought of driving 800 miles (12-16 hours) does not appeal to me, so we decided to break up the drive into shorter sprints. On the way up, stopped overnight in Pittsburgh, and on the way down, Hershey.
The drive up was nice. We passed by Pilot Mountain, and later by the Boy Scout Jamboree near Beckley WV, then the New River Gorge Bridge, and we finally stopped in Pittsburgh. We took the funicular (inclined) train to the overlook at Mount Washington.
The next morning, we headed north to Erie PA. At first, we looked across the water and mistook the Presque Isle State Park peninsula for Canada… but that can’t be… Lake Erie had to be bigger than that. So we drove out onto the peninsula and determined that no, you can not see Canada from Erie. It’s 24 miles from Presque Isle to Long Point (Ontario), and you can typically only see about 3 miles from the shore. You’d have to be about 120 above the water level to see 24 miles across the lake. (If you’re interested, here is a good article explaining why). Finally, we headed northeast to Buffalo and Niagara Falls.
The two shores of Niagara Falls are very different from each other. Most of the New York side is a beautiful state park. But once you venture off of park land, the neighboring property is low-rent commercial. So we hopped back in the car and went across “Rainbow Bridge” to Canada.
Here, we discovered two things. First, our car GPS does not know about Canadian roads. Second, our AT&T mobile data service does not work in Canada (it WILL still work within sight of New York).
We spent two days in Niagara Falls. We bought a ticket package the include the Maid of the Mist boat tour, a behind-the-falls tour, the butterfly house and a cable car ride across the whirlpool.
One thing that is very interesting, but that we did not see, is the power generation on both sides of the river. I learned from the Ontario Power Generation web site (and from Wikipedia) that there are a bunch of massive tunnels that divert up to two thirds of the water away from the falls and into power generating stations. All of this water diversion is done in a way that maintains the beauty of the falls for visitors, while also reducing erosion and generating very cheap electricity. This is worth a deep dive on the web, if you’re interested.
From Niagara, we headed north into “no cellular data coverage area” and on to Toronto. Without maps on our GPS or our phones, we had to navigate “old school”. (By the way, we found that Foong’s Virgin Mobile phone continued to work deep into Canada, and only stopped when she closed the navigation app and restarted it, so I am guessing that it only does “authentication” when that particular data session starts). We drove up to Toronto and met our niece, who just graduated from the University of Toronto. She showed us around the UT campus.
Since we had good luck with the Niagara Falls multi-pass, we did the same thing in Toronto with their City Pass. This gave us admission to Casa Loma, the Ontario Science Centre, the Royal Ontario Museum (ROM), the Toronto Zoo and the CN tower.
Casa Loma was interesting, sort of Toronto’s version of the Biltmore House, I suppose. To me, the most fascinating part was learning about the rise and fall of Sir Henry Pellatt, who got very rich by having the right idea at the right time, but who then mismanaged his fortune until his unfinished estate was broke.
The Ontario Science Centre was fantastic, and totally impossible to fully absorb in a single day. The exhibits had enough depth that they needed some study to appreciate. We spent a good deal of time in the display of video game history; I enjoyed showing the girls all of the games that I grew up with, from the (1972) Magnavox Odyssey to the Atari 2600 and console games that I played at the local Putt Putt arcade. Later, we explored exhibits on everything from friction to resonance, along with stations for craft-building and some really cool interactive kinetic art. Note to self — next time, allocate AT LEAST a complete day for the Ontario Science Centre. There was so much great stuff to see, we left with a curious mixture of excitement and disappointment.
The CN Tower was about what you’d expect… a nice view. But we discovered that there’s not much to eat in that area, outside of the CN Tower café.
The Royal Ontario Museum (ROM) contained miles and miles of historical artifacts, seemingly arranged in random order. If I could have, I would have exchanged my time at the ROM for more time at the Science Centre.
We completed our stay in Toronto with a visit to the zoo, a sprawling park filled with all types of animals. This was definitely a first class zoo. The highlight, of course, was the panda exhibit. Between the ROM and the zoo, I think I wore through an entire pair of sneakers.
There were other side trips along the way that left impressions on us. One of them was dinner at the Gourmet Malaysia, a meal intended to please momma. The service was lousy (they forgot my order entirely), and Pad Thai was probably the worst I’ve had, but the real redeeming quality was the host, Yummy Tan, and his karaoke show. The girls each performed a song (“Skyscraper” and “Fireflies”) in front of a mostly disinterested audience of old Asian folks. It was thrilling.
Our trip home was broken up just like the trip up, with a stop about halfway, this time in Hershey PA. We took the so-called “factory tour”. But this was no factory… there is no factory here… sugar costs too much in the US to produce candy here. The candy is made in Mexico. But Hershey still has a presence in that town, and their animatronics ride and expansive gift shop made a good enough excuse to stop there for the night. Just don’t go expecting to see a factory.
We also stopped at Skyline Caverns in Front Royal VA. It was pretty typical of caverns, which is to say, it’s pretty cool to see.
We thoroughly enjoyed our week-long vacation in Canada, including the trips up and back.
iPhone app startup: AppDelgates, MainWindow.xib and some code
0
13 years
When beginners learn to write programs in C, they learn that main() is the starting point of their program. But that is only partially correct. There is stuff that happens before main() is called. The first thing to run is the C runtime, which is in a library called crt.o. It allocates space for global and static variables, it copies initial values to initialized variables, and it initializes all static variables to 0. Then it calls your main(). At the end, it takes your return code from main() and passes it back to the operating system.
AppDelegates: your app’s front door
Similarly, iPhone apps have a startup and shutdown sequence that is handled by iOS. At certain points, it will dip into your code to determine what to do. The primary interface that you have to control this is the AppDelegate. The AppDelegate protocol has several methods that can be used to notify your app that something is about to happen (low memory, you’re going into the background, a notification of a time change or location change, etc). It also has some methods where you can specify your preferences (which orientations does your app support, what should the status bar look like). It’s a lot richer than just a simple call to main(), but the concept is the same. The OS is doing stuff, and when it needs you, these methods are the entry points into your app.
If you do not set your AppDelegate up properly, your app may fail to load, or it may simply show a black screen instead of your views.
I recently discovered this while trying to “modernize” an early XIB-based app that has been in the store for a few years. Somewhere in the process, I messed up this startup sequence, and I was greeted with a plain black screen. Here is what I found out about the startup sequence.
You actually do include a main() in your code. Usually, it is very small. This is the main.m from my XIB-based app.
#import <UIKit/UIKit.h>

int main(int argc, char *argv[]) {
    @autoreleasepool {
        return UIApplicationMain(argc, argv, nil, nil);
    }
}
The main thing it does it set up an autoreleasepool which keeps track of memory pointers and is used for garbage collection. Then it calls UIApplicationMain(). The first two arguments are familiar, but the next two are used if you want to override default behavior.
- The third argument is where you can specify the name of your own Application subclass.
- The fourth argument is where you can specify the name of your own class that will implement the AppDelegate protocol. We’ll talk about that below.
At this point, there are two ways your app can start up: through XIB files created in Interface Builder, or in Objective-C code.
XIB-based app startup
When the fourth argument to UIApplicationMain() is nil, the application will look in your plist file for a Main Storyboard or a Main Interface. You’ll see these in XCode under “target” in the “summary” tab. This will be the name of a XIB file.
It loads this XIB file, and looks for a class that will be your AppDelegate and a window that will be your main application window.
There are many tutorials on setting up these XIB files. The one that I used is at http://www.trappers.tk/site/2011/06/16/mainwindow-xib/.
In a nutshell, this is what you do. Note that all of my terminology is probably wrong here, because I don’t use Interface Builder much.
- Create an empty IB document.
- Set the Owner to a UIApplication class.
- Add an “Object” to the canvas, make it of
myAppDelegateclass. - Add a “Window” to the canvas.
- You already have a skeleton AppDelegate class (.h and .m files), edit the .h file to contain the key word “IBOutlet” in the window declaration. Interface Builder uses this to identify code that it can hook to objects in the XIB.
- Connect the AppDelegate object to the File Owner’s “delegate” hookup.
- Connect the Window object to the AppDelegate’s “window” hookup.
- Then edit your project target, in the “summary” tab, go to “Main Interface” and select your XIB file from the pulldown.
I find that using a GUI drawing tool to set up this sort of plumbing is confusing, but the gist of it is that you are creating an association between this class that you have (probably called myAppDelegate), a window, and the app’s AppDelegate protocol.
When the app starts up, it runs your main(), calls UIApplicationMain(), sees the nil in the fourth argument slot and decides that you want to use the XIB method. It looks in the myapp-Info.plist and finds the MainWindow XIB file, loads that XIB, loads that window, finds out which class is your AppDelegate, and then calls application:didFinishLaunchingWithOptions: on that class.
Programmatic app startup
Instead, I choose to implement most of my plumbing in Objective-C code, for the following reasons:
- I find the pictorial representation of these abstract connections to be more confusing than their code equivalents.
- It’s difficult to reproduce something when the steps are “control-drag the whoosit to the whatsit over there”.
- Code is much easier to copy and compare.
- This is a biggie — XIB file formats change with new tool releases, and so sometimes you’re left with no way forward. An example is when I used XCode5 (iOS7 tools) to create a XIB file, but could not use it at all under XCode 4.2 (iOS6 tools).
- I get all starry-eyed when I use a plain text editor.
Here are the three files that you must set up to get this same startup process working using Objective-C.
main.m
#import <UIKit/UIKit.h>
#import "AppDelegate.h"

int main(int argc, char *argv[]) {
    @autoreleasepool {
        return UIApplicationMain(
            argc, argv,                            // command-line args
            nil,                                   // Application class
            NSStringFromClass([AppDelegate class]) // AppDelegate
        );
    }
}
AppDelegate.h
#import <UIKit/UIKit.h>
#import "MyappModel.h"

@interface AppDelegate : UIResponder
<UIApplicationDelegate>
{
    UINavigationController * navController;
    MyappModel * myappModel;
}

@property (nonatomic, retain) UIWindow * window;
@property (nonatomic, retain) MyappModel * myappModel;

@end
AppDelegate.m
#import "AppDelegate.h"
#import "MyScreen1VC.h"
#import "MyScreen2VC.h"
#import "MyappModel.h"

@implementation AppDelegate

// create getters and setters for @properties
@synthesize window = _window;
@synthesize myappModel;

- (BOOL) application:(UIApplication *)application
didFinishLaunchingWithOptions:(NSDictionary *)launchOptions
{

    // My application model
    myappModel = [[MyappModel alloc] init];

    // Create a root window. Application delegates are expected to have one.
    self.window = [[UIWindow alloc] initWithFrame:[[UIScreen mainScreen] bounds]];
    self.window.backgroundColor = [UIColor lightGrayColor];

    // Create a navigation controller, attach it to the window as the "root".
    navController = [[UINavigationController alloc] init];
    [self.window setRootViewController: navController];

    // create a view controller for the first view
    MyScreen1VC * vc = [[MyScreen1VC alloc] init];
    // Push the first view controller on the stack.
    [navController pushViewController:vc animated:NO];

    // Add the navigation controller’s view to the window
    [self.window addSubview:navController.view];

    // Display the main window.
    [self.window makeKeyAndVisible];
}

@end
So how does this one work?
When the app starts up, it runs your main(), calls UIApplicationMain(), sees the name of your AppDelegate class in the fourth argument slot and sees that you will be handing app delegation yourself. It calls application:didFinishLaunchingWithOptions:, which you have implemented in your AppDelegate. Now it is up to you to allocate a window, create a controller and assign it as the root controller, and then make the window “key and visible”.
Conclusion
Whether you prefer to use Interface Builder or Objective-C code to create your views, it is important to understand the sequence of events that takes place when your app starts up. If you miss one of these steps, it could cause your app to fail to launch. I recently encountered the dreaded “black screen of nothing”, and it caused me to scratch a little deeper to see what was going on.
I hope this tutorial clarifies some of this delicate dance in your mind.
mrtg on Wheezy
0
13 years
by alan
in free software on 2013-05-06
I just upgraded my home server (a “Fit PC 1.0“) to Debian 7.0 “Wheezy”. Most of it went smoothly, but there were a few small snags.
I use a package called “mrtg” to create nice graphs of my network usage. See the pretty picture below.
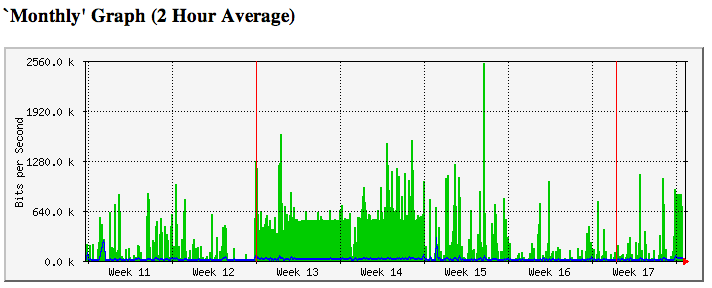
However, after the upgrade from Debian 6.0 “Squeeze” to 7.0 “Wheezy”, mrtg was reporting errors:
Subroutine SNMP_Session::pack_sockaddr_in6 redefined at /usr/share/perl/5.14/Exporter.pm line 67.
at /usr/share/perl5/SNMP_Session.pm line 149
Subroutine SNMP_Session::unpack_sockaddr_in6 redefined at /usr/share/perl/5.14/Exporter.pm line 67.
at /usr/share/perl5/SNMP_Session.pm line 149
Subroutine SNMP_Session::sockaddr_in6 redefined at /usr/share/perl/5.14/Exporter.pm line 67.
at /usr/share/perl5/SNMP_Session.pm line 149
Subroutine SNMPv1_Session::pack_sockaddr_in6 redefined at /usr/share/perl/5.14/Exporter.pm line 67.
at /usr/share/perl5/SNMP_Session.pm line 608
Subroutine SNMPv1_Session::unpack_sockaddr_in6 redefined at /usr/share/perl/5.14/Exporter.pm line 67.
at /usr/share/perl5/SNMP_Session.pm line 608
Subroutine SNMPv1_Session::sockaddr_in6 redefined at /usr/share/perl/5.14/Exporter.pm line 67.
at /usr/share/perl5/SNMP_Session.pm line 608
Subroutine SNMP_Session::pack_sockaddr_in6 redefined at /usr/share/perl/5.14/Exporter.pm line 67.
I am not sure what caused this problem, but I found a solution on a Raspberry Pi discussion board.
Simply patch this one SNMP_Session.pm file like this:
--- SNMP_Session.pm.orig   2011-06-01 15:48:06.000000000 +0200
+++ SNMP_Session.pm   2011-06-01 15:56:19.000000000 +0200
@@ -146,7 +146,7 @@

     if (eval {local $SIG{__DIE__};require Socket6;} &&
        eval {local $SIG{__DIE__};require IO::Socket::INET6; IO::Socket::INET6->VERSION("1.26");}) {
-   import Socket6;
+   Socket6->import(qw(inet_pton getaddrinfo));
    $ipv6_addr_len = length(pack_sockaddr_in6(161, inet_pton(AF_INET6(), "::1")));
    $SNMP_Session::ipv6available = 1;
     }
@@ -605,7 +605,7 @@
 BEGIN {
     if($SNMP_Session::ipv6available) {
    import IO::Socket::INET6;
-   import Socket6;
+   Socket6->import(qw(inet_pton getaddrinfo));
     }
 }
This quick fix worked for me. Let’s hope it gets included in the upstream package, libsnmp-session-perl.
Rush Concert
1I saw my first rock concert in November 1986… Journey, Greensboro. But that is another story.
A year later, my second concert was Rush in Charlotte. My friends and I drove down from NC State to see their “Hold Your Fire” tour. An excellent show, and one that left a memorable impression.
Shortly after the show, the band announced more tour dates, including one at Reynolds Coliseum in Raleigh, just a few hundred feet from my dorm room! So my friends and I got tickets for that one, too. On the day of the show, I won 2nd row tickets from our campus radio station, WKNC. We were so close, I felt like I could high-five Geddy Lee.
Fast forward 25 years, and now I have a family. I don’t listen to classic rock that much, but I do try to raise my kids right, teaching them to pick out the important bands like Rush or Van Halen just from their style. My older daughter has a good ear for that sort of thing, but my younger one simply guesses the same names for every song: Beatles, Prince, Van Halen. Prince?? Really?
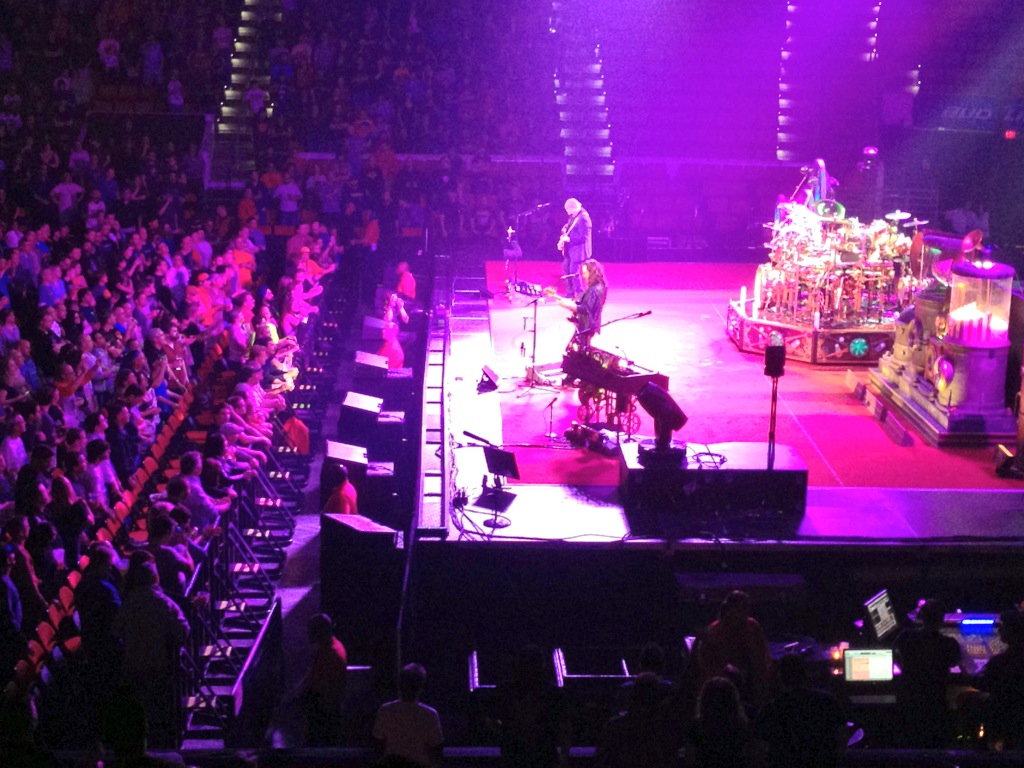
Last night, Rush came to PNC Arena in Raleigh as part of their Clockwork Angels tour, and I brought the family to see these legends of rock-n-roll. We were not quite “high-five” close, but we had great seats — 18th row beside the stage (on Geddy Lee’s side, of course).
For a bunch of 60-year-olds, the trio put on a great show. Geddy Lee couldn’t hit the high notes that he could in the 80’s, but that did not slow them down at all.
The stage was decorated in a steampunk theme, with lots of mechanical gear, and even a popcorn machine (at one point, a stagehand snuck on stage and grabbed some popcorn).
The show was divided into three sets: two halves and a so-called “encore”.
The first set was mostly from Moving Pictures, Signals, Power Windows, and Hold Your Fire (1981-1987). This was the Rush that I came to see.
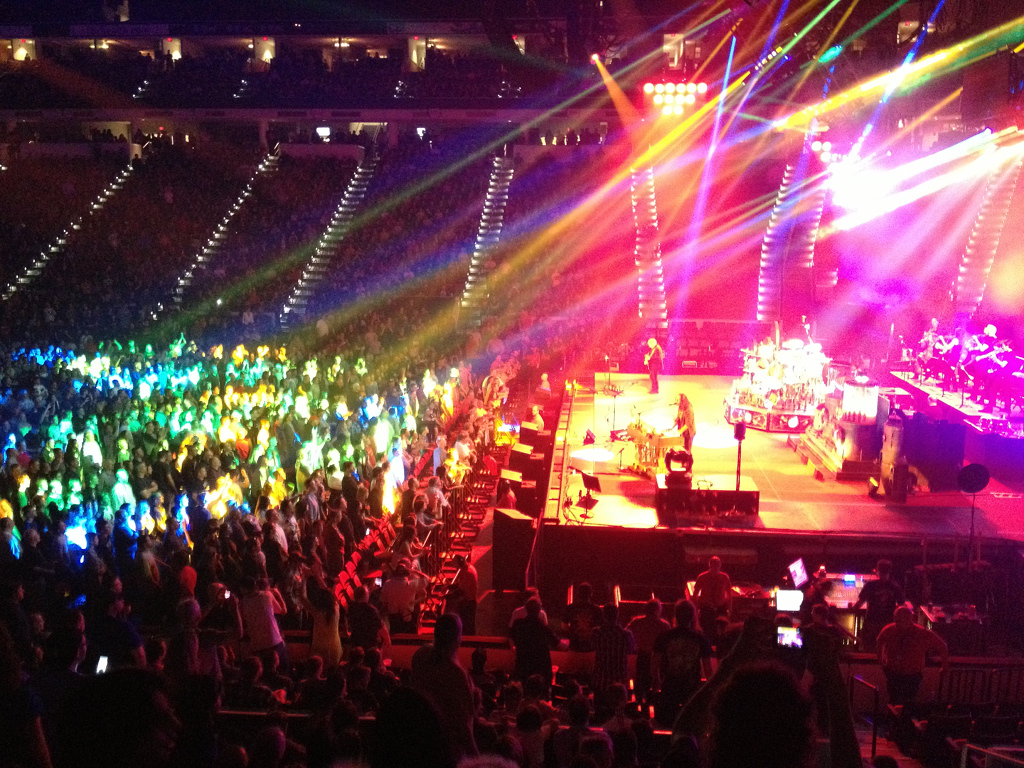
The second set dove into a lot of new stuff from the last 10 years that I am not really familiar with. It was enjoyable, but not epic. They spiced up this part of the show, first with a hard-rockin’ string ensemble backup, and then later with some surprise pyrotechnics. Towards the end of this set, Sydney actually drifted off to sleep… at a rock concert.
They finished up with an encore set of classics from Moving Pictures and 2112.
Play List
Set One
|
Set Two
|
Encore:
|
News & Observer photos
 |
 |
 |
 |
 |
 |
Moving a domain to a new registrar
1
13 years
by alan
in geeky stuff on 2013-04-20
This week, I moved the “trilug.org” domain from GoDaddy to NameCheap. Our renewal time was coming up. And at the same time, we were discussing a new policy of inclusiveness and a code of proper conduct for the group. I had long felt that GoDaddy’s branding was “tacky”, and did not really align with the direction that TriLUG was heading. Really… GoDaddy Girls? It wouldn’t be appropriate to hold our meetings at Hooters, and we feel the same way about the GoDaddy Girls.
If you’ve never moved a domain from one registrar to another, it can be confusing. There are several interlocking steps that have to be done in a certain order. If you have a roadmap, it can take an hour or so. If not, you can waste a day or more waiting for all of the steps to complete.
This is the recipe that I have followed for several transfers.
From GoDaddy to NameCheap
- GoDaddy:unlock domain
- GoDaddy: send EPP (authorization code) via email
- NameCheap: initiate transfer
- NameCheap: fill in EPP codes
- NameCheap: use coupon code “SWITCH2NC”, save $1/domain
- NameCheap: submit transfer order, pay
- wait for email from NameCheap
- receive email from transfer-domain.com (for NameCheap)
- click on link, agree to the transfer
- wait for email from GoDaddy
- receive email from GaDaddy
- GoDaddy: pending transfers, accept or decline
- you’re done – wait for email confirmations
- email from GoDaddy, domain is transferred
- whois reports new registrar
- email from NameCheap, welcome
At this point, it’s a good idea to double-check that your DNS settings transferred correctly. Mine always have.
I hope that your transfer goes as smoothly as ours did.
iPhone photo gallery
0
13 years
I like to keep albums of recent photos on my iPhone, so I can show them to friends and family. Not only do I keep the photos that I took on the iPhone itself, but I also keep the photos I took using other cameras. Here, I will describe the method and tools I use to keep several months worth of photos conveniently in my pocket.
At first, this seems like a very simple problem, but there are a few subtle quirks, and I have worked around them using a script and some open source tools. In the end, I will have:
- photos from multiple cameras
- selected folders, but not necessarily everything
- photos are optimized for phone size, not wasting space
- photos are oriented correctly, not sideways or upside-down
- photos from multiple cameras appear in chronological order
- process is mostly automated
The end result looks like this:
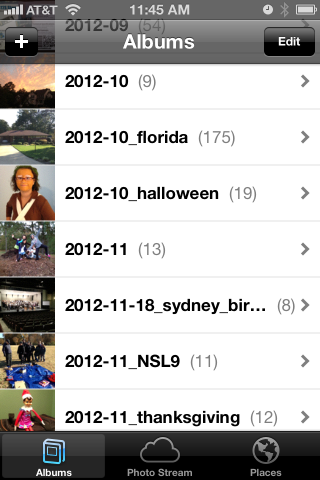
iPhone “Photos” app showing albums
How my photos are organized
When I worked at Ericsson’s research lab in Singapore, they had done a study on how people store their digital photos and how they find a particular one in the bunch. They found that people tend to associate events with nearby dates, so they might say “Let’s see… Bill broke his leg skiing right before Janet’s wedding, so that must have been Winter of 2009”.
I definitely fall into that category, and so my pictures are stored in folders by date. It looks like this:
pictures     - top level
+ bulk       - raw unprocessed stuff, too big to browse
+ import     - a working area
+ y          - photo albums arranged by year/month/event
  + 2011
  + 2012
    + 2012-09
    + 2012-10
    + 2012-10_florida
    + 2012-10_halloween
    + 2012-11
    + 2012-11-12_ducks
    + 2012-11-18_sydney_birthday
    + 2012-11_NSL9
    + 2012-11_thanksgiving
  + 2013
I also want to note that some of my friends take a completely different approach… they pick a single tool and simply dump the photos into the tool. They don’t care to organize them at all and just rely on the tool. That’s certainly OK… I would guess these are the same people who don’t balance their checkbooks. If that describes you, then I suggest you stop reading here, because none of this will apply to you.
I have used the date-folder method since I got my first digital camera in 1998. It has migrated from Windows to Linux to MacOS. My data far outlasts any one tool.
So one of my assumptions is that my “pictures” directory is sacred. I do not want any tool to write anything to that directory (I am looking at you, iPhoto & iTunes).
Selecting folders (albums) to copy to the iPhone
So I set up two more directories.
- $HOME/iphone/pictures – where I say what photos to copy
- $HOME/itunes/pictures – a directory that iTunes can sync with
In the first one, $HOME/iphone/pictures, I set up a bunch of symlinks to point to the directories that I would like to copy. I do this so I can easily select some folders but leave out others.
2011-11_happy_crabby       -> ../../pictures/y/2011/2011-11_happy_crabby
2012-09                    -> ../../pictures/y/2012/2012-09
2012-10                    -> ../../pictures/y/2012/2012-10
2012-10_florida            -> ../../pictures/y/2012/2012-10_florida
2012-10_halloween          -> ../../pictures/y/2012/2012-10_halloween
2012-11                    -> ../../pictures/y/2012/2012-11
*** note - no ducks here ***
2012-11-18_sydney_birthday -> ../../pictures/y/2012/2012-11-18_sydney_birthday
2012-11_NSL9               -> ../../pictures/y/2012/2012-11_NSL9
2012-11_thanksgiving       -> ../../pictures/y/2012/2012-11_thanksgiving
For example, let’s say I took 1000 boring photos of ducks in November. I could easily skip 2012-11-12_ducks by not creating a symlink. I can also specifically include a very old folder by leaving the symlink in this directory. I have done that here with my Happy Crabby pictures from 2011.
Copying and processing photos
I have written a script that will go through each of these directories and perform a few clean-up tasks as it copies the photos to the itunes staging area.
- It copies the photos to a temporary working directory.
We should never alter the original photos… always work with a copy.
- It rotates the image based on the EXIF orientation tag.
I’m gonna start slamming on Apple, so fanbois should cover their ears. I have found that Apple handles image rotation differently than everyone else, and it took a while to get a handle on it. I can take pictures on my iPhone and email them to someone and they’ll show up as upside-down or sideways. The images look OK on the iPhone or on a Mac, but everyone else (Linux, Windows) sees them rotated. The same thing happens if I upload them to “gallery”, an online photo gallery. Sometimes, they would show the correct dimensions but the image would still be rotated. That is, a portrait would be taller than wide, but the person’s face would be sideways and extremely elongated. The solution I found is to process them using “renrot” (see my blog post about renrot for detail).
- It renames the file using the date & time in the EXIF data.
When we get back from vacations, I find that we have photos from several different cameras, and it just seemed weird for my wife’s Nikon images (named DSCNxxxx.JPG) to appear before my iPhone images (named IMG_xxxx.JPG) and then my Panasonic images (named Pxxxxxxx.JPG) last. If I rename all of the images to (YYYY)(MM)(DD)(hh)(mm)(ss).JPG, they will appear in chronological order, regardless of which camera was used.
- It resizes the image to be no bigger than 1280 pixels high or wide.
There is no need to me to waste space on my iPhone by storing each image in their 12MP glory (actually, I typically shoot 3MP for normal vacation photos). So I resize the images using imagemagick.
- It moves the files into the iTunes directory in numerical (chronological order).
At one point, I had a problem with iTunes arranging my photos in the order that they happened to appear in the directory instead of sorted by name or anything else. If you do a “find” command on Linux or a Mac, you’ll see the files in the order that they appear in the directory file. That’s OK under the hood, because “ls” and Mac Finder and Nautilus are all smart enough to show the files in sorted order. But no, not iTunes. So I move the files from the temporary work area to the iTunes sync directory one at a time, in chronological order.
Using the script
When it’s time to sync my iPhone (less and less frequent these days, and primarily driven by when I want to update my photo albums), I simply look over the symlinks, run the script and then sync.
Running the script takes a few minutes, and syncing all of the pictures instead of just the ones that have changed takes a few minutes as well. But I am very happy with the consistent results.
I’m sure that some folks will claim that I am “doing it wrong”, that I should not have to do so many work-arounds. But the bottom line is that I encountered real-world problems from the interaction between various cameras and the quirks of iTunes, and this script smooths out all of the wrinkles. It is really no trouble to run the pre-syncing script before syncing, and it does solve the problems of images being mis-rotated, taking too much space on my phone, and appearing out of order. It also makes it trivial to choose which album folders are copied to the iPhone and which ones are not.
The script itself appears below.
The pre-syncing script
#!/bin/bash
shopt -s nocaseglob
shopt -s nullglob

src="$HOME/iphone"
dest="$HOME/itunes"
if [ ! -d "$dest" ] ; then mkdir -p "$dest" ; fi

echo "=== PHOTOS ==="

wildcard="*.[Jj][Pp][Gg] *.[Jj][Pp][Ee][Gg] *.[Pp][Nn][Gg]"
stage="/tmp/itunes.$$.stage"
mkdir -p $stage
rm -rf "$dest/pictures"

# go through each directory, and do some processing
( ls -1 $src/pictures ) | while read d ; do

   # skip non-directories
   [ ! -d "$src/pictures/$d/." ] && continue

   echo "processing photos in [$d]"
   indent="   $d >> "

   # copy source photos to staging area
   ( cd $src/pictures/$d ; cp $wildcard $stage/ )

   # rotate
   echo " - rotating photos"
   ( cd $stage ; renrot $wildcard ) 2>/dev/null | sed -e "s/^/$indent/g"
   rm $stage/*_orig 2>/dev/null

   # resize
   echo " - resize photos"
   # iphone 4S screen is 640x960 (2xVGA)
   ( cd $stage ; mogrify -verbose -geometry '1280x1280>' $wildcard ) 2>/dev/null | sed -e "s/^/$indent/g"

   # move to itunes area, reorder as you go
   echo " - re-ordering files"
   mkdir -p "$dest/pictures/$d"
   ls -1 $stage | while read f ; do
      # Mac bash v3 does not have ${f^^*}, so we have to use 'tr'
      upper=$(echo $f | tr /a-z/ /A-Z/)  # was bash internal ${f^^*}
      mv -v "$stage/$f" "$dest/pictures/$(basename $d)/$upper" | sed -e "s/^/$indent/g"
   done

   echo ""
done

# clean up some special cases
xargsR='-r'
[ "$OSTYPE" == "darwin12" ] && xargsR=''  # Mac xargs does not have -r
find $dest/pictures/ -type d -print0 | xargs -0 rmdir 2> /dev/null # empty directories
find $dest/pictures/ -name \*_orig -print0 | xargs -0 $xargsR rm -v
find $dest/pictures/ -name MEDI\*.JPG -print0 | xargs -0 $xargsR rm -v
echo ""
Halloween – traffic light costume
0
13 years
Last year, at the neighborhood Halloween party, one of the kids had dressed up as a traffic light. He simply wore all black, and he had three cardboard circles attached to his front. Audrey saw that boy’s costume and got to thinking… could we build one with real lights?
This is what we came up with.

Front

Back
Putting it together
We had the entire year to think about it. Sometime in the summer, we actually started planning. I knew that we could do the controls, but I was not so confident about the power or how to drive several LEDs.
The controller was easy. We have been using Arduinos for several projects, and I had ordered a few “nano” boards, which are about the size of a stick of gum. We plugged one into a solderless prototyping board. We used five of the Arduino’s outputs for our five lights: red, yellow, green, “WALK” (white) and “DONT WALK” (orange). We ordered super-bright colored LEDs from DealExtreme in Hong Kong.
The hard part was figuring out how to power several LEDs at the same time. I discovered a web site called “ledcalc.com” that showed us how to arrange the LEDs in several serial strings wired to each other in parallel. And after taking a few measurements, we figure out what the voltage drop on each LED was and we estimated how much current to push through each LED. This suggested that we should use a higher voltage than I normally would use to just power the Arduino. We chose 8 NiMH rechargeable AA batteries for 9.6 volts.
The LED calculator suggested that for red, yellow and orange, we should plug the LEDs in strings of 4 with a small resistor at the end. We wanted 8 LEDs for each color, so that meant we’d plug two strings of 4 LEDs together in parallel.

Since the “forward voltage” (voltage drop) across the white and green LEDs was higher, we ended up using strings of 3 LEDs for those. Fortunately, they were so bright that the fewer LEDs made no difference in overall brightness.
Now came the tricky part. We wanted the LEDs to run at 9.6 volts, but the Arduino runs at 5 volts. That meant we needed to use a transistor on each output to switch the higher-voltage LED strings on and off. We were able to figure out how to do this by looking at an Arduino experiment book. Below, you can see how one 5V output line from the Arduino can be used to switch 9.6V through a bank of LEDs.

During our tests, we found that after a while (a pretty long while), the white and green LEDs got very dim while the others stayed normal brightness. We decided that the battery had drained and the voltage had dropped just enough to make driving the three higher-voltage LEDs too hard. Doing a little bit of back-of-the-napkin math tells why. The white and green LEDs each have a 2.5V drop… times three LEDs and that means you have to have at least 7.5V to run them at all in series. The other color LEDs each dropped 1.75V, for a total of 7.0V. That means the white and green lights will poop out 0.5V earlier than the other colors will.
As a quick fix, we replaced the 1.2 volt NiMH rechargeable batteries with 1.5 volt alkaline batteries, making our total supply voltage a bit higher, a full 12 volts. This kept all of the LEDs bright all night. A quick estimate suggested we might get two or more DAYS worth of operation from a single set of batteries. But after watching them dim earlier, I decided to take a spare set of batteries with us while we went trick-or-treating, and I kept a close eye on the white and green LED brightness.
The big night
Halloween was a big hit. Everyone got a chuckle out of the costume, especially when Audrey turned around and they could see the WALK and DONT WALK signs.
Here is a photo of the Audrey in her stop light costume, Syndey as an Oompa Loompa and me as Harry Potter.

The Happy Crabby
0
13 years
In 2009, we got a hermit crab named “Peek-a-boo”. We kept him in a plastic shoebox-sized container with creek sand in the bottom and holes drilled in the lid. He seemed to enjoy his new home, and we enjoyed his company. But some time in the winter, he died.
This turned into an annual tradition. Peek-a-boo was followed by Boo and Sprinkle in 2010, Flicker in 2011, and Blink and Barney in 2012. Some of our crabs only stayed with us a short while; others lived through the winter, but not much longer.
I wanted to know how we could take better care of them, so in 2011, we replaced the plastic box with a small glass terrarium with a glass lid. I suspected that they were getting too cold in the winter, but when I read about crabs, I found that humidity might have been a factor. I know our house gets very dry in the winter.

Oregon Scientific hygrometer
It was time to find measure the temperature and humidity inside the cage.
I thought about buying a simple hygrometer. We have one in our hallway . But I wanted to keep a long-running log of temperature and humidity over time.
So I decided to build an Arduino-based crab cage monitor.
The Happy Crabby
I would use an Arduino UNO to control the overall flow. I wanted to add the following peripherals:
- temperature/humidity sensor – I chose one based on the SHT11 sensor: see Adafruit or the one I got.
- real-time clock – Adafruit has a breakout board for $9.
- SD card slot – Adafruit has a breakout board for $15.
- LCD display – Adafruit has a 20×4 character LCD for $18 and an I2C-to-LCD driver board for $10.
- Relays to turn on/off a heater or light – I have not added this yet.
- Some buttons for a simple UI – I have not added this yet.

Drivers
The first thing I had to do was write some software to read the temperature and humidity from the SHT11 board. The documentation claimed that it was an I2C device, which should have made it very easy. I knew all about I2C from when I worked at Ericsson. A lot of peripherals used an I2C interface. It’s a simple two-wire protocol where you can just wiggle two output lines in a specific order to send signals to the devices. It turns out that the SHT11 is mostly I2C, but it has a strange quirk that I had to code around.
Hardware Planning
After I was receiving real temperature and humidity readings from the SHT11, I had to start allocating Arduino I/O pins to the peripherals. I made a spreadsheet to keep track of the pins. Some pins on the Arduino have special alternate uses, so I made a note of them there. Since I was working on a prototyping board, I kept changing stuff, and when I did I’d just create a new spreadsheet column. In some configurations, I did not have enough pins… specifically, if I did not use the I2C-to-LCD board, I had to allocate most of my pins to simply driving the LCD display. In other configurations, I had plenty of pins left over.
What I ended up with was this:
| PIN | FEATURES | MY USE |
|---|---|---|
| D0 | RX | serial (future: for Bluetooth) |
| D1 | TX | serial (future: for Bluetooth) |
| D2 | relay (future: to control a relay) | |
| D3 | PWM | |
| D4 | ||
| D5 | PWM | |
| D6 | PWM | |
| D7 | ||
| D8 | bit-banged I2C-SDA for T/H | |
| D9 | PWM | bit-banged I2C-SCK for T/H |
| D10 | PWM or SPI-SS | SPI-SS for SD card |
| D11 | PWM or SPI-MOSI | SPI-MOSI for SD card |
| D12 | SPI-MISO | SPI-MISO for SD card |
| D13 | LED, SPI-SCK | SPI-SCK for SD card |
| A0 | (future) keyboard | |
| A1 | ||
| A2 | ||
| A3 | ||
| A4 | SDA | I2C-SDA for RTC and LCD |
| A5 | SCK | I2C-SCK for RTC and LCD |
Software and Integration
I wrote a simple program that takes a temperature and humidity reading, reads the current time, appends a line to a CSV file on the SD card, and updates the LCD display. Then it sleeps for a minute and does it all over again.
For a long while, we ran the Happy Crabby on the prototype board, with wires hanging out all over.

The Happy Crabby.

The display, up close.
What we learned
We ran in this configuration for a long time. We had been thinking that we would eventually add a relay to control either a heat lamp or a terrarium heater pad. But after taking measurements for several months, we decided that temperature was nearly as much of a problem in our house as humidity.
So we kept an eye on the humidity and we rearranged the inside of the cage, dumping a few inches of moist sand into the bottom. They like to dig tunnels and hide, especially when they are molting. Overall, they seem to be healthier now that the cage is not so dry, and they are less stressed because they have a place to hide.
Almost a year after we originally started taking measurements, we decided that our design was OK enough to make “permanent”. So we bought a “shield” board and soldered all of the pieces down. I made sure that all of the pieces still plug together, in case we feel like changing it down the road. It looks a little nicer without all of the rats nest of wires, and it’s a lot less likely to get messed up if somebody bumps it.

The component boards.

Fully assembled.
Resources
Source code that we wrote for this project can be found on github.
We’re going to Hogwarts!
3Our family just returned from a trip to Florida.
My wife and I had been planning to take a family vacation in October during our kids’ “track out”, the three-week break between the first and second quarters of school. Since the kids (and their dad) have been reading the Harry Potter books, we thought it would be fun to visit the “Wizarding World of Harry Potter” at Universal Studios. But we did not want to tell the kids about it until we had made firm plans.
We picked our week to go, and I arranged for time off at work. And then, a week before our vacation, we got news that we would need to attend a funeral in Georgia. Rather than make that long drive twice, once for the funeral and then again the next week for our vacation, we hastily moved our vacation up a week. Since the kids still did not know about our vacation plans yet, we decided to keep it a secret. We told them to pack for the funeral, and we quietly packed an extra suitcase for them.
They were so good… stuck at a boring funeral with a bunch of boring old grownups, and yet they behaved so well.
After the funeral, a bunch of extended family went out to a restaurant. While we were there, we presented them with a mysterious letter.
It read:

Dear Misses Audrey and Sydney Porter,
We are pleased to inform you that you have been accepted at the Hogwarts School of Witchcraft and Wizardry, Orlando campus.
This special Autumn Session will take place during the week of October the 8th through the 12th. There is no need to send an Owl as we already know that you are planning to attend. All necessary materials will be provided for you.
Yours Sincerely
Minerva McGonnagall
Deputy Headmistress
So we left the restaurant and headed south for Orlando!
Although the theme of the trip was Harry Potter and Hogwarts, it was really only a small portion of our week. We spent two days at Universal Studios (one day at the Islands of Adventure and one day at the studio park), one day at Sea World, and two days at Disney World (one day at the Magic Kingdom and one day at EPCOT).
We’re going to Hogwarts!
We had a blast at all of the parks. But since the motivation behind going was to see the Harry Potter park, I want to go into a little detail about that one section of Universal Studios “Islands of Adventure” park.
I was surprised at how little of the Harry Potter theme’s potential was actually developed by Universal. For example, they have a Hogwarts Express train engine, but only as a photo backdrop. I had somehow imagined more exploration of the castle, but I suppose the parks (other than EPCOT) are not really into exploration as much as they are into moving people in a controlled manner through queues and rides. That being said, we still thoroughly enjoyed the Wizarding World experience.
The “Harry Potter and the Forbidden Journey” ride was excellent, an “experience ride” where your family-sized cart shakes and wobbles from screen to screen in a 4½ minute ride around Hogwarts. We also enjoyed the smaller roller coaster, the “Flight of the Hippogriff“, which was perfect for the average HP-reading kid (the ride was a mere 60 seconds, beginning-to-end). We chose to pass on the “Dragon Challenge“, a pretty serious-looking double roller coaster. We ate lunch at the Three Broomsticks pub and bought Butterbeer and Pumpkin Juice from a street vendor.
We also shopped at the three shops:
- Filch’s Emporium of Confiscated Goods
- Honeydukes / Zonko’s
- Ollivanders / Owl Post / Dervish and Banges
I was a little disappointed in the souvenir selections. I was kind of hoping to find a Hogwarts coffee mug… you know… all of the other dads at work have NC State and UNC mugs. But the selection was pretty lousy, so I passed. The shirts were all pretty much very expensive and tacky-looking T-shirts, nothing that I would ever wear — how about a nice golf shirt with a Hogwarts crest on it, for muggle dads? I did buy an over-priced deck of cards, but when I got home, I was disappointed to find that it contained only 14 characters from the movies, not 54. That is, the same Dumbledore picture is on all four aces, same Harry on all four kings, and so on (Fred and George are the jokers).
There were lots of Gryffindor and Slytherin items, but very few Ravenclaw or Hufflepuff items, just some crest patches, pins and lanyards. You see, lots of fans choose a favorite house to root for. It was important for us to find some Hufflepuff stuff, since at my daughter’s school, the four core teachers each lead a house, and they actually hold a sorting ceremony to assign the students to houses. But there was not much for us to choose from. (As I write this, I see that there are more items on Universal’s online store than we saw in the on-site shops, and there is more balance among the four houses).
So, we were not so tempted to part with our galleons and sickles at the shops.
The other 4½ days
The rest of Universal’s Islands of Adventure was pretty nice. The kids liked the Spider Man experience ride and the Dr Seuss area. At Universal Studios, we focused on the experience rides like The Simpsons, Men in Black and Despicable Me, and skipped the live shows (we should’ve skipped ET, considering the long wait). Sea World had some great shows, with lots of trained animals of every kind. The Disney Magic Kingdom was like visiting an old friend (October is a strange month to visit though, because at night the park transitions to a lively Halloween party, and day guests have to leave). EPCOT, as always, struck a nice balance between “rides” and “exploring”.
We had a great week in Florida, and we thoroughly enjoyed each of the parks. But both girls agree that the Universal Islands of Adventure was their favorite… because of Harry Potter, of course. Their mother preferred Sea World, and I am split between the Magic Kingdom and EPCOT.